Last Updated: 04/24/2025 1:45 AM
The following table lists all the components that make up the document.
Replace gamma detector VD-580 voltage divider.
Prior to arrival, notify operators concerning expected work, duration, and anticipated alarms and fault indications.
7264 - 1401 - Establish Initial Conditions; Remark:
1401 - Establish Initial Conditions
Establish Initial Conditions
7622 - 7592 - Inform system operators; Remark:11335
7592 - Inform system operators
Inform system operators
11335 - Upon arrival, brief system operators on expected work, duration, anticipated ...
Upon arrival, brief system operators on expected work, duration, anticipated alarms, and fault indications before starting work.
7268 - 7231 - Close lane; Remark:7233
9053 - Warning : Traffic should temporarily be rerouted or halted during conduction of this pr...
Traffic should temporarily be rerouted or halted during conduction of this procedure to ensure maintenance provider safety and to prevent unscreened vehicles from passing.
7231 - Close lane
Close lane
7233 - Use orange safety (traffic control) cones to setup barriers. Practice establi...
Use orange safety (traffic control) cones to setup barriers. Practice established safety protocols.
7269 - 7232 - Open RPM door; Remark:7234
7232 - Open RPM door
Open RPM door
7234 - Open all doors needed to access components.
Open all doors needed to access components.
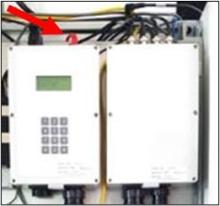
7755 - 7679 - Disconnect Ethernet; Remark:11336
7680 - Caution : Make sure to press release button on back of Ethernet cable before removing.
Make sure to press release button on back of Ethernet cable before removing.
7679 - Disconnect Ethernet
Disconnect Ethernet
11336 - Locate Ethernet connector on top of SC-770 controller. Press release button o...
Locate Ethernet connector on top of SC-770 controller. Press release button on back of connector. Pull connector.
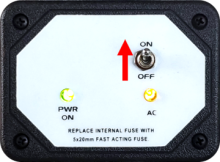
7270 - 7235 - Power off RPM; Remark:7236
7235 - Power off RPM
Power off RPM
7236 - Move LD-260 switch to OFF position. The PWR ON
Move LD-260 switch to OFF position. The PWR ON LED will turn off.

9283 - 8309 - Remove VD-580; Remark:
8309 - Remove VD-580
Remove VD-580
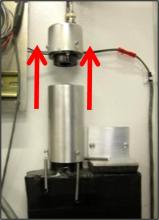
9279 - 9207 - Disconnect BNC and MHV cables from VD-580 on top of gamma detector; Remark:
7792 - Note : It is good engineering practice to ensure all cables and connectors are label...
It is good engineering practice to ensure all cables and connectors are labeled before disconnecting them.
9207 - Disconnect BNC and MHV cables from VD-580 on top of gamma detector
9280 - 9208 - Unhook springs from photomultiplier tube ...; Remark:
9221 - Note : Do not release the springs while they are under tension, the springs may fly ...
Do not release the springs while they are under tension, the springs may fly off and be lost. If the springs come off the PMT, set them aside in a safe location. They are required for the following steps.
9208 - Unhook springs from photomultiplier tube (PMT) using needle nose pliers
9281 - 9209 - Pull VD-580 off gently to remove from PMT; Remark:9518
9209 - Pull VD-580 off gently to remove from PMT
9518 -
9282 - 9210 - Verify VD-580 to be installed is potted; Remark:9218
9210 - Verify VD-580 to be installed is potted
9218 - Potted version has visible gel coating on circuit board.
Potted version has visible gel coating on circuit board.
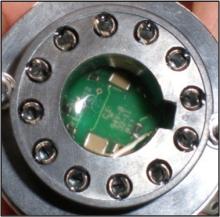
9219 - Potted Version
Potted Version
9278 - 9211 - Install New VD-580; Remark:
9211 - Install New VD-580
Install New VD-580
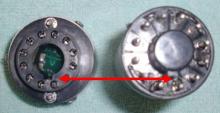
9275 - 9212 - Line up alignment key and notch between PMT and VD‑580; Remark:9519
9212 - Line up alignment key and notch between PMT and VD‑580
9519 -
9276 - 9213 - Firmly press VD-580 into place on PMT and...; Remark:
9222 - Note : It may be easier to install the rear spring first. You can install that spring b...
9213 - Firmly press VD-580 into place on PMT and reattach springs
9277 - 9214 - Reconnect BNC and MHV cables to VD-580; Remark:
7811 - Caution : Proper connection of cables is critical.
Proper connection of cables is critical.
9214 - Reconnect BNC and MHV cables to VD-580
Reconnect BNC and MHV cables to VD-580
7279 - 7249 - Return equipment to normal operating condition; Remark:
7249 - Return equipment to normal operating condition
Return equipment to normal operating condition
7280 - 7250 - Power on RPM; Remark:7251
7250 - Power on RPM
Power on RPM
7251 - Move LD-260 switch to ON position. The LED PWR ON
Move LD-260 switch to ON position. The LED PWR ON will illuminate.
9272 - 9215 - Verify detector count rate; Remark:9220
9215 - Verify detector count rate
Verify detector count rate
9220 - Navigate to SHOW COUNTS on SC-770. Enter “Program Mode” by pres...
Navigate to SHOW COUNTS on SC-770.
Enter “Program Mode” by pressing 0.
Enter password 1234 and press # (enter)
1: GAMMA -> 2: FUNCTIONS -> 1: SHOW COUNTS
Verify count rate for detector with new VD-580 is approximately the same count rate of other detectors.
7781 - 7730 - Reconnect Ethernet; Remark:7731
7730 - Reconnect Ethernet
Reconnect Ethernet
7731 - Insert Ethernet connector at top of SC-770 module. Connector will audibly "cl...
Insert Ethernet connector at top of SC-770 module. Connector will audibly "click" when seated properly.
9273 - 9216 - Reopen RPM Lane; Remark:
9216 - Reopen RPM Lane
Reopen RPM Lane
7842 - 7820 - Inform system operators upon completion of maintenance action; Remark:
7820 - Inform system operators upon completion of maintenance action
Inform system operators upon completion of maintenance action
322 - 321 - Document maintenance actions; Remark:
321 - Document maintenance actions
Document maintenance actions
2869 - 2585 - Document maintenance performed; Remark:2866
2585 - Document maintenance performed
Document maintenance performed
2866 - Record observations, times, and results for the maintenance report.
Record observations, times, and results for the maintenance report.
4706 - 4705 - Submit report; Remark:4864
4705 - Submit report
Submit report
4864 - As specified by management or contractual obligations.
As specified by management or contractual obligations.