Last Updated: 05/02/2025 1:37 AM
The following table lists all the components that make up the document.
Replace the internal battery for the BT-DU3 Adapter
As appropriate
1849 - 1358 - Remove BT-DU3 Adapter; Remark:
1358 - Remove BT-DU3 Adapter
Remove BT-DU3 Adapter
1353 - 878 - Power off BT-DU3 Adapter; Remark:1348
878 - Power off BT-DU3 Adapter
Power off BT-DU3 Adapter
1348 - The BT-DU3 Adapter is located in the middle compartment of the backpack. Hold...
The BT-DU3 Adapter is located in the middle compartment of the backpack. Hold the power button until all lights turn off.

1356 - 1355 - Remove all detector cables from BT-DU3 Adapter; Remark:1354
1347 - Caution : Ensure the BT-DU3 adapter unit is powered off before removing or connecting d...
Ensure the BT-DU3 adapter unit is powered off before removing or connecting detector cables to the BT-DU3 adapter unit.
1355 - Remove all detector cables from BT-DU3 Adapter
Remove all detector cables from BT-DU3 Adapter
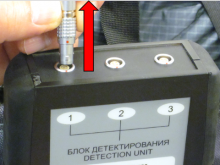
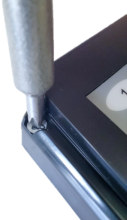
1354 - To remove the push-pull type connector, hold by the collar and pull.
To remove the push-pull type connector, hold by the collar and pull.
1359 - 1358 - Remove BT-DU3 Adapter; Remark:1357
1358 - Remove BT-DU3 Adapter
Remove BT-DU3 Adapter
1850 - 1808 - Disassemble BT-DU3 Adapter; Remark:
1808 - Disassemble BT-DU3 Adapter
Disassemble BT-DU3 Adapter
1851 - 1809 - Remove rubber guards; Remark:1848
1829 - Caution : Do not use a tool to pry the guards as this may damage the BT-DU3 Adapter cas...
Do not use a tool to pry the guards as this may damage the BT-DU3 Adapter case.
1809 - Remove rubber guards
Remove rubber guards
1848 - It is recommended to use gloves with good grip as the guards require signific...
It is recommended to use gloves with good grip as the guards require significant force to remove.
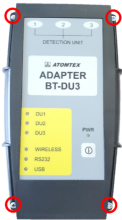
1852 - 1810 - Remove four case screws; Remark:1847
1810 - Remove four case screws
Remove four case screws
1847 - Use a small Phillips (PH1) screwdriver. Some screws will need to be accessed ...
Use a small Phillips (PH1) screwdriver. Some screws will need to be accessed from the bottom side of the case. One screw is concealed with a tamper sticker; the screwdriver will easily pierce the sticker.
1853 - 1811 - Partially remove upper case; Remark:1846
1830 - Caution : Remove cover slowly to minimize damage to wiring.
Remove cover slowly to minimize damage to wiring.
1811 - Partially remove upper case
Partially remove upper case
1846 - The end caps should remain attached to the upper case. A screwdriver may be u...
The end caps should remain attached to the upper case. A screwdriver may be used to carefully pry up the end caps.
1854 - 1812 - Continue to open upper case to access wiring; Remark:1845
1812 - Continue to open upper case to access wiring
Continue to open upper case to access wiring
1855 - 270 - Disconnect battery; Remark:1844
270 - Disconnect battery
Disconnect battery
1857 - 1814 - Remove battery holder screws; Remark:1839
1814 - Remove battery holder screws
Remove battery holder screws
1839 - Use a small Phillips (PH1) screwdriver.
Use a small Phillips (PH1) screwdriver.

1858 - 1815 - Remove battery holder; Remark:1843
1815 - Remove battery holder
Remove battery holder
1859 - 1816 - Remove battery; Remark:4790
1816 - Remove battery
Remove battery
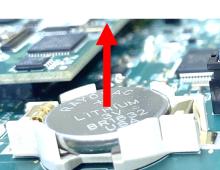
4790 - Carefully lift battery out of battery holder using a slotted screwdriver or f...
Carefully lift battery out of battery holder using a slotted screwdriver or finger.
1860 - 1817 - Assemble BT-DU3 Adapter; Remark:
1817 - Assemble BT-DU3 Adapter
Assemble BT-DU3 Adapter
1861 - 1818 - Install replacement battery; Remark:1841
1818 - Install replacement battery
Install replacement battery
1862 - 1819 - Replace battery holder; Remark:1840
1819 - Replace battery holder
Replace battery holder
1865 - 1820 - Replace battery holder screws; Remark:1839
1820 - Replace battery holder screws
Replace battery holder screws
1839 - Use a small Phillips (PH1) screwdriver.
Use a small Phillips (PH1) screwdriver.
1867 - 1821 - Connect battery; Remark:1838
1821 - Connect battery
Connect battery
1870 - 1822 - Replace upper case; Remark:1837
1822 - Replace upper case
Replace upper case
1836 - End caps should fit into slots on each end of lower case.
End caps should fit into slots on each end of lower case.
1873 - 1823 - Replace case screws; Remark:1835
1823 - Replace case screws
Replace case screws
1835 - Use a small Phillips (PH1) screwdriver.
Use a small Phillips (PH1) screwdriver.
1876 - 1824 - Replace rubber guards; Remark:1834
1824 - Replace rubber guards
Replace rubber guards
1878 - 1825 - Connect Detectors; Remark:
1825 - Connect Detectors
Connect Detectors
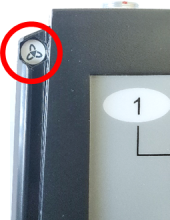
1371 - 1370 - Align DU cable connector with BT-DU3 Adapter connector; Remark:1368
1370 - Align DU cable connector with BT-DU3 Adapter connector
Align DU cable connector with BT-DU3 Adapter connector
1368 - Red dots can be used to align the connectors.
Red dots can be used to align the connectors.
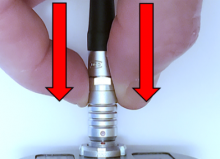
1369 - Connectors only fit in one orientation. Rotate the DU cable connector until i...
Connectors only fit in one orientation. Rotate the DU cable connector until it easily slides into place.

1375 - 1374 - Connect DU cables to BT-DU3 Adapter; Remark:1372
1695 - Caution : Do not force the connectors together.
Do not force the connectors together.
1374 - Connect DU cables to BT-DU3 Adapter
Connect DU cables to BT-DU3 Adapter
1372 - Push the connector to connect.
Push the connector to connect.
1373 - Gamma detector connects to port 1. Neutron detector connects to port 3.
Gamma detector connects to port 1. Neutron detector connects to port 3.

1879 - 1826 - Check battery function and status; Remark:
1826 - Check battery function and status
Check battery function and status
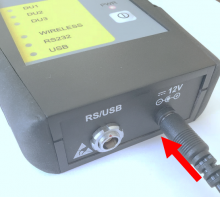
1793 - 315 - Connect charger; Remark:2502
315 - Connect charger
Connect charger
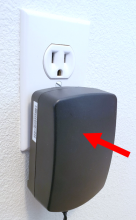
2502 - Plug the charger into the wall and connect to the Adapter at the 12V input.
Plug the charger into the wall and connect to the Adapter at the 12V input.
1782 - IO Charger Plug and connection socket
1794 - 1770 - Verify BT-DU3 Adapter is charging; Remark:1780
1770 - Verify BT-DU3 Adapter is charging
Verify BT-DU3 Adapter is charging
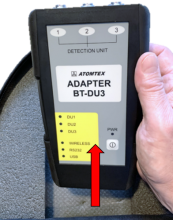
1780 - The red LED below PWR will be illuminated.
The red LED below PWR will be illuminated.

1795 - 1771 - Disconnect charger from BT-DU3 Adapter; Remark:1781
1771 - Disconnect charger from BT-DU3 Adapter
Disconnect charger from BT-DU3 Adapter

1880 - 1435 - Check BT-DU3 battery; Remark:1833
1435 - Check BT-DU3 battery
Check BT-DU3 battery
1833 - Momentarily press the POWER button on the BT-DU3 to view the battery charge; ...
Momentarily press the POWER button on the BT-DU3 to view the battery charge; all 6 LEDs illuminated indicates full battery.
1381 - 1380 - Verify detectors are communicating with BT-DU3 Adapter; Remark:1379
1380 - Verify detectors are communicating with BT-DU3 Adapter
Verify detectors are communicating with BT-DU3 Adapter
1379 - The DU1 and DU3 LEDs will blink rapidly.
The DU1 and DU3 LEDs will blink rapidly.

1881 - 1828 - Repack backpack; Remark:
1828 - Repack backpack
Repack backpack
1883 - 1827 - Place BT-DU3 Adapter unit into backpack; Remark:1365
1827 - Place BT-DU3 Adapter unit into backpack
Place BT-DU3 Adapter unit into backpack

1384 - 1383 - Close backpack; Remark:1382
1383 - Close backpack
Close backpack
1382 - Make sure the BT-DU3 adapter unit is firmly in place and all backpack pockets...
Make sure the BT-DU3 adapter unit is firmly in place and all backpack pockets are zipped shut.
1387 - 319 - Perform operational test; Remark:1385
319 - Perform operational test
Perform operational test
1385 - DET-HHD-ATM-RM01 AT6101C Operational Test.
DET-HHD-ATM-RM01 AT6101C Operational Test.
322 - 321 - Document maintenance actions; Remark:
321 - Document maintenance actions
Document maintenance actions
2869 - 2585 - Document maintenance performed; Remark:2866
2585 - Document maintenance performed
Document maintenance performed
2866 - Record observations, times, and results for the maintenance report.
Record observations, times, and results for the maintenance report.
4706 - 4705 - Submit report; Remark:4864
4705 - Submit report
Submit report
4864 - As specified by management or contractual obligations.
As specified by management or contractual obligations.