Last Updated: 04/24/2025 1:45 AM
The following table lists all the components that make up the document.
Replace HHV-448/458 high voltage circuit board.
Hour
Prior to arrival, notify operators concerning expected work, duration, anticipated alarms, and fault indications.
9508 - 1401 - Establish Initial Conditions; Remark:
1401 - Establish Initial Conditions
Establish Initial Conditions
8490 - 7592 - Inform system operators; Remark:
7592 - Inform system operators
Inform system operators
8221 - 7676 - Brief system operators on expected work, duration, anticipated alarms, and fa...; Remark:
7676 - Brief system operators on expected work, duration, anticipated alarms, and fa...
Brief system operators on expected work, duration, anticipated alarms, and fault indications before starting work
10312 - 7967 - Close lane and set up barriers or establish a safety watch; Remark:7595
7967 - Close lane and set up barriers or establish a safety watch
Close lane and set up barriers or establish a safety watch
7595 - Use orange safety (traffic control) cones or equivalent per site-specific saf...
Use orange safety (traffic control) cones or equivalent per site-specific safety practices.
7270 - 7235 - Power off RPM; Remark:7236
7235 - Power off RPM
Power off RPM
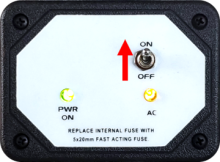
7236 - Move LD-260 switch to OFF position. The PWR ON
Move LD-260 switch to OFF position. The PWR ON LED will turn off.

9646 - 9645 - Prepare for Faulty High Voltage Board Removal; Remark:
9645 - Prepare for Faulty High Voltage Board Removal
Prepare for Faulty High Voltage Board Removal
7852 - 7849 - Disconnect two cables on bottom of SCA-775 module; Remark:7851
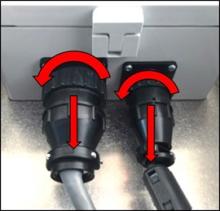
7849 - Disconnect two cables on bottom of SCA-775 module
Disconnect two cables on bottom of SCA-775 module
7851 - Connectors are disconnected by turning lock ring multiple times and then pull...
Connectors are disconnected by turning lock ring multiple times and then pulling straight down.
7855 - 7853 - Disconnect all BNC and miniature high voltage (MHV) cables on top of SCA-775 ...; Remark:7854
7792 - Note : It is good engineering practice to ensure all cables and connectors are label...
It is good engineering practice to ensure all cables and connectors are labeled before disconnecting them.
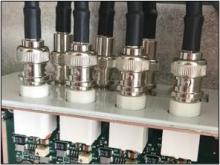
7853 - Disconnect all BNC and miniature high voltage (MHV) cables on top of SCA-775 ...
Disconnect all BNC and miniature high voltage (MHV) cables on top of SCA-775 module
7854 - BNC Connectors
9709 - 9435 - Loosen screws in each corner (4) using a medium Philips screwdriver and open ...; Remark:9708
9435 - Loosen screws in each corner (4) using a medium Philips screwdriver and open ...
Loosen screws in each corner (4) using a medium Philips screwdriver and open SC-770 controller module
9708 - Normally the cover screws are “captured” and should not come out of the c...
Normally the cover screws are “captured” and should not come out of the cover.
To prevent breaking the hinge on the module / door, once the retainer screws are loosened, take care to gently pull the bottom of the cover away from the module approximately ¼” before letting the door open.
7861 - 7859 - Remove 4 mounting screws; Remark:7860
7858 - Note : Most replaceable bit type screwdrivers will be too large in diameter to fit i...
Most replaceable bit type screwdrivers will be too large in diameter to fit into the hole.
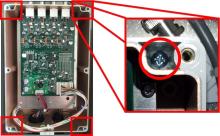
7859 - Remove 4 mounting screws
Remove 4 mounting screws
7860 - The screws to be removed are located in the bottom of the irregularly shaped ...
The screws to be removed are located in the bottom of the irregularly shaped hole next to the round hole. Insert the long shaft small Phillips screwdriver into each of the four corner pockets and loosen/remove screws.
7863 - 7862 - Remove SCA-775 module from back plate; Remark:
7862 - Remove SCA-775 module from back plate
Remove SCA-775 module from back plate
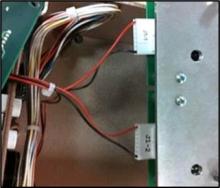
7830 - 7799 - Disconnect 4 wiring harness assembly/connectors (J6, J8, J10, J11) from SCA-7...; Remark:7800
7798 - Caution : Never remove connectors by pulling on wires.
Never remove connectors by pulling on wires.
7792 - Note : It is good engineering practice to ensure all cables and connectors are label...
It is good engineering practice to ensure all cables and connectors are labeled before disconnecting them.
7799 - Disconnect 4 wiring harness assembly/connectors (J6, J8, J10, J11) from SCA-7...
Disconnect 4 wiring harness assembly/connectors (J6, J8, J10, J11) from SCA-774 board
7800 - J8 and J11 should be labeled; write J6 and J10 on the appropriate connector i...
J8 and J11 should be labeled; write J6 and J10 on the appropriate connector in permanent marker.
J8 and J11 should be easily removed by grasping the connector and pulling it out with a gentle rocking motion.
J10 is locked in place by the position of J6; remove J6 first.
9658 - 9647 - Remove SCA-774 board from SCA-775 module; Remark:9648
9647 - Remove SCA-774 board from SCA-775 module
Remove SCA-774 board from SCA-775 module
9648 - BNC connectors are attached to the SCA-774 board and easily slide down then o...
BNC connectors are attached to the SCA-774 board and easily slide down then out of the SCA-775 box.
9657 - 9650 - Uninstall Faulty High Voltage Board; Remark:
9649 - Note : If spare SCA-775 boxes or mounting plates are available it is advisable to re...
If spare SCA-775 boxes or mounting plates are available it is advisable to replace the boards on the mounting plates ahead of time and just replace the mounting plates in SCA-775 boxes in the field.
9650 - Uninstall Faulty High Voltage Board
Uninstall Faulty High Voltage Board
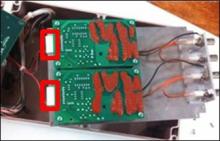
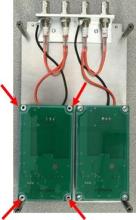
9653 - 9651 - Remove four corners screws from high voltage plate to remove from box; Remark:9652
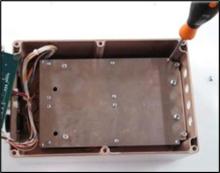
9651 - Remove four corners screws from high voltage plate to remove from box
Remove four corners screws from high voltage plate to remove from box
9656 - 9654 - Disconnect wiring harness from faulty board(s); Remark:9655
7798 - Caution : Never remove connectors by pulling on wires.
Never remove connectors by pulling on wires.
7792 - Note : It is good engineering practice to ensure all cables and connectors are label...
It is good engineering practice to ensure all cables and connectors are labeled before disconnecting them.
9654 - Disconnect wiring harness from faulty board(s)
Disconnect wiring harness from faulty board(s)
9661 - 9659 - Remove faulty board; Remark:9660
9659 - Remove faulty board
Remove faulty board
9660 - Using a small Phillips screwdriver, remove screws at four corners.
Using a small Phillips screwdriver, remove screws at four corners.
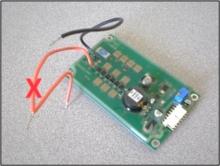
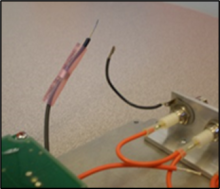
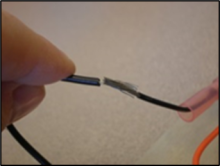
9707 - 9705 - Cut ground wire (black) and high-voltage wires (orange) as close to bad board...; Remark:9706
9705 - Cut ground wire (black) and high-voltage wires (orange) as close to bad board...
Cut ground wire (black) and high-voltage wires (orange) as close to bad board(s) as possible
3397 - 3395 - Arızalı bileşeni etiketleyin; Remark:3396
3395 - Arızalı bileşeni etiketleyin
Arızalı bileşeni etiketleyin
3396 - Etiket veya bant kullanın. Çıkarıldığı tarihi, arıza belirtilerinin açıklamasını...
Etiket veya bant kullanın. Çıkarıldığı tarihi, arıza belirtilerinin açıklamasını, ülkeyi, sahayı ve şerit numarasını ekleyin. Nükleer Kaçakçılık Tespiti ve Caydırıcılık (NSDD) kılavuzuna veya sözleşme gereksinimlerine göre imha edin.
9696 - 9690 - Install New High Voltage Board (HHV-448 or HHV-458); Remark:
9690 - Install New High Voltage Board (HHV-448 or HHV-458)
Install New High Voltage Board (HHV-448 or HHV-458)
9697 - 9691 - Strip approximately 3/8” of insulation off ground and high voltage wire fro...; Remark:
9691 - Strip approximately 3/8” of insulation off ground and high voltage wire fro...
Strip approximately 3/8” of insulation off ground and high voltage wire from wires in Step 3-4
9698 - 9692 - Cut “tinned” ends off of new high voltage board wires and strip approxima...; Remark:9693
9692 - Cut “tinned” ends off of new high voltage board wires and strip approxima...
Cut “tinned” ends off of new high voltage board wires and strip approximately 3/8” insulation off wires
9693 - Do not twist wires by hand
Do not twist wires by hand
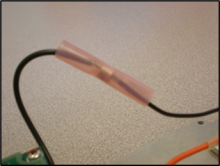
9699 - 9694 - Slip sealed solder butt splice connector over one wire; Remark:9695
9694 - Slip sealed solder butt splice connector over one wire
Slip sealed solder butt splice connector over one wire
9695 - Match wires and splice (intermingle) wire strands to form butt joint.
Match wires and splice (intermingle) wire strands to form butt joint.
9700 - 9689 - Place splice connector so solder ferrule is in center of splice; Remark:9688
9689 - Place splice connector so solder ferrule is in center of splice
Place splice connector so solder ferrule is in center of splice
9688 - Splice Connection
9701 - 9686 - Heat with heat gun; Remark:9685
9687 - Caution : Do not overheat the wire and/or circuit boards when using heat gun. Do not po...
Do not overheat the wire and/or circuit boards when using heat gun. Do not point heat gun towards high voltage board.
9686 - Heat with heat gun
Heat with heat gun
9685 - Starting at center, gently distribute heat to ends until the inner tube is fu...
Starting at center, gently distribute heat to ends until the inner tube is fully reduced and the rest of the tube fits to the wire.
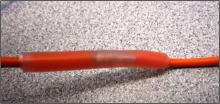
9702 - 9683 - Wait for wires to cool; Remark:9684
9683 - Wait for wires to cool
Wait for wires to cool
9684 - Pull on wires to verify good connection.
Pull on wires to verify good connection.
9703 - 9682 - Repeat steps 4-2 through 4-5 for each connection; Remark:
9682 - Repeat steps 4-2 through 4-5 for each connection
Repeat steps 4-2 through 4-5 for each connection
7279 - 7249 - Return equipment to normal operating condition; Remark:
7249 - Return equipment to normal operating condition
Return equipment to normal operating condition
9681 - 9675 - Reinstall 4 screws to mount board back to 4 posts; Remark:9676
9675 - Reinstall 4 screws to mount board back to 4 posts
Reinstall 4 screws to mount board back to 4 posts
9680 - 9673 - Reattach wiring harness; Remark:9674
7808 - Caution : Proper connection of wiring harnesses is critical.
Proper connection of wiring harnesses is critical.
9673 - Reattach wiring harness
Reattach wiring harness
9679 - 9671 - Reinstall plate on SCA-775 module; Remark:9672
9671 - Reinstall plate on SCA-775 module
Reinstall plate on SCA-775 module
9672 - SCA-775 Plate

9678 - 9670 - Ensure all connectors are securely mated to board; Remark:
9670 - Ensure all connectors are securely mated to board
Ensure all connectors are securely mated to board
9677 - 9668 - Secure SCA-774 board; Remark:9669
9668 - Secure SCA-774 board
Secure SCA-774 board
9669 - Use screws previously removed.
Use screws previously removed.
7835 - 7809 - Reconnect 4 wiring harness assembly/connectors (J6, J8, J10, J11) from SCA-77...; Remark:7810
7808 - Caution : Proper connection of wiring harnesses is critical.
Proper connection of wiring harnesses is critical.
7809 - Reconnect 4 wiring harness assembly/connectors (J6, J8, J10, J11) from SCA-77...
Reconnect 4 wiring harness assembly/connectors (J6, J8, J10, J11) from SCA-774 board
7810 - Ensure all pins are engaged. It is easy to install the connectors one pin off...
Ensure all pins are engaged. It is easy to install the connectors one pin off in either direction.
9667 - 9665 - Reinstall 4 corner screws to mount SCA-775 module; Remark:9666
9665 - Reinstall 4 corner screws to mount SCA-775 module
Reinstall 4 corner screws to mount SCA-775 module
9666 - Install all screws loosely at first to facilitate easy mounting, then careful...
Install all screws loosely at first to facilitate easy mounting, then carefully but firmly tighten all four screws.
7836 - 7813 - Reconnect BNC connectors on top of SCA-775 module; Remark:
7811 - Caution : Proper connection of cables is critical.
Proper connection of cables is critical.
7813 - Reconnect BNC connectors on top of SCA-775 module
Reconnect BNC connectors on top of SCA-775 module
7879 - 7878 - Reattach two connectors on bottom of SCA-775 module; Remark:7870
7878 - Reattach two connectors on bottom of SCA-775 module
Reattach two connectors on bottom of SCA-775 module
7870 - The cable connectors are different sizes and keyed so they cannot be reinstal...
The cable connectors are different sizes and keyed so they cannot be reinstalled incorrectly.
8874 - 7250 - Power on RPM; Remark:7251
7250 - Power on RPM
Power on RPM
7251 - Move LD-260 switch to ON position. The LED PWR ON
Move LD-260 switch to ON position. The LED PWR ON will illuminate.
7281 - 7252 - Verify RPM start-up; Remark:7253
7252 - Verify RPM start-up
Verify RPM start-up
7253 - RPM will perform a power on self-test (POST) and collect a background radiati...
RPM will perform a power on self-test (POST) and collect a background radiation measurement.
8506 - 7254 - Confirm network connection; Remark:7255
7254 - Confirm network connection
Confirm network connection
7255 - Contact operators to confirm communications have been reestablished between RPM ...
9664 - 9662 - Navigate to SHOW COUNTS on SC-770 to verify gamma counts are...; Remark:9663
9662 - Navigate to SHOW COUNTS on SC-770 to verify gamma counts are...
Navigate to SHOW COUNTS on SC-770 to verify gamma counts are within normal range
9663 - Enter Program Mode by pressing "0" Press 01234#
Enter Program Mode by pressing "0"
Press 01234#
Then, press 2: GAMMA > 2: FUNCTIONS > 1:SHOW COUNTS
8580 - 8548 - Navigate to SHOW COUNTS for neutron channels; Remark:8549
8548 - Navigate to SHOW COUNTS for neutron channels
Navigate to SHOW COUNTS for neutron channels
8549 - On SC-770, press 01234# Then, press 2:
On SC-770, press 01234#
Then, press 2: NEUTRON > 2: FUNCTIONS > 1: SHOW COUNTS.
7840 - 7816 - Perform electronic alignment; Remark:7817
7816 - Perform electronic alignment
Perform electronic alignment
7817 - DET-RPM-RAP-CM01, RPM Electronic Alignment Procedure.
DET-RPM-RAP-CM01, RPM Electronic Alignment Procedure.
8507 - 7256 - Close and lock all RPM doors; Remark:
7256 - Close and lock all RPM doors
Close and lock all RPM doors
7842 - 7820 - Inform system operators upon completion of maintenance action; Remark:
7820 - Inform system operators upon completion of maintenance action
Inform system operators upon completion of maintenance action
322 - 321 - Bakım İşlemlerini kaydedin; Remark:
321 - Bakım İşlemlerini kaydedin
Bakım İşlemlerini kaydedin
2869 - 2585 - Yapılan bakımı kaydedin; Remark:2866
2585 - Yapılan bakımı kaydedin
Yapılan bakımı kaydedin
2866 - Düzeltici Bakım Raporu için gözlemleri, zamanları ve sonuçları kaydedin.
Düzeltici Bakım Raporu için gözlemleri, zamanları ve sonuçları kaydedin.
4706 - 4705 - Submit report; Remark:4864
4705 - Submit report
Submit report
4864 - As specified by management or contractual obligations.
As specified by management or contractual obligations.