Last Updated: 04/24/2025 1:45 AM
The following table lists all the components that make up the document.
Remove and replace Banner Infrared (IR) occupancy sensor
Prior to arrival, notify operators concerning expected work, duration, and anticipated alarms and fault indications.
Updated pillar names
Typographical corrections in 2-1
8468 - 1401 - Establish Initial Conditions; Remark:
1401 - Establish Initial Conditions
Establish Initial Conditions
7268 - 7231 - Close lane; Remark:7233
9053 - Warning : Traffic should temporarily be rerouted or halted during conduction of this pr...
Traffic should temporarily be rerouted or halted during conduction of this procedure to ensure maintenance provider safety and to prevent unscreened vehicles from passing.
7231 - Close lane
Close lane
7233 - Use orange safety (traffic control) cones to setup barriers. Practice establi...
Use orange safety (traffic control) cones to setup barriers. Practice established safety protocols.
7269 - 7232 - Open RPM door; Remark:7234
7232 - Open RPM door
Open RPM door
7234 - Open all doors needed to access components.
Open all doors needed to access components.
7270 - 7235 - Power off RPM; Remark:7236
7235 - Power off RPM
Power off RPM
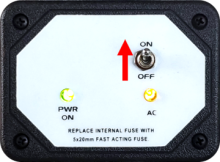
7236 - Move LD-260 switch to OFF position. The PWR ON
Move LD-260 switch to OFF position. The PWR ON LED will turn off.

8623 - 8613 - Uninstall Faulty Sensor; Remark:
8613 - Uninstall Faulty Sensor
Uninstall Faulty Sensor
8624 - 8614 - Locate infrared sensors; Remark:8615
8614 - Locate infrared sensors
Locate infrared sensors
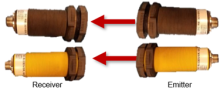
8615 - Typical sensor locations are as follows: Control pillar hou...
Typical sensor locations are as follows:
- Control pillar houses both "RECEIVERS"
- Auxiliary pillar houses both "EMITTERS"
8625 - 8617 - Disconnect applicable infrared sensors; Remark:8618
8617 - Disconnect applicable infrared sensors
Disconnect applicable infrared sensors
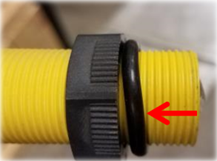
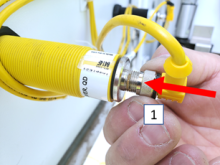
8618 - To disconnect sensor cable, turn collar counterclockwise and pull away from s...
To disconnect sensor cable, turn collar counterclockwise and pull away from sensor.
8626 - 8619 - Unscrew mounting nut; Remark:8620
8619 - Unscrew mounting nut
Unscrew mounting nut
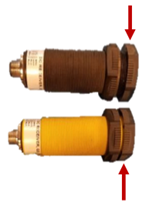
8620 - Rotate threaded nut counterclockwise. It may be necessary to hold the infrare...
Rotate threaded nut counterclockwise. It may be necessary to hold the infrared sensor from the back.

8627 - 8621 - Remove sensor from back of door; Remark:8622
8621 - Remove sensor from back of door
Remove sensor from back of door
3397 - 3395 - وضع علامة على المكون المعطّل; Remark:3396
3395 - وضع علامة على المكون المعطّل
وضع علامة على المكون المعطّل
3396 - استخدم ملصق او شريط. اكتب تاريخ الإزالة، ووصف أعراض العطل، والدولة والموقع ورقم ...
استخدم ملصق او شريط. اكتب تاريخ الإزالة، ووصف أعراض العطل، والدولة والموقع ورقم المسرب. تخلص من القطع حسب توجيهات هيئة الكشف عن تهريب المواد النووية وردعه (NSDD) أو المتطلبات التعاقدية.
8641 - 8628 - Install New Sensor; Remark:
8628 - Install New Sensor
Install New Sensor
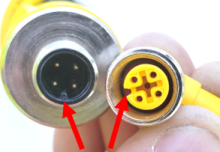
8642 - 8629 - Verify replacement sensor matches function and color of sensor previously rem...; Remark:8630
8629 - Verify replacement sensor matches function and color of sensor previously rem...
Verify replacement sensor matches function and color of sensor previously removed
8643 - 8631 - Remove nut closest to sensor face; Remark:8632
8631 - Remove nut closest to sensor face
Remove nut closest to sensor face
8632 - Infrared Nut
8645 - 8635 - Mount new infrared sensor; Remark:8636
8635 - Mount new infrared sensor
Mount new infrared sensor
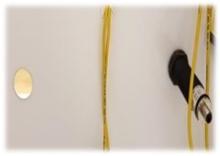
8636 - Insert sensor through hole on the back side of door.
Insert sensor through hole on the back side of door.
8646 - 8638 - Add outside nut to front and hand tighten; Remark:8639
8637 - Note : The nut on the outside should be flush with the sensor.
The nut on the outside should be flush with the sensor.
8638 - Add outside nut to front and hand tighten
Add outside nut to front and hand tighten
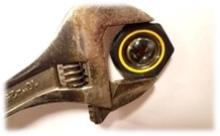
8639 - Use the adjustable wrench to snug the nut up slightly, just enough for the ga...
Use the adjustable wrench to snug the nut up slightly, just enough for the gasket to make a good seal.
8647 - 8661 - Reconnect applicable cable previously removed in Step 4-6; Remark:8559
5553 - Caution : Correct placement of connectors and wiring is critical to proper operation.
Correct placement of connectors and wiring is critical to proper operation.
8661 - Reconnect applicable cable previously removed in Step 4-4
Reconnect applicable cable previously removed in Step 4-4
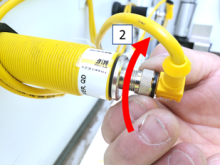
8559 - To reconnect sensor cable, align connectors, push towards sensor, and turn co...
To reconnect sensor cable, align connectors, push towards sensor, and turn collar clockwise.
7279 - 7249 - Return equipment to normal operating condition; Remark:
7249 - Return equipment to normal operating condition
Return equipment to normal operating condition
8503 - 7250 - Power on RPM; Remark:7251
7250 - Power on RPM
Power on RPM
7251 - Move LD-260 switch to ON position. The LED PWR ON
Move LD-260 switch to ON position. The LED PWR ON will illuminate.
7281 - 7252 - Verify RPM start-up; Remark:7253
7252 - Verify RPM start-up
Verify RPM start-up
7253 - RPM will perform a power on self-test (POST) and collect a background radiati...
RPM will perform a power on self-test (POST) and collect a background radiation measurement.
8654 - 8648 - Verify SC-770 display shows OCCUPIED when infrared beams are...; Remark:8651
8648 - Verify SC-770 display shows OCCUPIED when infrared beams are...
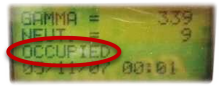
Verify SC-770 display shows OCCUPIED when infrared beams are broken
8651 - SC-770 Occupied
8655 - 8649 - Test sensors independently; Remark:8650
8649 - Test sensors independently
Test sensors independently
8650 - Disconnect one receiver cable, shut door, and clear sensors for five (5) seco...
Disconnect one receiver cable, shut door, and clear sensors for five (5) seconds.
8656 - 8648 - Verify SC-770 display shows OCCUPIED when infrared beams are...; Remark:8651
8648 - Verify SC-770 display shows OCCUPIED when infrared beams are...
Verify SC-770 display shows OCCUPIED when infrared beams are broken
8651 - SC-770 Occupied
8647 - 8661 - Reconnect applicable cable previously removed in Step 4-6; Remark:8559
5553 - Caution : Correct placement of connectors and wiring is critical to proper operation.
Correct placement of connectors and wiring is critical to proper operation.
8661 - Reconnect applicable cable previously removed in Step 4-4
Reconnect applicable cable previously removed in Step 4-4
8559 - To reconnect sensor cable, align connectors, push towards sensor, and turn co...
To reconnect sensor cable, align connectors, push towards sensor, and turn collar clockwise.
8653 - 8652 - Repeat steps 4-4 through 4-6 for other receiver sensors.; Remark:
8652 - Repeat steps 4-4 through 4-6 for other receiver sensors.
Repeat steps 4-4 through 4-6 for other receiver sensors.
7282 - 7254 - Confirm network connection; Remark:7255
7254 - Confirm network connection
Confirm network connection
7255 - Contact operators to confirm communications have been reestablished between RPM ...
7283 - 7256 - Close and lock all RPM doors; Remark:
7256 - Close and lock all RPM doors
Close and lock all RPM doors
7842 - 7820 - Inform system operators upon completion of maintenance action; Remark:
7820 - Inform system operators upon completion of maintenance action
Inform system operators upon completion of maintenance action
322 - 321 - توثيق إجراءات الصيانة; Remark:
321 - توثيق إجراءات الصيانة
توثيق إجراءات الصيانة
2869 - 2585 - توثيق الصيانة المنفذة; Remark:2866
2585 - توثيق الصيانة المنفذة
توثيق الصيانة المنفذة
2866 - سجل الملاحظات والأوقات والنتائج لتقرير الصيانة التصحيحية.
سجل الملاحظات والأوقات والنتائج لتقرير الصيانة التصحيحية.
4706 - 4705 - إرسال تقرير; Remark:4864
4705 - إرسال تقرير
إرسال تقرير
4864 - كما هو محدد من قبل الإدارة او حسب الالتزامات التعاقدية
كما هو محدد من قبل الإدارة او حسب الالتزامات التعاقدية