Last Updated: 04/24/2025 1:44 AM
The following table lists all the components that make up the document.
Replace a gamma detector on a Rapiscan Radiation Portal Monitor (RPM). There are two (2) models of gamma detectors, DA630 and DA1248. The DA630 model is used in vehicle (VM-250) and pedestrian (PM-700) RPMs. The DA1248 is used in train (TM-850) RPMs.
DET-RPM-RAP-CM01, RPM Electronic Alignment
Prior to arrival, notify operators concerning expected work, duration, and anticipated alarms and fault indications.
7621 - 1401 - Establish Initial Conditions; Remark:
1401 - Establish Initial Conditions
Establish Initial Conditions
7268 - 7231 - Close lane; Remark:7233
9053 - Warning : Traffic should temporarily be rerouted or halted during conduction of this pr...
Traffic should temporarily be rerouted or halted during conduction of this procedure to ensure maintenance provider safety and to prevent unscreened vehicles from passing.
7231 - Close lane
Close lane
7233 - Use orange safety (traffic control) cones to setup barriers. Practice establi...
Use orange safety (traffic control) cones to setup barriers. Practice established safety protocols.
7269 - 7232 - Open RPM door; Remark:7234
7232 - Open RPM door
Open RPM door
7234 - Open all doors needed to access components.
Open all doors needed to access components.
7454 - 7290 - Disable tamper switches; Remark:7416
7290 - Disable tamper switches
Disable tamper switches
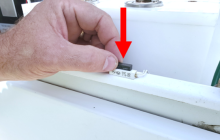
7416 - Use a magnet to disable tamper switches for all open doors. Use adhesive tape...
Use a magnet to disable tamper switches for all open doors. Use adhesive tape to disable older mechanical switches.
8281 - 8280 - Disable both infrared occupancy sensors; Remark:8279
7351 - Note : It is good practice to verify all cables and connectors are labeled prior to ...
It is good practice to verify all cables and connectors are labeled prior to disconnection.
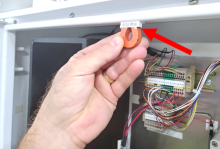
8280 - Disable both infrared occupancy sensors
Disable both infrared occupancy sensors
8279 - Verify sensors mounted in control pillar door are receivers
Verify sensors mounted in control pillar door are receivers
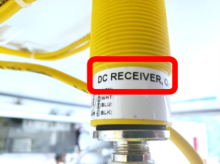
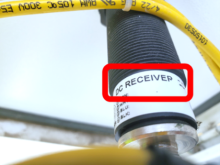
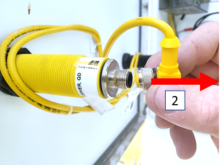
8287 - To disconnect sensor cable, turn collar counterclockwise and pull away from s...
To disconnect sensor cable, turn collar counterclockwise and pull away from sensor.

7270 - 7235 - Power off RPM; Remark:7236
7235 - Power off RPM
Power off RPM
7236 - Move LD-260 switch to OFF position. The PWR ON
Move LD-260 switch to OFF position. The PWR ON LED will turn off.

8286 - 8285 - Uninstall VD-580; Remark:
8285 - Uninstall VD-580
Uninstall VD-580
8284 - 8283 - Disconnect BNC and MHV cables; Remark:8282
7352 - Note : It is good practice to verify all cables and connectors are labeled prior to ...
It is good practice to verify all cables and connectors are labeled prior to disconnection.
8283 - Disconnect BNC and MHV cables
Disconnect BNC and MHV cables
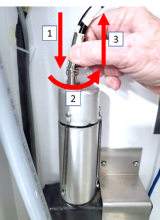
8282 - Push toward connection, turn coupling nut counterclockwise, and pull away fro...
Push toward connection, turn coupling nut counterclockwise, and pull away from connection.
8313 - 8311 - Remove three (3) mounting springs; Remark:8310
8312 - Note : Take care when removing springs, as they might snap back and become misplaced...
Take care when removing springs, as they might snap back and become misplaced
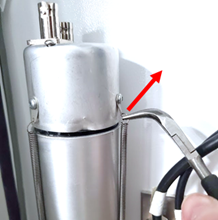
8311 - Remove three (3) mounting springs
Remove three (3) mounting springs
8310 - Use needle nose pliers. Retain springs for reinstallation.
Use needle nose pliers. Retain springs for reinstallation.
8314 - 8309 - Remove VD-580; Remark:8308
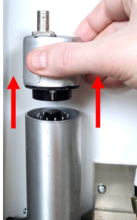
8309 - Remove VD-580
Remove VD-580
8308 - Pull VD-580, using small side-to-side motion.
Pull VD-580, using small side-to-side motion.
8307 - 8306 - Uninstall faulty gamma detector; Remark:
8306 - Uninstall faulty gamma detector
Uninstall faulty gamma detector
8302 - 8301 - Remove metal brackets; Remark:8300
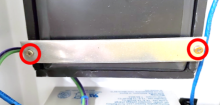
8301 - Remove metal brackets
Remove metal brackets
8300 - Use small Phillips (PH1) screwdriver. Retain brackets and screws
Use small Phillips (PH1) screwdriver. Retain brackets and screws

8303 - 8298 - Remove securing straps; Remark:8297
8299 - Caution : Detector may fall out of lead shielding when brackets and straps are removed....
Detector may fall out of lead shielding when brackets and straps are removed.
8298 - Remove securing straps
Remove securing straps
8297 - Do NOT cut straps. Straps may be hook and loop (Velcro) or cable ties. Some w...
Do NOT cut straps. Straps may be hook and loop (Velcro) or cable ties. Some wire ties can be released by pushing on tab

3397 - 3395 - Marque el componente defectuoso; Remark:3396
3395 - Marque el componente defectuoso
Marque el componente defectuoso
3396 - Utilice una etiqueta o cinta adhesiva. Incluya la fecha de extracción, la descri...
Utilice una etiqueta o cinta adhesiva. Incluya la fecha de extracción, la descripción de los síntomas de la falla, el país, el lugar y el número de carril. Deseche según los procedimientos de la Oficina de Detección y Disuasión de Contrabando Nuclear (NSDD) o los requisitos contractuales.
8292 - 8291 - Install new gamma detector; Remark:
8291 - Install new gamma detector
Install new gamma detector
8333 - 8332 - Fasten securing straps; Remark:8331
8332 - Fasten securing straps
Fasten securing straps
8331 - Use hook and loop (Velcro) straps or long, heavy-duty cable ties. If cable ti...
Use hook and loop (Velcro) straps or long, heavy-duty cable ties. If cable ties were cut and/or new wire ties are used, the lead shielding must be loosened to insert a new wire tie. This is a difficult process.
8334 - 8330 - Replace metal brackets; Remark:472
8330 - Replace metal brackets
Replace metal brackets
472 - Use a small Phillips (PH1) screwdriver.
Use a small Phillips (PH1) screwdriver.


8329 - 8328 - Install VD-580; Remark:
8328 - Install VD-580
Install VD-580
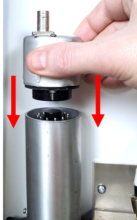
8325 - 8324 - Reconnect VD-580 to photomultiplier tube; Remark:8323
8324 - Reconnect VD-580 to photomultiplier tube
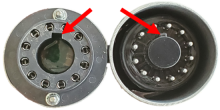
Reconnect VD-580 to photomultiplier tube
8323 - The VD-580 has a notch that aligns with the tab on the photomultiplier tube
The VD-580 has a notch that aligns with the tab on the photomultiplier tube
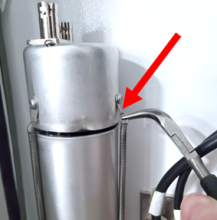
8326 - 8322 - Reattach mounting springs; Remark:9071
8322 - Reattach mounting springs
Reattach mounting springs
9071 - Use needle nose pliers.
Use needle nose pliers.
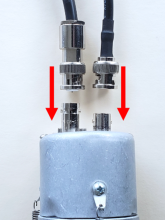
8327 - 8320 - Reconnect BNC and MHV cables; Remark:8319
5553 - Caution : Correct placement of connectors and wiring is critical to proper operation.
Correct placement of connectors and wiring is critical to proper operation.
8320 - Reconnect BNC and MHV cables
Reconnect BNC and MHV cables
8319 - Ensure cables are connected correctly. Connector placement should not require...
Ensure cables are connected correctly. Connector placement should not require force. Rotate to align connector notches. Push toward connection and turn coupling nut clockwise.

7279 - 7249 - Return equipment to normal operating condition; Remark:
7249 - Return equipment to normal operating condition
Return equipment to normal operating condition
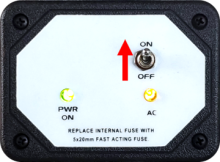
7280 - 7250 - Power on RPM; Remark:7251
7250 - Power on RPM
Power on RPM
7251 - Move LD-260 switch to ON position. The LED PWR ON
Move LD-260 switch to ON position. The LED PWR ON will illuminate.
7468 - 7304 - Confirm RPM has restarted correctly; Remark:7487
7304 - Confirm RPM has restarted correctly
Confirm RPM has restarted correctly
7487 - The SC-770 controller will display "OK" following Power On Self-Test (POST) a...
The SC-770 controller will display "OK" following Power On Self-Test (POST) and background measurement.
7469 - 7254 - Confirm network connection; Remark:7255
7254 - Confirm network connection
Confirm network connection
7255 - Contact operators to confirm communications have been reestablished between RPM ...
7840 - 7816 - Perform electronic alignment; Remark:7817
7816 - Perform electronic alignment
Perform electronic alignment
7817 - DET-RPM-RAP-CM01, RPM Electronic Alignment Procedure.
DET-RPM-RAP-CM01, RPM Electronic Alignment Procedure.
8317 - 8316 - Enable both infrared occupancy sensors; Remark:8315
7263 - Caution : Correct placement of connectors and wiring is critical to proper operation.
Correct placement of connectors and wiring is critical to proper operation.
8316 - Enable both infrared occupancy sensors
Enable both infrared occupancy sensors
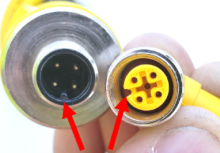
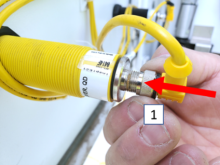
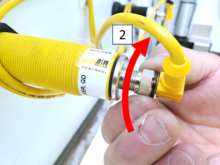
8315 - To reconnect sensor cable, align connectors, push towards sensor, and turn th...
To reconnect sensor cable, align connectors, push towards sensor, and turn the collar clockwise.
8318 - 7450 - Enable tamper switches; Remark:7348
7450 - Enable tamper switches
Enable tamper switches
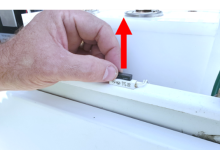
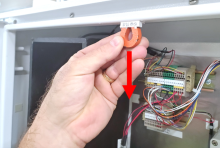
7348 - Remove all magnets and/or adhesive tape from door switches.
Remove all magnets and/or adhesive tape from door switches.
7283 - 7256 - Close and lock all RPM doors; Remark:
7256 - Close and lock all RPM doors
Close and lock all RPM doors
7842 - 7820 - Inform system operators upon completion of maintenance action; Remark:
7820 - Inform system operators upon completion of maintenance action
Inform system operators upon completion of maintenance action
322 - 321 - Registre las tareas de mantenimiento; Remark:
321 - Registre las tareas de mantenimiento
Registre las tareas de mantenimiento
2869 - 2585 - Registre el mantenimiento realizado; Remark:2866
2585 - Registre el mantenimiento realizado
Registre el mantenimiento realizado
2866 - Registre las observaciones, las horas y los resultados para el informe de manten...
Registre las observaciones, las horas y los resultados para el informe de mantenimiento correctivo.
4706 - 4705 - Envíe el informe; Remark:4864
4705 - Envíe el informe
Envíe el informe
4864 - Según lo especificado por la gerencia o las obligaciones contractuales.
Según lo especificado por la gerencia o las obligaciones contractuales.

