Last Updated: 04/24/2025 1:44 AM
The following table lists all the components that make up the document.
Replace Rabbit Board in SC-770
Prior to arrival, notify operators concerning expected work, duration, and anticipated alarms and fault indications.
7478 - 1401 - Establish Initial Conditions; Remark:
1401 - Establish Initial Conditions
Establish Initial Conditions
7372 - 7231 - Close lane; Remark:7233
7261 - Warning : Traffic should temporarily be rerouted or halted during this procedure to ens...
Traffic should temporarily be rerouted or halted during this procedure to ensure safety and prevent unscreened vehicles from passing.
7231 - Close lane
Close lane
7233 - Use orange safety (traffic control) cones to setup barriers. Practice establi...
Use orange safety (traffic control) cones to setup barriers. Practice established safety protocols.
7373 - 7232 - Open RPM door; Remark:7267
7232 - Open RPM door
Open RPM door
7267 - Open all doors needed to access components.
Open all doors needed to access components.
7270 - 7235 - Power off RPM; Remark:7236
7235 - Power off RPM
Power off RPM
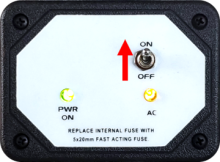
7236 - Move LD-260 switch to OFF position. The PWR ON
Move LD-260 switch to OFF position. The PWR ON LED will turn off.

7386 - 7250 - Power on RPM; Remark:7367
7250 - Power on RPM
Power on RPM
7367 - Move LD-260 switch to ON position. The PWR ON
Move LD-260 switch to ON position. The PWR ON LED will illuminate.
7281 - 7252 - Verify RPM start-up; Remark:7253
7252 - Verify RPM start-up
Verify RPM start-up
7253 - RPM will perform a power on self-test (POST) and collect a background radiati...
RPM will perform a power on self-test (POST) and collect a background radiation measurement.
8199 - 8174 - Record existing SC-770 parameter settings; Remark:8175
8174 - Record existing SC-770 parameter settings
Record existing SC-770 parameter settings
8175 - Use the attached parameter settings sheet to record the current settings and ...
Use the attached parameter settings sheet to record the current settings and reference Vehicle and Pedestrian Monitor VM-250AGN/PM-700AGN Operations & Service Manual to navigate the parameters.
8221 - 7676 - Brief system operators on expected work, duration, anticipated alarms, and fa...; Remark:
7676 - Brief system operators on expected work, duration, anticipated alarms, and fa...
Brief system operators on expected work, duration, anticipated alarms, and fault indications before starting work
8200 - 8176 - Uninstall Faulty Rabbit Board; Remark:
8176 - Uninstall Faulty Rabbit Board
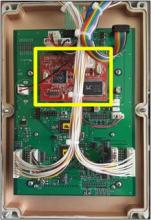
Uninstall Faulty Rabbit Board
8201 - 8177 - Loosen screws in each corner and side (6) using medium Phillips screwdriver a...; Remark:8178
7795 - Caution : If you rotate cover of the SCA-775 down without first pulling out from the bo...
If you rotate cover of the SCA-775 down without first pulling out from the box, the hinge will break.
8177 - Loosen screws in each corner and side (6) using medium Phillips screwdriver a...
Loosen screws in each corner and side (6) using medium Phillips screwdriver and open SC-770 controller module
8178 - Normally, the cover screws are "captured" and should not come out of cover.
Normally, the cover screws are "captured" and should not come out of cover.
To prevent breaking the hinge on the module / door, once the retainer screws are loosened, take care to gently pull the bottom of the cover away from the module approximately ¼” before letting the door open.
8205 - 8180 - Disconnect Ethernet cable from Rabbit board; Remark:8204
7680 - Caution : Make sure to press release button on back of Ethernet cable before removing.
Make sure to press release button on back of Ethernet cable before removing.
8180 - Disconnect Ethernet cable from Rabbit board
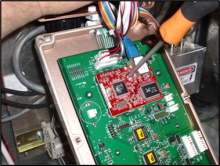
Disconnect Ethernet cable from Rabbit board

8207 - 8181 - Disconnect wiring harness from SC-771 board for easier access to Rabbit board...; Remark:8206
7798 - Caution : Never remove connectors by pulling on wires.
Never remove connectors by pulling on wires.
7792 - Note : It is good engineering practice to ensure all cables and connectors are label...
It is good engineering practice to ensure all cables and connectors are labeled before disconnecting them.
8181 - Disconnect wiring harness from SC-771 board for easier access to Rabbit board...
Disconnect wiring harness from SC-771 board for easier access to Rabbit board

8209 - 8182 - Using small Phillips screwdriver, remove single retaining screw from Rabbit b...; Remark:8208
8182 - Using small Phillips screwdriver, remove single retaining screw from Rabbit b...
Using small Phillips screwdriver, remove single retaining screw from Rabbit board
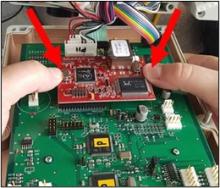
8211 - 8183 - Remove Rabbit board by gently rocking it back and forth, taking care not to d...; Remark:8210
8183 - Remove Rabbit board by gently rocking it back and forth, taking care not to d...
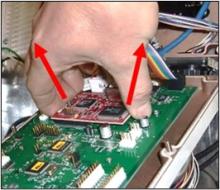
Remove Rabbit board by gently rocking it back and forth, taking care not to damage pins or sockets
3397 - 3395 - Label faulty component; Remark:3396
3395 - Label faulty component
Label faulty component
3396 - Use tag or tape. Include date of removal, description of failure symptoms, co...
Use tag or tape. Include date of removal, description of failure symptoms, country, site, and lane number. Dispose per Nuclear Smuggling Detection and Deterrence (NSDD) guidance or contractual requirements.
8212 - 8184 - Install New Rabbit Board; Remark:
8184 - Install New Rabbit Board
Install New Rabbit Board
8213 - 8185 - Mount new Rabbit board; Remark:8186
8185 - Mount new Rabbit board
Mount new Rabbit board
8186 - Press on left and right sides of Rabbit board by rocking it back and forth.&n...
Press on left and right sides of Rabbit board by rocking it back and forth.
8214 - 8187 - Reinstall single retaining screw securing Rabbit board in place; Remark:8208
8187 - Reinstall single retaining screw securing Rabbit board in place
Reinstall single retaining screw securing Rabbit board in place
8215 - 8188 - Reconnect wiring harnesses and Ethernet cable; Remark:7731
7808 - Caution : Proper connection of wiring harnesses is critical.
Proper connection of wiring harnesses is critical.
8188 - Reconnect wiring harnesses and Ethernet cable
Reconnect wiring harnesses and Ethernet cable
7731 - Insert Ethernet connector at top of SC-770 module. Connector will audibly "cl...
Insert Ethernet connector at top of SC-770 module. Connector will audibly "click" when seated properly.
8216 - 8189 - Close and secure SC-770 module; Remark:8190
8189 - Close and secure SC-770 module
Close and secure SC-770 module
8190 - Gently tighten 6 screws at the corners and sides on the SC-770 module.
Gently tighten 6 screws at the corners and sides on the SC-770 module.

7279 - 7249 - Return equipment to normal operating condition; Remark:
7249 - Return equipment to normal operating condition
Return equipment to normal operating condition
7386 - 7250 - Power on RPM; Remark:7367
7250 - Power on RPM
Power on RPM
7367 - Move LD-260 switch to ON position. The PWR ON
Move LD-260 switch to ON position. The PWR ON LED will illuminate.
7281 - 7252 - Verify RPM start-up; Remark:7253
7252 - Verify RPM start-up
Verify RPM start-up
7253 - RPM will perform a power on self-test (POST) and collect a background radiati...
RPM will perform a power on self-test (POST) and collect a background radiation measurement.
8217 - 8193 - Verify Rabbit board firmware is correct; Remark:8194
8191 - Caution : Rabbit board must be configured with correct firmware version before use....
Rabbit board must be configured with correct firmware version before use.
8192 - Note : If Rabbit board is not pre-configured with correct firmware version, this mus...
If Rabbit board is not pre-configured with correct firmware version, this must be done manually by performing procedure DET-RPM-RAP-CM02 following installation of new Rabbit board.
8193 - Verify Rabbit board firmware is correct
Verify Rabbit board firmware is correct
8194 - Enter Program Mode by pressing “0.” Enter the password ...
Enter Program Mode by pressing “0.”
Enter the password 1234 and press “#” (enter); navigate to:
1: Gamma
3: Advanced
3: Show Version
The displayed version number indicates the firmware version installed on the board. (e.g. 1.10.1H)
8218 - 8195 - Verify parameter settings for specific RPM; Remark:8196
8195 - Verify parameter settings for specific RPM
Verify parameter settings for specific RPM
8196 - Every RPM has unique parameter settings. The currently approved parameter set...
Every RPM has unique parameter settings. The currently approved parameter settings for each RPM are listed in the LANL configuration management database or can be found by contacting the NSDD Program or partner country maintenance manager.
8220 - 8197 - Verify equipment is in normal operating condition; Remark:8219
8197 - Verify equipment is in normal operating condition
Verify equipment is in normal operating condition
8219 - DET-RPM-RAP-RM03, Operational Testing procedure.
DET-RPM-RAP-RM03, Operational Testing procedure.
7283 - 7256 - Close and lock all RPM doors; Remark:
7256 - Close and lock all RPM doors
Close and lock all RPM doors
7842 - 7820 - Inform system operators upon completion of maintenance action; Remark:
7820 - Inform system operators upon completion of maintenance action
Inform system operators upon completion of maintenance action
322 - 321 - Document maintenance actions; Remark:
321 - Document maintenance actions
Document maintenance actions
2869 - 2585 - Document maintenance performed; Remark:2866
2585 - Document maintenance performed
Document maintenance performed
2866 - Record observations, times, and results for the maintenance report.
Record observations, times, and results for the maintenance report.
4706 - 4705 - Submit report; Remark:4864
4705 - Submit report
Submit report
4864 - As specified by management or contractual obligations.
As specified by management or contractual obligations.