Last Updated: 06/14/2025 1:39 AM
The following table lists all the components that make up the document.
Search for and identify radioactive material using the Atomtex AT6101C backpack radiation scanner with the Atomtex Windows mobile application (App).
Include instructions for manual identification
Updated reference to Operational Test Windows, updated title to reflect Windows App, added several notes and steps.
804 - 803 - Prepare Atomtex for Operation; Remark:
2138 - Note : For this procedure, automatic identification is disabled per NSDD settings.
For this procedure, automatic identification is disabled per NSDD settings.
785 - Note : Apply a rain cover when necessary (due to weather conditions, possible contam...
Apply a rain cover when necessary (due to weather conditions, possible contamination, or to change backpack appearance)
883 - Note : Headphones can be used in a noisy environment or for discrete operation. ...
Headphones can be used in a noisy environment or for discrete operation.
803 - Prepare Atomtex for Operation
Prepare Atomtex for Operation
786 - 219 - Verify there are no sources of radiation near instrument; Remark:7
219 - Verify there are no sources of radiation near instrument
Verify there are no sources of radiation near instrument
7 - No Radiation symbol

794 - 793 - Place check sample into side pocket; Remark:791
793 - Place check sample into side pocket
Place check sample into side pocket
791 - Atomtex_Place_check_sample_in_side_pocket
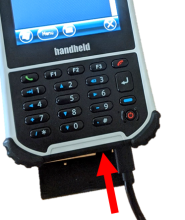
940 - 1377 - Power on BT-DU3 Adapter; Remark:939
1467 - Note : The BT-DU3 will power off after 10 minutes if not connected to the handheld c...
The BT-DU3 will power off after 10 minutes if not connected to the handheld computer.
1377 - Power on BT-DU3 Adapter
Power on BT-DU3 Adapter
939 - Press and hold the BT-DU3 Adapter PWR button until the yello...
Press and hold the BT-DU3 Adapter PWR button until the yellow light is on and component lights flash. Place the Adapter back in the backpack and secure zippers.

808 - 1495 - Power on mobile device; Remark:805
773 - Caution : Temperature range for operation of the handheld computer is -20 to 50°C....
Temperature range for operation of the handheld computer is -20 to 50°C.
1495 - Power on mobile device
Power on mobile device
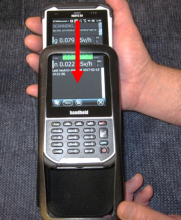
805 - Press the Power button and wait for the screen to activate
Press the Power button and wait for the screen to activate


806 - The ATAS Scanner Mobile Software should start automatically. If not, press
The ATAS Scanner Mobile Software should start automatically. If not, press F1.

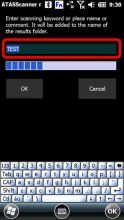
2137 - 1418 - Enter scanning file name; Remark:2129
1934 - Note : The prompt to enter a file name will only appear for about 5 seconds if nothi...
The prompt to enter a file name will only appear for about 5 seconds if nothing is typed.
1418 - Enter scanning file name
Enter scanning file name
2129 - Enter a filename associated with the current task. For example: Stadium-1 or ...
Enter a filename associated with the current task. For example: Stadium-1 or TRAIN-421.
811 - 2220 - Wait for measurement to complete; Remark:809
2220 - Wait for measurement to complete
Wait for measurement to complete
809 - The start-up sequence may take a few minutes to complete.
The start-up sequence may take a few minutes to complete.
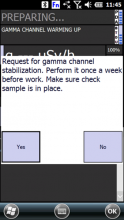
2136 - 2128 - If prompted, tap Yes to perform stabilization; Remark:2130
2126 - Note : It is recommended to perform a stabilization upon startup, at least once a we...
It is recommended to perform a stabilization upon startup, at least once a week. Not performing stabilization can result in failure to correctly identify isotopes.
2128 - If prompted, tap Yes to perform stabilization
If prompted, tap Yes to perform stabilization
815 - 814 - Verify backpack connection to handheld computer; Remark:813
814 - Verify backpack connection to handheld computer
Verify backpack connection to handheld computer
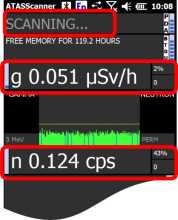
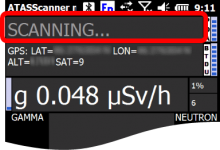
813 - SCANNING... should appear at the top of the display. Gamma a...
SCANNING... should appear at the top of the display. Gamma and neutron values should be changing.
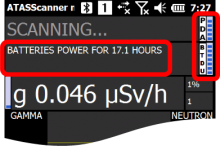
818 - 817 - Verify sufficient battery level is available to conduct operation; Remark:816
817 - Verify sufficient battery level is available to conduct operation
Verify sufficient battery level is available to conduct operation
816 - Battery power is indicated across the top of the screen and by the number of&...
Battery power is indicated across the top of the screen and by the number of bars at the right of the display.
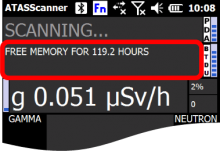
2135 - 1943 - Verify sufficient memory to conduct operation; Remark:2131
1943 - Verify sufficient memory to conduct operation
Verify sufficient memory to conduct operation
822 - 821 - Verify GPS connection (if needed); Remark:819
820 - Note : The GPS (Global Positioning System) signal appears only when the handheld com...
The GPS (Global Positioning System) signal appears only when the handheld computer can detect GPS satellite signals.
1935 - Note : If the instrument was moved >200 km, it may take 5 to 10 minutes to acquir...
If the instrument was moved >200 km, it may take 5 to 10 minutes to acquire GPS.
821 - Verify GPS connection (if needed)
Verify GPS connection (if needed)
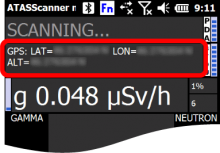
819 - GPS position connection is displayed across the top of the screen. The text a...
GPS position connection is displayed across the top of the screen. The text alternates with remaining hours of battery life and available memory.
826 - 825 - Verify Fn at top of screen; Remark:823
825 - Verify Fn at top of screen
Verify Fn at top of screen
823 - This will allow the use of "shortcut" keys
This will allow the use of "shortcut" keys
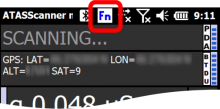
824 - If the screen does not show Fn, press the blue button.
If the screen does not show Fn, press the blue button.

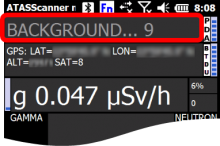
2134 - 828 - Choose background mode; Remark:2132
2125 - Note : Permanent background mode is recommended when using the backpack for stationa...
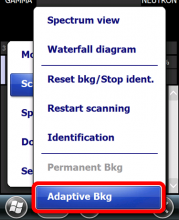
Permanent background mode is recommended when using the backpack for stationary operations or in a moving vehicle such as a railway train. Adaptive background is only recommended for search operations on foot.
828 - Choose background mode
Choose background mode
2132 - Tap Menu > Scanner to see background mod...
Tap Menu > Scanner to see background mode options.
832 - 831 - Adjust volume as needed; Remark:830
831 - Adjust volume as needed
Adjust volume as needed
830 - The volume can be adjusted using the buttons on the left side of the handheld...
The volume can be adjusted using the buttons on the left side of the handheld computer. You can also turn the volume on/off by selecting Menu > Settings.

835 - 834 - Place handheld computer in case; Remark:833
834 - Place handheld computer in case
Place handheld computer in case
833 - Attach the handheld computer to clothing (such as a belt) or hand carry. ...
Attach the handheld computer to clothing (such as a belt) or hand carry.
838 - 319 - Perform operational test; Remark:836
319 - Perform operational test
Perform operational test
836 - Refer to DET-HHD-ATM-RM09 Operational Test Windows to verify equipme...
Refer to DET-HHD-ATM-RM09 Operational Test Windows to verify equipment functionality before use.
840 - 839 - Search Item/Area of Interest; Remark:
839 - Search Item/Area of Interest
Search Item/Area of Interest
844 - 843 - Verify instrument is in SCANNING mode; Remark:898
841 - Note : The Atomtex backpack automatically enters SCANNING mode after successful init...
The Atomtex backpack automatically enters SCANNING mode after successful initialization and stabilization.
843 - Verify instrument is in SCANNING mode
Verify instrument is in SCANNING mode
842 - Press Right button to start a new scan at any time.
Press Right button to start a new scan at any time.

847 - 846 - Walk slowly in the area of interest; Remark:845
846 - Walk slowly in the area of interest
Walk slowly in the area of interest

850 - 849 - Observe instrument response for elevated radiation levels; Remark:848
849 - Observe instrument response for elevated radiation levels
Observe instrument response for elevated radiation levels
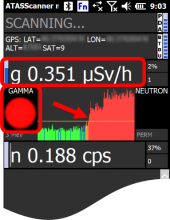
848 - When the alarm thresholds are exceeded, lights will flash and an audio messag...
When the alarm thresholds are exceeded, lights will flash and an audio message will sound.
854 - 853 - Locate area with highest level of radiation; Remark:852
851 - Note : A handheld survey instrument can be used to more accurately locate the source...
A handheld survey instrument can be used to more accurately locate the source of radiation.
853 - Locate area with highest level of radiation
Locate area with highest level of radiation
852 - A gradual 360° turn may be needed to determine the direction of the source. ...
A gradual 360° turn may be needed to determine the direction of the source. Move in the direction of increasing radiation. Continue moving until radiation levels begin to decrease.
857 - 856 - Identify Isotopes; Remark:
856 - Identify Isotopes
Identify Isotopes
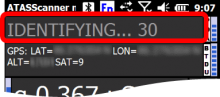
860 - 859 - Start identification measurement; Remark:858
859 - Start identification measurement
Start identification measurement
858 - Press the Up button.
Press the Up button.
863 - 2220 - Wait for measurement to complete; Remark:861
2123 - Note : If needed, press the UP button to add identification time.
If needed, press the UP button to add identification time.
2220 - Wait for measurement to complete
Wait for measurement to complete
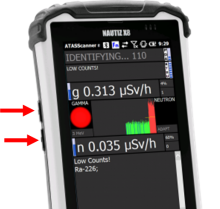
861 - The remaining time is displayed at the top of the screen.
The remaining time is displayed at the top of the screen.
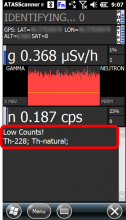
867 - 866 - Evaluate identification results; Remark:865
866 - Evaluate identification results
Evaluate identification results
865 - Identified isotopes are displayed in the program messages. Unrecognized isoto...
Identified isotopes are displayed in the program messages. Unrecognized isotopes are listed as “unknown.”
260 - 313 - Power off instrument; Remark:
313 - Power off instrument
Power off instrument
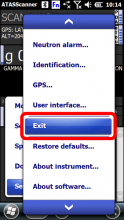
2133 - 2127 - Stop ATAS Scanner Mobile software; Remark:1805
2127 - Stop ATAS Scanner Mobile software
Stop ATAS Scanner Mobile software
1805 - Tap MENU > Settings > Exit
Tap MENU > Settings > Exit

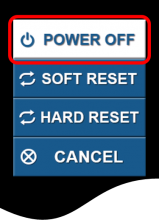
876 - 4703 - Power off mobile device; Remark:874
4703 - Power off mobile device
Power off mobile device
874 - To power off the handheld computer, press the Power button u...
To power off the handheld computer, press the Power button until the menu appears, then tap POWER OFF.

879 - 878 - Power off BT-DU3 Adapter; Remark:877
878 - Power off BT-DU3 Adapter
Power off BT-DU3 Adapter
877 - To power off the BT-DU3 Adapter, press the PWR button for ab...
To power off the BT-DU3 Adapter, press the PWR button for about 3 seconds.

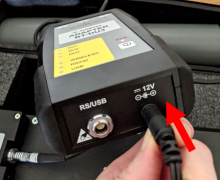
882 - 881 - Connect instrument to external power; Remark:880
2139 - Note : The handheld computer will power on when connected to the charger.
The handheld computer will power on when connected to the charger.
881 - Connect instrument to external power
Connect instrument to external power
880 - The BT-DU3 Adapter and handheld computer should charge when not in use.
The BT-DU3 Adapter and handheld computer should charge when not in use.