Last Updated: 06/12/2025 1:44 AM
The following table lists all the components that make up the document.
Check internal connections of Thermo Scientific FHT 1377 PackEye indicator unit.
Prior to arrival, notify operators concerning expected work, duration, and anticipated alarms and fault indications.
6744 - 6743 - Disassemble Indicator Unit; Remark:
6743 - Disassemble Indicator Unit
Disassemble Indicator Unit
3869 - 313 - Power off instrument; Remark:3850
313 - Power off instrument
Power off instrument
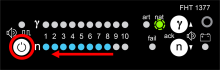
3850 - Press and hold the power button for approximately 10 seconds until indicator ...
Press and hold the power button for approximately 10 seconds until indicator lights are off.
6753 - 6752 - Odstraňte dva (2) kryty šroubů; Remark:6751
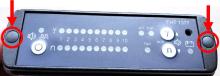
6752 - Remove two (2) screw caps
Remove two (2) screw caps
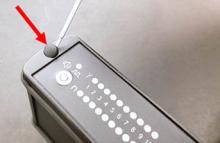
6751 - These are located on the front panel. Use 2.5-mm slotted screwdriver. Retain ...
These are located on the front panel. Use 2.5-mm slotted screwdriver. Retain caps.
6754 - 6750 - Vyšroubujte dva (2) šrouby v čelním panelu; Remark:6749
6750 - Remove two (2) front panel screws
Remove two (2) front panel screws
6749 - Use a T8 Torx driver. Retain screws.
Use a T8 Torx driver. Retain screws.


6756 - 6746 - Disconnect ribbon cable from front panel; Remark:6745
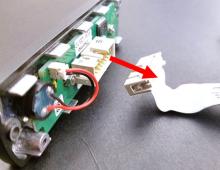
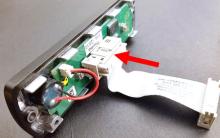
6746 - Disconnect ribbon cable from front panel
Disconnect ribbon cable from front panel
6745 -
6742 - 6741 - Check internal connections; Remark:
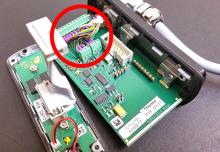
6741 - Check internal connections
Check internal connections
6807 - 6806 - Reseat ribbon cable on internal board; Remark:6805
6815 - Caution : Take care not to touch or damage circuit boards.
Take care not to touch or damage circuit boards.
6806 - Reseat ribbon cable on internal board
Reseat ribbon cable on internal board
6805 - Disconnect and reconnect ribbon cable several times to remove oxidation. Veri...
Disconnect and reconnect ribbon cable several times to remove oxidation. Verify connection is secure.
6808 - 6804 - Dotáhněte hardware; Remark:6803
6804 - Tighten hardware
Tighten hardware
6803 - Verify nuts on rear of front panel are secure. Check for any other loose hard...
Verify nuts on rear of front panel are secure. Check for any other loose hardware.

6816 - 6814 - Vraťte plochý kabel na čelní panel; Remark:6813
6814 - Reseat ribbon cable on front panel
Reseat ribbon cable on front panel
6813 - Disconnect and reconnect ribbon cable several times to remove oxidation. Veri...
Disconnect and reconnect ribbon cable several times to remove oxidation. Verify connection is secure.
6817 - 6812 - Zkontrolujte připojení kabelů; Remark:6811
6812 - Check wiring connections
Check wiring connections
6811 - Check for bad connections, loose wires, or any visible damage Use 2.5-mm slot...
Check for bad connections, loose wires, or any visible damage Use 2.5-mm slotted screwdriver to tighten connections if needed.
6818 - 319 - Proveďte provozní test; Remark:6809
6810 - Caution : Take care not to touch circuit board while performing an operational test. Do...
Take care not to touch circuit board while performing an operational test. Do not allow the circuit board to touch the metal frame.
319 - Perform operational test
Perform operational test
6809 - DET-HHD-THR-PAK-RM01, PackEye Operational Test. If PackEye is not fu...
DET-HHD-THR-PAK-RM01, PackEye Operational Test. If PackEye is not functioning properly, the issue might be in the FHT 681 Amplifier.
6740 - 6739 - Reassemble Indicator Unit; Remark:
6739 - Reassemble Indicator Unit
Reassemble Indicator Unit
6756 - 6746 - Disconnect ribbon cable from front panel; Remark:6745
6746 - Disconnect ribbon cable from front panel
Disconnect ribbon cable from front panel
6745 -
6768 - 6767 - Jemně zasuňte vnitřní desku do spodního zářezu v krytu indikátorové jednotky; Remark:6766
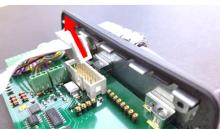
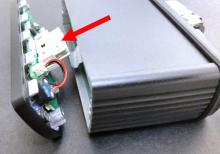
6767 - Gently slide internal board into bottom notch of indicator unit housing
Gently slide internal board into bottom notch of indicator unit housing

6769 - 6765 - Upevněte zadní panel pomocí dvou (2) šroubů; Remark:6764
6765 - Secure back panel with two (2) screws
Secure back panel with two (2) screws
6764 - Rubber gasket must be aligned between back panel and enclosure before inserti...
Rubber gasket must be aligned between back panel and enclosure before inserting screws. Use T8 Torx driver.

6770 - 6738 - Umístěte dva (2) kryty šroubů; Remark:6763
6738 - Replace two (2) screw caps
Replace two (2) screw caps

6771 - 6762 - Znovu zapojte plochý kabel k čelnímu panelu; Remark:6761
6762 - Reconnect ribbon cable to front panel
Reconnect ribbon cable to front panel
6772 - 6760 - Upevněte přední panel pomocí dvou (2) šroubů; Remark:6759
6760 - Secure front panel with two (2) screws
Secure front panel with two (2) screws
6759 -

6773 - 6738 - Umístěte dva (2) kryty šroubů; Remark:6758
6738 - Replace two (2) screw caps
Replace two (2) screw caps
6774 - 319 - Proveďte provozní test; Remark:6757
319 - Perform operational test
Perform operational test
6757 - It is recommended to perform an operational test to verify the instrument was...
It is recommended to perform an operational test to verify the instrument was assembled correctly. DET-HHD-THR-PAK-RM01, PackEye Operational Test.
322 - 321 - Document maintenance actions; Remark:
321 - Document maintenance actions
Document maintenance actions
2869 - 2585 - Document maintenance performed; Remark:2866
2585 - Document maintenance performed
Document maintenance performed
2866 - Record observations, times, and results for the maintenance report.
Record observations, times, and results for the maintenance report.
4706 - 4705 - Submit report; Remark:4864
4705 - Submit report
Submit report
4864 - As specified by management or contractual obligations.
As specified by management or contractual obligations.