Last Updated: 04/24/2025 1:45 AM
The following table lists all the components that make up the document.
Replace neutron detector helium-3 (He3) tube on radiation portal monitor (RPM).
Prior to arrival, notify operators concerning expected work, duration, and anticipated alarms and fault indications.
7621 - 1401 - Establish Initial Conditions; Remark:
1401 - Establish Initial Conditions
Establish Initial Conditions
7268 - 7231 - Close lane; Remark:7233
9053 - Warning : Traffic should temporarily be rerouted or halted during conduction of this pr...
Traffic should temporarily be rerouted or halted during conduction of this procedure to ensure maintenance provider safety and to prevent unscreened vehicles from passing.
7231 - Close lane
Close lane
7233 - Use orange safety (traffic control) cones to setup barriers. Practice establi...
Use orange safety (traffic control) cones to setup barriers. Practice established safety protocols.
7269 - 7232 - Open RPM door; Remark:7234
7232 - Open RPM door
Open RPM door
7234 - Open all doors needed to access components.
Open all doors needed to access components.
7454 - 7290 - Disable tamper switches; Remark:7416
7290 - Disable tamper switches
Disable tamper switches
7416 - Use a magnet to disable tamper switches for all open doors. Use adhesive tape...
Use a magnet to disable tamper switches for all open doors. Use adhesive tape to disable older mechanical switches.
8561 - 7291 - Disable both infrared occupancy sensors; Remark:8514
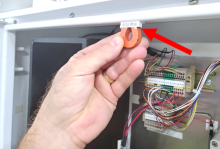
5291 - Note : It is good practice to verify all cables and connectors are labeled prior to ...
It is good practice to verify all cables and connectors are labeled prior to disconnection.
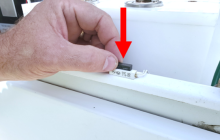
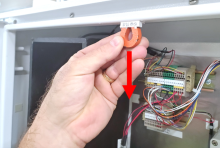
7291 - Disable both infrared occupancy sensors
Disable both infrared occupancy sensors
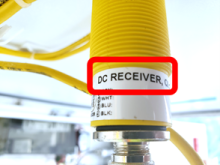
8514 - Verify sensors mounted in control pillar door are receivers.
Verify sensors mounted in control pillar door are receivers.

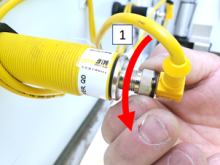
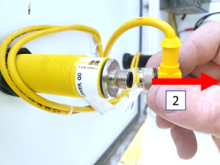
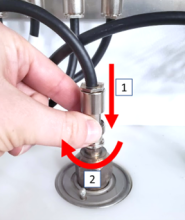
9205 - To disconnect sensor cable, turn collar counterclockwise and pull away from s...
To disconnect sensor cable, turn collar counterclockwise and pull away from sensor.
8221 - 7676 - Brief system operators on expected work, duration, anticipated alarms, and fa...; Remark:
7676 - Brief system operators on expected work, duration, anticipated alarms, and fa...
Brief system operators on expected work, duration, anticipated alarms, and fault indications before starting work
8591 - 8515 - Uninstall Faulty Neutron Tube; Remark:
8515 - Uninstall Faulty Neutron Tube
Uninstall Faulty Neutron Tube
8562 - 8516 - Disconnect cable from faulty helium-3 (He3) tube; Remark:8517
5291 - Note : It is good practice to verify all cables and connectors are labeled prior to ...
It is good practice to verify all cables and connectors are labeled prior to disconnection.
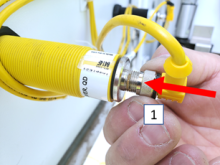
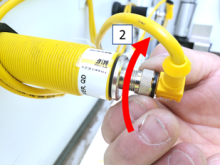
8516 - Disconnect cable from faulty helium-3 (He3) tube
Disconnect cable from faulty helium-3 (He3) tube
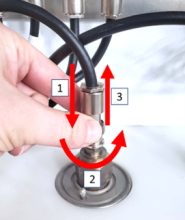
8517 - Push toward connection, turn coupling nut counterclockwise, and pull away fro...
Push toward connection, turn coupling nut counterclockwise, and pull away from connection.
8563 - 8518 - Remove four (4) front panel screws; Remark:8519
8518 - Remove four (4) front panel screws
Remove four (4) front panel screws
8519 - Use a large Phillips (PH3) screwdriver. There should be four (4) screws, but ...
Use a large Phillips (PH3) screwdriver. There should be four (4) screws, but quantity may vary. Retain screws for reinstallation.

8564 - 6748 - Remove front panel; Remark:
6748 - Remove front panel
Remove front panel
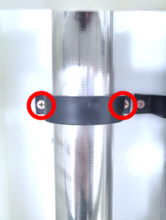
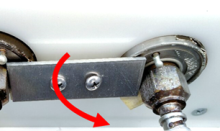
8565 - 8520 - Remove stabilizing brace screws; Remark:8521
8520 - Remove stabilizing brace screws
Remove stabilizing brace screws
8521 - There should be two stabilizing braces for each He3 tube; configurations migh...
There should be two stabilizing braces for each He3 tube; configurations might vary. Use a medium Phillips (PH2) screwdriver. Retain screws.
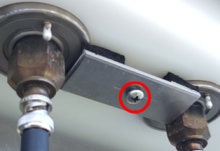
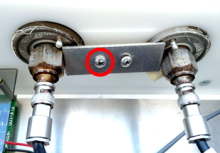
8566 - 8523 - Loosen bracket screw (if applicable); Remark:8525
8522 - Caution : Tube may fall out of detector assembly when bracket screw is removed.
Tube may fall out of detector assembly when bracket screw is removed.
9605 - Note : This step is only needed if cleaning He3 tube from upper detector.
This step is only needed if cleaning He3 tube from upper detector.
8523 - Loosen bracket screw (if applicable)
Loosen bracket screw (if applicable)
8525 - If there is more than one screw, completely remove one. Use medium Phillips (...
If there is more than one screw, completely remove one. Use medium Phillips (PH2) screwdriver. Retain screws.
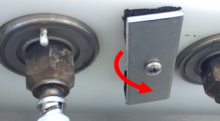
8567 - 8526 - Rotate bracket (if applicable); Remark:8527
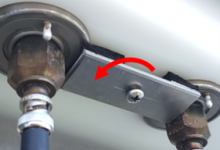
8526 - Rotate bracket (if applicable)
Rotate bracket (if applicable)
8527 - Rotate neutron bracket
Rotate neutron bracket
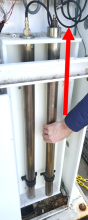
8568 - 8528 - Remove He3 tube; Remark:8529
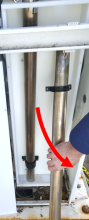
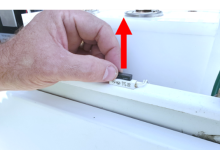
8528 - Remove He3 tube
Remove He3 tube
8529 - Slide tube up through hole and then pull out of moderator.
Slide tube up through hole and then pull out of moderator.
8569 - 8530 - Remove stabilizing braces; Remark:8531
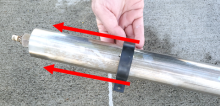
8530 - Remove stabilizing braces
Remove stabilizing braces
8531 - Slide stabilizing braces off He3 tube.
Slide stabilizing braces off He3 tube.
3397 - 3395 - Label faulty component; Remark:3396
3395 - Label faulty component
Label faulty component
3396 - Use tag or tape. Include date of removal, description of failure symptoms, co...
Use tag or tape. Include date of removal, description of failure symptoms, country, site, and lane number. Dispose per Nuclear Smuggling Detection and Deterrence (NSDD) guidance or contractual requirements.
8571 - 8533 - Install New He3 Tube; Remark:
8533 - Install New He3 Tube
Install New He3 Tube
8572 - 8534 - Place stabilizing braces onto new He3 tube; Remark:
8534 - Place stabilizing braces onto new He3 tube
Place stabilizing braces onto new He3 tube
8573 - 8535 - Insert new He3 tube into moderator; Remark:
8535 - Insert new He3 tube into moderator
Insert new He3 tube into moderator
8574 - 8526 - Rotate bracket (if applicable); Remark:8536
8526 - Rotate bracket (if applicable)
Rotate bracket (if applicable)
8575 - 8537 - Tighten bracket screw (if applicable); Remark:8538
8537 - Tighten bracket screw (if applicable)
Tighten bracket screw (if applicable)
8538 - Use medium Phillips (PH2) screwdriver.
Use medium Phillips (PH2) screwdriver.
8576 - 8539 - Reinstall stabilizing braces screws; Remark:8540
8539 - Reinstall stabilizing braces screws
Reinstall stabilizing braces screws
8540 - Use medium Phillips (PH2) screwdriver.
Use medium Phillips (PH2) screwdriver.
8577 - 8541 - Reinstall front panel with four (4) screws; Remark:8542
8541 - Reinstall front panel with four (4) screws
Reinstall front panel with four (4) screws
8542 - Use large Phillips (PH3) screwdriver.
Use large Phillips (PH3) screwdriver.
8578 - 8543 - Reconnect cable to He3 tube; Remark:8544
5553 - Caution : Correct placement of connectors and wiring is critical to proper operation.
Correct placement of connectors and wiring is critical to proper operation.
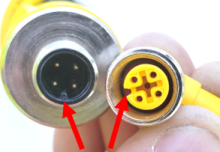
8543 - Reconnect cable to He3 tube
Reconnect cable to He3 tube
8544 - Rotate to align connector notches. Push toward connection and turn coupling n...
Rotate to align connector notches. Push toward connection and turn coupling nut clockwise.
7279 - 7249 - Return equipment to normal operating condition; Remark:
7249 - Return equipment to normal operating condition
Return equipment to normal operating condition
7280 - 7250 - Power on RPM; Remark:7251
7250 - Power on RPM
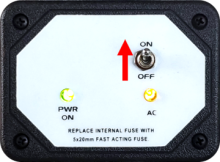
Power on RPM
7251 - Move LD-260 switch to ON position. The LED PWR ON
Move LD-260 switch to ON position. The LED PWR ON will illuminate.
7281 - 7252 - Verify RPM start-up; Remark:7253
7252 - Verify RPM start-up
Verify RPM start-up
7253 - RPM will perform a power on self-test (POST) and collect a background radiati...
RPM will perform a power on self-test (POST) and collect a background radiation measurement.
7282 - 7254 - Confirm network connection; Remark:7255
7254 - Confirm network connection
Confirm network connection
7255 - Contact operators to confirm communications have been reestablished between RPM ...
8579 - 8545 - Isolate new He3 tube; Remark:8547
8546 - Caution : Do not disconnect cable from new tube
Do not disconnect cable from new tube
8545 - Isolate new He3 tube
Isolate new He3 tube
8547 - Disconnect cables from all He3 tubes in moderator (white box) except
Disconnect cables from all He3 tubes in moderator (white box) except new He3 tube.
8580 - 8548 - Navigate to SHOW COUNTS for neutron channels; Remark:8549
8548 - Navigate to SHOW COUNTS for neutron channels
Navigate to SHOW COUNTS for neutron channels
8549 - On SC-770, press 01234# Then, press 2:
On SC-770, press 01234#
Then, press 2: NEUTRON > 2: FUNCTIONS > 1: SHOW COUNTS.
8581 - 8550 - Place neutron source on neutron detector; Remark:8551
8550 - Place neutron source on neutron detector
Place neutron source on neutron detector
8551 - Secure source to middle of detector with adhesive tape.
Secure source to middle of detector with adhesive tape.

8582 - 9606 - Verify counts from cleaned He3 tube; Remark:8553
9606 - Verify counts from cleaned He3 tube
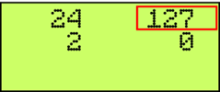
Verify counts from cleaned He3 tube
8553 - Neutron counts will increase on the channel with the new He3 tube
Neutron counts will increase on the channel with the new He3 tube
8583 - 2581 - Remove radioactive source; Remark:
2581 - Remove radioactive source
Remove radioactive source
8584 - 8458 - Exit programming mode; Remark:8554
8458 - Exit programming mode
Exit programming mode
8554 - On SC-770, press # button until main controller screen is di...
On SC-770, press # button until main controller screen is displayed.
8585 - 8555 - Reconnect all neutron detectors; Remark:8556
8555 - Reconnect all neutron detectors
Reconnect all neutron detectors
8586 - 8557 - Perform functional compliance test; Remark:8558
8557 - Perform functional compliance test
Perform functional compliance test
8558 - DET-RPM-RAP-RM05, RPM Functional Compliance Test.
DET-RPM-RAP-RM05, RPM Functional Compliance Test.
8588 - 7305 - Enable both infrared occupancy sensors; Remark:8559
5553 - Caution : Correct placement of connectors and wiring is critical to proper operation.
Correct placement of connectors and wiring is critical to proper operation.
7305 - Enable both infrared occupancy sensors
Enable both infrared occupancy sensors
8559 - To reconnect sensor cable, align connectors, push towards sensor, and turn co...
To reconnect sensor cable, align connectors, push towards sensor, and turn collar clockwise.
8589 - 7310 - Enable tamper switches; Remark:7348
7310 - Enable tamper switches
Enable tamper switches
7348 - Remove all magnets and/or adhesive tape from door switches.
Remove all magnets and/or adhesive tape from door switches.
7283 - 7256 - Close and lock all RPM doors; Remark:
7256 - Close and lock all RPM doors
Close and lock all RPM doors
7842 - 7820 - Inform system operators upon completion of maintenance action; Remark:
7820 - Inform system operators upon completion of maintenance action
Inform system operators upon completion of maintenance action
322 - 321 - Document maintenance actions; Remark:
321 - Document maintenance actions
Document maintenance actions
2869 - 2585 - Document maintenance performed; Remark:2866
2585 - Document maintenance performed
Document maintenance performed
2866 - Record observations, times, and results for the maintenance report.
Record observations, times, and results for the maintenance report.
4706 - 4705 - Submit report; Remark:4864
4705 - Submit report
Submit report
4864 - As specified by management or contractual obligations.
As specified by management or contractual obligations.