Last Updated: 04/24/2025 1:46 AM
The following table lists all the components that make up the document.
Removal and replacement of door gasket
2 hours for procedure and 24 hours for cure time
Prior to arrival, notify operators concerning expected work, duration, and anticipated alarms and fault indications.
1402 - 7927 - Establish Initial Conditions; Remark:
7927 - Establish Initial Conditions
Establish Initial Conditions
10199 - 10198 - Assess if weather conditions are suitable to complete the full procedure ...; Remark:10197
10198 - Assess if weather conditions are suitable to complete the full procedure ...
Assess if weather conditions are suitable to complete the full procedure
10197 - If the temperature is below 10°C (50°F) or the door is damp due to rain or ...
If the temperature is below 10°C (50°F) or the door is damp due to rain or high humidity, wait until the conditions are more optimal. See Step 3-2.
7268 - 7231 - Close lane; Remark:7233
9053 - Warning : Traffic should temporarily be rerouted or halted during conduction of this pr...
Traffic should temporarily be rerouted or halted during conduction of this procedure to ensure maintenance provider safety and to prevent unscreened vehicles from passing.
7231 - Close lane
Close lane
7233 - Use orange safety (traffic control) cones to setup barriers. Practice establi...
Use orange safety (traffic control) cones to setup barriers. Practice established safety protocols.
10196 - 10192 - Remove Old Gasket; Remark:
10192 - Remove Old Gasket
Remove Old Gasket
10188 - 10187 - Use putty knife to scrape gasket from door; Remark:10186
10193 - Note : Replacement gasket must be obtained prior to starting. The peel and stick gas...
Replacement gasket must be obtained prior to starting. The peel and stick gasket material must be closed-cell EPDM rubber foam or neoprene, with a width of 5/8 to 3/4 inch and height of 1/4 inch.
10194 - Note : May be ordered from Rapiscan on a “per foot” basis, Part No. 6987G.
May be ordered from Rapiscan on a “per foot” basis, Part No. 6987G.
10195 - Note : For ordering, the total length required is shown in Total Gasket Length table...
For ordering, the total length required is shown in Total Gasket Length table after Step 6.
10187 - Use putty knife to scrape gasket from door
Use putty knife to scrape gasket from door
10186 - Use care to not scrape the paint.
Use care to not scrape the paint.
10189 - 10185 - Discard loose material; Remark:
10185 - Discard loose material
Discard loose material
10190 - 10184 - Apply acetone directly onto residue; Remark:10182
10184 - Apply acetone directly onto residue
Apply acetone directly onto residue
10182 - Either spray or squirt Acetone onto residue and allow soaking for a few minut...
Either spray or squirt Acetone onto residue and allow soaking for a few minutes.
10183 - Use care to not scrape the paint. A razor blade and acetone may be necessary ...
Use care to not scrape the paint. A razor blade and acetone may be necessary to remove smaller pieces of gasket material that the putty knife may not be able to remove.
10191 - 10181 - Remove any remaining adhesive; Remark:10180
10181 - Remove any remaining adhesive
Remove any remaining adhesive
10180 - Use additional acetone and paper towels as needed.
Use additional acetone and paper towels as needed.
10179 - 10178 - Prep Area for Install of New Gasket; Remark:
10178 - Prep Area for Install of New Gasket
Prep Area for Install of New Gasket
10175 - 10174 - Clean affected surface with rubbing alcohol and paper towels; Remark:10173
10174 - Clean affected surface with rubbing alcohol and paper towels
Clean affected surface with rubbing alcohol and paper towels
10173 - Remaining adhesive will become slightly sticky.
Remaining adhesive will become slightly sticky.
10176 - 10172 - Wait until conditions are optimal; Remark:10169
10172 - Wait until conditions are optimal
Wait until conditions are optimal
10169 - To help promote a strong bond, the surface area needs to be free of the origi...
To help promote a strong bond, the surface area needs to be free of the original gasket material, clean and dry.
10170 - If the temperature is below 10°C (50°F) or the door is damp due to rain or ...
If the temperature is below 10°C (50°F) or the door is damp due to rain or high humidity, wait until the conditions are more optimal or remove the door and complete the task in a more favorable environment.
10171 - If removing the doors, be sure to protect the electronics and detectors from ...
If removing the doors, be sure to protect the electronics and detectors from direct sunlight and or rain.
10177 - 10167 - Measure and cut appropriate lengths of gasket material required; Remark:10164
10168 - Caution : Incomplete seals may cause environmental damage to the cabinet contents. Gask...
Incomplete seals may cause environmental damage to the cabinet contents. Gasket lengths must be customized to the specific vendor and series cabinet.
10167 - Measure and cut appropriate lengths of gasket material required
Measure and cut appropriate lengths of gasket material required
10164 - Use scissors and measuring tape.
Use scissors and measuring tape.
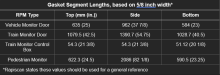
10165 - Use Gasket Segment Lengths table for appropriate gasket lengths.
Use Gasket Segment Lengths table for appropriate gasket lengths.
10166 - Suggested technique is to add 3-5 cm to the listed length for the initial cut...
Suggested technique is to add 3-5 cm to the listed length for the initial cut, then trim to final length in Step 4.
10203 - 10200 - Mark gasket location on door using attached drawing; Remark:
10201 - Standard : The gasket spacing to the door edge on the top, lock side, and bottom is appr...
The gasket spacing to the door edge on the top, lock side, and bottom is approximately 6 mm. The gasket spacing on the hinge side of the vehicle monitor door is 19 mm.
10200 - Mark gasket location on door using attached drawing
Mark gasket location on door using attached drawing
10230 - 10229 - Preheat gasket and/or contact area; Remark:10228
10229 - Preheat gasket and/or contact area
Preheat gasket and/or contact area
10228 - Use a hair dryer or similar device until gasket is warm to your touch. This w...
Use a hair dryer or similar device until gasket is warm to your touch. This will make the adhesive sticky and help create a stronger bond with the mating surface area.
10221 - 10220 - Peel protective paper backing from top gasket and attach adhesive side of gas...; Remark:10219
10314 - Caution : Do not stretch or pull the gaskets when placing them on the door as this can ...
Do not stretch or pull the gaskets when placing them on the door as this can cause them to become detached when they relax.
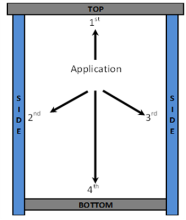
10315 - Note : Attaching the gaskets to the door in the correct sequence is important to kee...
Attaching the gaskets to the door in the correct sequence is important to keeping water from entering the pillar. Refer to the arrangement above when applying the gasket lengths, making sure to keep all joints tight and without gaps. Example drawing of vehicle monitor attached.
10220 - Peel protective paper backing from top gasket and attach adhesive side of gas...
Peel protective paper backing from top gasket and attach adhesive side of gasket to door top
10219 - (This is the first application.) Use care when removing/peeling backing paper...
(This is the first application.) Use care when removing/peeling backing paper from adhesive. The adhesive easily can be peeled away along with the protective backing paper.
10222 - 10218 - Peel protective paper backing from side gasket and attach adhesive side of ga...; Remark:10217
10218 - Peel protective paper backing from side gasket and attach adhesive side of ga...
Peel protective paper backing from side gasket and attach adhesive side of gasket to door side
10217 - (This is the second application.)
(This is the second application.)
10223 - 10216 - Peel protective paper backing from side gasket and attach adhesive side of ga...; Remark:10215
10216 - Peel protective paper backing from side gasket and attach adhesive side of ga...
Peel protective paper backing from side gasket and attach adhesive side of gasket to other door side
10215 - (This is the third application.)
(This is the third application.)
10224 - 10214 - Peel protective paper backing from bottom gasket and attach adhesive side of ...; Remark:10213
10214 - Peel protective paper backing from bottom gasket and attach adhesive side of ...
Peel protective paper backing from bottom gasket and attach adhesive side of gasket to door bottom
10213 - (This is the fourth application.)
(This is the fourth application.)
7279 - 7249 - Return equipment to normal operating condition; Remark:
7249 - Return equipment to normal operating condition
Return equipment to normal operating condition
10210 - 10209 - Close cabinet door; Remark:
10209 - Close cabinet door
Close cabinet door
10211 - 10207 - Keep door closed for at least 24 hours; Remark:10206
10208 - Note : Cure times vary depending on temperature and humidity.
Cure times vary depending on temperature and humidity.
10207 - Keep door closed for at least 24 hours
Keep door closed for at least 24 hours
10206 - The constant pressure of the door will help create a strong bond during the 2...
The constant pressure of the door will help create a strong bond during the 24-hour curing time.
10212 - 10205 - Check gasket adhesion at end of 24 hours; Remark:10204
10205 - Check gasket adhesion at end of 24 hours
Check gasket adhesion at end of 24 hours
10204 - Check temperature or cleanliness of surface if gasket does not adhere properl...
Check temperature or cleanliness of surface if gasket does not adhere properly.
8260 - 8250 - Reopen Lane; Remark:8249
8250 - Reopen Lane
Reopen Lane
8249 - Remove orange safety (traffic control) cones
Remove orange safety (traffic control) cones
7842 - 7820 - Inform system operators upon completion of maintenance action; Remark:
7820 - Inform system operators upon completion of maintenance action
Inform system operators upon completion of maintenance action
322 - 321 - Document maintenance actions; Remark:
321 - Document maintenance actions
Document maintenance actions
2869 - 2585 - Document maintenance performed; Remark:2866
2585 - Document maintenance performed
Document maintenance performed
2866 - Record observations, times, and results for the maintenance report.
Record observations, times, and results for the maintenance report.
4706 - 4705 - Submit report; Remark:4864
4705 - Submit report
Submit report
4864 - As specified by management or contractual obligations.
As specified by management or contractual obligations.