Last Updated: 05/03/2025 1:46 AM
The following table lists all the components that make up the document.
Use the Cseco Freedomview Fiberscope to search for contraband
247 - 257 - Prepare instrument; Remark:
257 - Prepare instrument
Prepare instrument
10257 - 10232 - Insert battery into battery compartment; Remark:10233
10232 - Insert battery into battery compartment
Insert battery into battery compartment
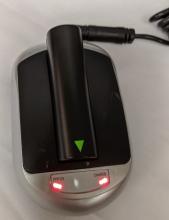
10233 - The battery should be inserted with the green arrow on the battery positioned...
The battery should be inserted with the green arrow on the battery positioned toward the instrument
10275 -


10259 - 4712 - Verify sufficient battery power is available; Remark:10235
4712 - Verify sufficient battery power is available
Verify sufficient battery power is available
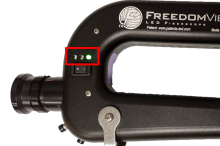
10235 - The three status LEDs above the power switch indicate the amount of power rem...
The three status LEDs above the power switch indicate the amount of power remaining in the battery:
Green – estimated charge level is greater than 60%.
Green/Yellow –approximately 40% - 60% charge remaining.
Yellow – The battery has less than 10 minutes of power remaining.
Red – Inadequate charge to operate the light source. Change the battery or use DC power.
10421 -
10256 - 10255 - Connect grounding cable if needed; Remark:
10274 - Warning : Always use the grounding cable when checking fuel tanks to prevent explosions...
Always use the grounding cable when checking fuel tanks to prevent explosions from static electricity.
10255 - Connect grounding cable if needed
Connect grounding cable if needed
10253 - 10252 - Plug grounding cable into electrostatic discharge (ESD) common point connecti...; Remark:10420
10252 - Plug grounding cable into electrostatic discharge (ESD) common point connecti...
Plug grounding cable into electrostatic discharge (ESD) common point connection
10420 -

10254 - 10251 - Connect alligator clip to bare conducive metal; Remark:
10251 - Connect alligator clip to bare conducive metal
Connect alligator clip to bare conducive metal
10250 - 10249 - Look for suspicious indicators; Remark:
10249 - Look for suspicious indicators
Look for suspicious indicators
10245 - 10244 - Carefully guide insertion shaft into area to be searched; Remark:10419
10244 - Carefully guide insertion shaft into area to be searched
Carefully guide insertion shaft into area to be searched
10419 -

10246 - 10243 - Observe image through eyepiece; Remark:
10243 - Observe image through eyepiece
Observe image through eyepiece
10247 - 10242 - Adjust articulation as needed; Remark:10241
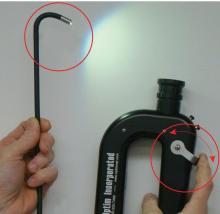
10272 - Caution : Do not force the articulation lever. This could severely damage the instrumen...
Do not force the articulation lever. This could severely damage the instrument.
10273 - Caution : Do not exceed an articulation radius of 20mm when guiding the insertion shaft...
Do not exceed an articulation radius of 20mm when guiding the insertion shaft.
10242 - Adjust articulation as needed
Adjust articulation as needed
10241 - The articulating tip is connected to the articulation control lever on the ha...
The articulating tip is connected to the articulation control lever on the handle.
10418 -
10248 - 10240 - Adjust light intensity as needed; Remark:10239
10240 - Adjust light intensity as needed
Adjust light intensity as needed
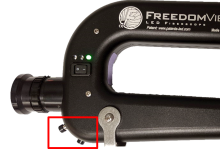
10239 - Light controls are located on the handle.
Light controls are located on the handle.
10417 -

10287 - 10284 - When search is complete, carefully remove insertion shaft; Remark:
10284 - When search is complete, carefully remove insertion shaft
When search is complete, carefully remove insertion shaft
10283 - 10282 - Power off and charge equipment; Remark:
10282 - Power off and charge equipment
Power off and charge equipment
10279 - 313 - Power off instrument; Remark:
313 - Power off instrument
Power off instrument
10280 - 1816 - Remove battery; Remark:
1816 - Remove battery
Remove battery
10281 - 10277 - CONNECT battery to battery charger; Remark:10276
10277 - CONNECT battery to battery charger
CONNECT battery to battery charger
10276 - The “CHARGE” LED will turn red when charging. The battery is fully charge...
The “CHARGE” LED will turn red when charging. The battery is fully charged when the “CHARGE” LED is green.