Last Updated: 06/17/2025 1:35 AM
The following table lists all the components that make up the document.
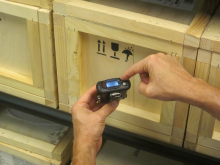
Alert user to radioactive material in close proximity using the Polimaster PM1703GN/GNA personal radiation detector.
1158 - 220 - Power on instrument; Remark:
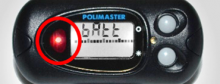
220 - Power on instrument
Power on instrument
786 - 219 - Verify there are no sources of radiation near instrument; Remark:7
219 - Verify there are no sources of radiation near instrument
Verify there are no sources of radiation near instrument
7 - No Radiation symbol

1155 - 220 - Power on instrument; Remark:1110
1109—Note : The instrument uses a single AA battery.
The instrument uses a single AA battery.
220 - Power on instrument
Power on instrument
1110 - There are two ways to power on the PM1703GN/GNA. If a new or replacement batt...
There are two ways to power on the PM1703GN/GNA. If a new or replacement battery is inserted, the instrument will power on automatically.

1111 - Otherwise, press the Mode button to power on the instrument.
Otherwise, press the Mode button to power on the instrument.

1154 - 817 - Verify sufficient battery level is available to conduct operation; Remark:1112
817 - Verify sufficient battery level is available to conduct operation
Verify sufficient battery level is available to conduct operation
1112 - The battery indication will automatically appear during startup. Replace the ...
The battery indication will automatically appear during startup. Replace the battery if warning indicator is visible and tone or vibration occurs periodically.
1153 - 1086 - Wait for instrument to complete self-tests and background calibration; Remark:1113
1086 - Wait for instrument to complete self-tests and background calibration
Wait for instrument to complete self-tests and background calibration

1114 - The instrument will automatically enter Search mode after calibration.
The instrument will automatically enter Search mode after calibration.
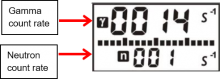
1152 - 233 - Verify instrument is in SEARCH MODE; Remark:1115
233 - Verify instrument is in SEARCH MODE
Verify instrument is in SEARCH MODE
1151 - 1087 - Perform functional test; Remark:1116
1087 - Perform functional test
Perform functional test
1116 - See DET-HHD-PLM-1703-RM01 Polimaster PM1703 GN/GNA Functional Test.
See DET-HHD-PLM-1703-RM01 Polimaster PM1703 GN/GNA Functional Test.
1101 - 1088 - Switch Audio Alarm On or Off; Remark:
1108 - Note : In noisy environments, use visual and vibration alarms when audio alarms cann...
In noisy environments, use visual and vibration alarms when audio alarms cannot be heard.
1107 - Note : The steps for changing audio and vibration alarms must be completed with litt...
The steps for changing audio and vibration alarms must be completed with little delay between steps or the instrument will revert to Search mode.
1088 - Switch Audio Alarm On or Off
Switch Audio Alarm On or Off
1148 - 1089 - Press and hold Mode button for at least 5 seconds; Remark:1117
1089 - Press and hold Mode button for at least 5 seconds
Press and hold Mode button for at least 5 seconds
1117 - Wait until CAL and coefficient n settings screens appear.
Wait until CAL and coefficient n settings screens appear.
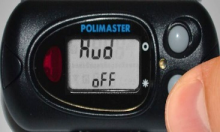
1150 - 1090 - Press Mode button twice for audio setting; Remark:1128
1090 - Press Mode button twice for audio setting
Press Mode button twice for audio setting

1149 - 1091 - Press Light button to toggle audio on or off; Remark:1129
1091 - Press Light button to toggle audio on or off
Press Light button to toggle audio on or off
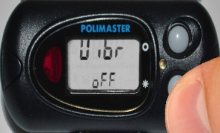
1100 - 1092 - Switch Vibration Alarm On or Off; Remark:
1092 - Switch Vibration Alarm On or Off
Switch Vibration Alarm On or Off
1148 - 1089 - Press and hold Mode button for at least 5 seconds; Remark:1117
1089 - Press and hold Mode button for at least 5 seconds
Press and hold Mode button for at least 5 seconds
1117 - Wait until CAL and coefficient n settings screens appear.
Wait until CAL and coefficient n settings screens appear.
1146 - 1093 - Press Mode button three times for vibration setting; Remark:1132
1093 - Press Mode button three times for vibration setting
Press Mode button three times for vibration setting
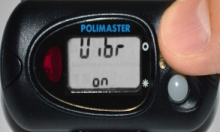
1147 - 1094 - Press Light button to toggle vibration on or off; Remark:1134
1094 - Press Light button to toggle vibration on or off
Press Light button to toggle vibration on or off
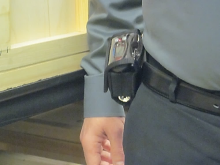
1145 - 1095 - Wear instrument for most sensitive readings; Remark:1136
1095 - Wear instrument for most sensitive readings
Wear instrument for most sensitive readings
1136 - Wear the instrument with the display closest to the area of interest (usually...
Wear the instrument with the display closest to the area of interest (usually facing forward) for the highest sensitivity.
1099 - 1096 - Respond to alarms; Remark:
1106 - Caution : Do not operate the instrument at temperatures lower than -20°C, higher than ...
Do not operate the instrument at temperatures lower than -20°C, higher than 50°C, or at humidity higher than 98% at 40°C.
1105 - Note : Wear the instrument at all times while on duty.
Wear the instrument at all times while on duty.
1104 - Note : The instrument is highly sensitive to changes in ambient background radiation...
The instrument is highly sensitive to changes in ambient background radiation and may ‘chirp’ when moving from an open (e.g., street) to a closed space (e.g., building).
1103 - Note : When in use, do not keep instrument near radio-emitting sources (e.g., cell p...
When in use, do not keep instrument near radio-emitting sources (e.g., cell phones) to avoid false alarms.
1096 - Respond to alarms
Respond to alarms
1144 - 1097 - Press Mode button to acknowledge alarm; Remark:1139
1097 - Press Mode button to acknowledge alarm
Press Mode button to acknowledge alarm
1139 - The instrument will enter Dose Rate mode.
The instrument will enter Dose Rate mode.
1143 - 1098 - Verify dose rate is below allowable rate for site; Remark:1140
1098 - Verify dose rate is below allowable rate for site
Verify dose rate is below allowable rate for site
1140 - The allowable dose rate is site dependent and should be indicated in the stan...
The allowable dose rate is site dependent and should be indicated in the standard operating procedure.

1142 - 313 - Power off instrument; Remark:1141
1102 - Note : The instrument display will not be blank even when the instrument is powered ...
The instrument display will not be blank even when the instrument is powered off. It is recommended to remove the battery at the end of the day.
313 - Power off instrument
Power off instrument
1141 - Press and hold Light button for 5 seconds until display shows “OFF.” ...
Press and hold Light button for 5 seconds until display shows “OFF.”
