Last Updated: 04/24/2025 1:44 AM
The following table lists all the components that make up the document.
| Title | Type | Status | Last Updated |
|---|---|---|---|
| Rapiscan PM-700 Pedestrian Monitor | Device
|
Published
|
06/20/2024 11:38 AM
|
| Rapiscan VM-250 Vehicle Monitor | Device
|
Published
|
10/14/2024 9:50 AM
|
| Rapiscan TM-850 Rail Monitor | Device
|
Published
|
09/18/2024 10:28 AM
|
| Rapiscan CM-267 Conveyor Monitor | Device
|
Published
|
06/27/2024 1:02 PM
|
| 1402 - 7927 - Establish Initial Conditions; Remark: | Procedure Step
|
Published
|
09/30/2022 1:47 PM
|
| 7927 - Establish Initial Conditions | Instruction
|
Published
|
07/12/2023 12:23 AM
|
| 7268 - 7231 - Close lane; Remark:7233 | Procedure Step
|
Published
|
04/27/2023 7:01 PM
|
| 9053 - Warning : Traffic should temporarily be rerouted or halted during conduction of this pr... | Annotation
|
Published
|
09/27/2023 9:09 AM
|
| 7231 - Close lane | Instruction
|
Published
|
04/18/2023 1:00 PM
|
| 7233 - Use orange safety (traffic control) cones to setup barriers. Practice establi... | Remark
|
Published
|
04/24/2023 12:18 PM
|
| 7269 - 7232 - Open RPM door; Remark:7234 | Procedure Step
|
Published
|
04/27/2023 7:02 PM
|
| 7232 - Open RPM door | Instruction
|
Published
|
04/18/2023 1:02 PM
|
| 7234 - Open all doors needed to access components. | Remark
|
Published
|
04/19/2025 7:48 PM
|
| 7270 - 7235 - Power off RPM; Remark:7236 | Procedure Step
|
Published
|
09/01/2023 7:57 PM
|
| 7235 - Power off RPM | Instruction
|
Published
|
04/24/2023 12:30 PM
|
| 7236 - Move LD-260 switch to OFF position. The PWR ON | Remark
|
Published
|
04/27/2023 4:25 PM
|
| 8070 - 8066 - Disconnect upper left connector; Remark:8065 | Procedure Step
|
Published
|
07/31/2023 1:54 PM
|
| 8066 - Disconnect upper left connector | Instruction
|
Published
|
07/31/2023 1:49 PM
|
| 8065 - The power input connector is a three-pin Molex. Both LEDs should be off when ... | Remark
|
Published
|
07/31/2023 1:54 PM
|
| 8077 - 8076 - Uninstall Faulty Fuse; Remark: | Procedure Step
|
Published
|
07/31/2023 4:31 PM
|
| 8076 - Uninstall Faulty Fuse | Instruction
|
Published
|
07/31/2023 4:31 PM
|
| 8075 - 8074 - Remove switch retaining nut; Remark:8073 | Procedure Step
|
Published
|
07/31/2023 4:38 PM
|
| 8074 - Remove switch retaining nut | Instruction
|
Published
|
07/31/2023 4:32 PM
|
| 8073 - A small box end or crescent wrench may be required to loosen the switch retai... | Remark
|
Published
|
07/31/2023 4:38 PM
|
| 8084 - 8083 - Remove four cover plate screws; Remark:8082 | Procedure Step
|
Published
|
07/31/2023 7:46 PM
|
| 8083 - Remove four cover plate screws | Instruction
|
Published
|
07/31/2023 7:44 PM
|
| 8082 - | Remark
|
Published
|
07/31/2023 7:46 PM
|
| 8085 - 8081 - Remove cover plate; Remark:8080 | Procedure Step
|
Published
|
07/31/2023 7:52 PM
|
| 8081 - Remove cover plate | Instruction
|
Published
|
07/31/2023 7:51 PM
|
| 8080 - | Remark
|
Published
|
07/31/2023 7:52 PM
|
| 8086 - 8079 - Remove failed fuse; Remark:8078 | Procedure Step
|
Published
|
07/31/2023 7:54 PM
|
| 8079 - Remove failed fuse | Instruction
|
Published
|
07/31/2023 7:53 PM
|
| 8078 - Carefully pull or pry the failed fuse from holder. | Remark
|
Published
|
07/31/2023 7:54 PM
|
| 3397 - 3395 - Label faulty component; Remark:3396 | Procedure Step
|
Published
|
07/21/2024 6:59 AM
|
| 3395 - Label faulty component | Instruction
|
Published
|
08/07/2021 11:07 AM
|
| 3396 - Use tag or tape. Include date of removal, description of failure symptoms, co... | Remark
|
Published
|
08/09/2021 11:35 AM
|
| 8097 - 8096 - Install New Fuse; Remark: | Procedure Step
|
Published
|
07/31/2023 7:56 PM
|
| 8096 - Install New Fuse | Instruction
|
Published
|
07/31/2023 7:55 PM
|
| 10323 - 10322 - Place the new fuse in the fuse holder.; Remark: | Procedure Step
|
Published
|
11/17/2023 7:19 PM
|
| 10322 - Place the new fuse in the fuse holder. | Instruction
|
Published
|
11/17/2023 7:18 PM
|
| 8098 - 8094 - Install cover plate; Remark: | Procedure Step
|
Published
|
07/31/2023 7:56 PM
|
| 8094 - Install cover plate | Instruction
|
Published
|
07/31/2023 7:56 PM
|
| 8099 - 8093 - Install four screws; Remark: | Procedure Step
|
Published
|
07/31/2023 7:57 PM
|
| 8093 - Install four screws | Instruction
|
Published
|
07/31/2023 7:57 PM
|
| 8100 - 8092 - Install switch retaining nut; Remark: | Procedure Step
|
Published
|
07/31/2023 7:58 PM
|
| 8092 - Install switch retaining nut | Instruction
|
Published
|
07/31/2023 7:57 PM
|
| 7279 - 7249 - Return equipment to normal operating condition; Remark: | Procedure Step
|
Published
|
04/27/2023 4:13 PM
|
| 7249 - Return equipment to normal operating condition | Instruction
|
Published
|
04/08/2025 3:22 PM
|
| 8089 - 8088 - Reconnect upper left connector; Remark:8087 | Procedure Step
|
Published
|
07/31/2023 8:06 PM
|
| 8088 - Reconnect upper left connector | Instruction
|
Published
|
07/31/2023 8:01 PM
|
| 8087 - When the connector is reconnected, the AC LED should be lit.... | Remark
|
Published
|
07/31/2023 8:05 PM
|
| 7280 - 7250 - Power on RPM; Remark:7251 | Procedure Step
|
Published
|
04/27/2023 4:14 PM
|
| 7250 - Power on RPM | Instruction
|
Published
|
05/01/2023 8:31 AM
|
| 7251 - Move LD-260 switch to ON position. The LED PWR ON | Remark
|
Published
|
05/10/2023 3:14 PM
|
| 7281 - 7252 - Verify RPM start-up; Remark:7253 | Procedure Step
|
Published
|
04/20/2025 3:26 PM
|
| 7252 - Verify RPM start-up | Instruction
|
Published
|
04/27/2023 2:23 PM
|
| 7253 - RPM will perform a power on self-test (POST) and collect a background radiati... | Remark
|
Published
|
05/10/2023 3:14 PM
|
| 7282 - 7254 - Confirm network connection; Remark:7255 | Procedure Step
|
Published
|
04/27/2023 4:15 PM
|
| 7254 - Confirm network connection | Instruction
|
Published
|
04/27/2023 2:22 PM
|
| 7255 - Contact operators to confirm communications have been reestablished between RPM ... | Remark
|
Published
|
05/10/2023 3:15 PM
|
| 7283 - 7256 - Close and lock all RPM doors; Remark: | Procedure Step
|
Published
|
09/01/2023 11:45 PM
|
| 7256 - Close and lock all RPM doors | Instruction
|
Published
|
04/27/2023 2:21 PM
|
| 7842 - 7820 - Inform system operators upon completion of maintenance action; Remark: | Procedure Step
|
Published
|
07/07/2023 11:15 PM
|
| 7820 - Inform system operators upon completion of maintenance action | Instruction
|
Published
|
07/07/2023 10:02 PM
|
| 322 - 321 - Document maintenance actions; Remark: | Procedure Step
|
Published
|
06/17/2021 9:49 AM
|
| 321 - Document maintenance actions | Instruction
|
Published
|
04/21/2025 11:19 AM
|
| 2869 - 2585 - Document maintenance performed; Remark:2866 | Procedure Step
|
Published
|
06/18/2021 5:58 PM
|
| 2585 - Document maintenance performed | Instruction
|
Published
|
07/09/2021 12:15 PM
|
| 2866 - Record observations, times, and results for the maintenance report. | Remark
|
Published
|
04/21/2025 11:39 AM
|
| 4706 - 4705 - Submit report; Remark:4864 | Procedure Step
|
Published
|
06/29/2022 9:50 AM
|
| 4705 - Submit report | Instruction
|
Published
|
06/29/2022 9:50 AM
|
| 4864 - As specified by management or contractual obligations. | Remark
|
Published
|
07/28/2022 1:36 PM
|
| Corrective Maintenance Procedure | Document Type
|
Published
|
03/02/2020 3:32 PM
|
| 20 minutes | Duration
|
Published
|
05/18/2020 5:44 PM
|
| Upon failure of the fuse | Frequency
|
Published
|
11/17/2023 6:27 PM
|
| Warning | Annotation Type
|
Published
|
03/02/2020 3:25 PM
|
| Technician 2 | Skill Level
|
Published
|
04/09/2020 1:17 AM
|
| Keys to access RPM | Replacement Parts
|
Published
|
04/27/2023 6:56 PM
|
| Small Phillips (PH1) screwdriver | Tools
|
Published
|
05/14/2020 2:48 PM
|
| Medium Phillips (PH2) screwdriver | Tools
|
Published
|
04/24/2020 4:40 PM
|
| Orange/yellow safety vest | Replacement Parts
|
Published
|
04/27/2023 6:56 PM
|
| Safety shoes | Replacement Parts
|
Published
|
04/27/2023 6:56 PM
|
| safety glasses | Replacement Parts
|
Published
|
07/02/2023 4:48 PM
|
| Ladder; 2 meters, 6 feet tall; non-conducting if required | Replacement Parts
|
Published
|
07/02/2023 4:48 PM
|
| Orange traffic cones | Replacement Parts
|
Published
|
04/27/2023 6:56 PM
|
| Small crescent wrench | Tools
|
Published
|
07/31/2023 10:46 AM
|
| LD-260 Disconnect Switch Power Off | Image
|
Published
|
04/24/2023 12:49 PM
|
| Unplugged LD-260 | Image
|
Published
|
11/17/2023 6:50 PM
|
| LD-260 Switch Power Off | Image
|
Published
|
11/17/2023 6:49 PM
|
| LD-260 Nut | Image
|
Published
|
11/17/2023 7:06 PM
|
| Remove four cover plate screws | Image
|
Published
|
07/31/2023 7:46 PM
|
| LD-260 Cover Removed | Image
|
Published
|
11/17/2023 8:25 PM
|
| LD-260 Fuse | Image
|
Published
|
11/17/2023 7:10 PM
|
| LD-260 | Image
|
Published
|
07/31/2023 7:42 PM
|
| LD-260 Disconnect Switch Power On | Image
|
Published
|
05/04/2023 3:37 PM
|
Replace fuse in LD-260 load disconnect
Prior to arrival, notify operators concerning expected work, duration, and anticipated alarms and fault indications.
1402 - 7927 - Establish Initial Conditions; Remark:
7927 - Establish Initial Conditions
Establish Initial Conditions
7268 - 7231 - Close lane; Remark:7233
9053 - Warning : Traffic should temporarily be rerouted or halted during conduction of this pr...
Traffic should temporarily be rerouted or halted during conduction of this procedure to ensure maintenance provider safety and to prevent unscreened vehicles from passing.
7231 - Close lane
Close lane
7233 - Use orange safety (traffic control) cones to setup barriers. Practice establi...
Use orange safety (traffic control) cones to setup barriers. Practice established safety protocols.
7269 - 7232 - Open RPM door; Remark:7234
7232 - Open RPM door
Open RPM door
7234 - Open all doors needed to access components.
Open all doors needed to access components.
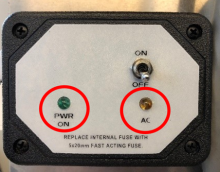
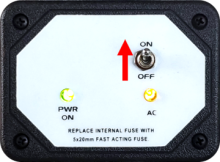
7270 - 7235 - Power off RPM; Remark:7236
7235 - Power off RPM
Power off RPM
7236 - Move LD-260 switch to OFF position. The PWR ON
Move LD-260 switch to OFF position. The PWR ON LED will turn off.

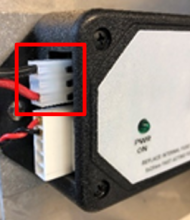
8070 - 8066 - Disconnect upper left connector; Remark:8065
8066 - Disconnect upper left connector
Disconnect upper left connector
8065 - The power input connector is a three-pin Molex. Both LEDs should be off when ...
The power input connector is a three-pin Molex. Both LEDs should be off when the power switch is OFF, and the upper left connector is disconnected.
8077 - 8076 - Uninstall Faulty Fuse; Remark:
8076 - Uninstall Faulty Fuse
Uninstall Faulty Fuse
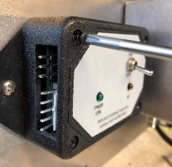
8075 - 8074 - Remove switch retaining nut; Remark:8073
8074 - Remove switch retaining nut
Remove switch retaining nut
8073 - A small box end or crescent wrench may be required to loosen the switch retai...
A small box end or crescent wrench may be required to loosen the switch retaining nut.

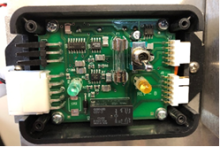
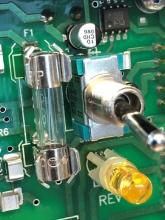
8086 - 8079 - Remove failed fuse; Remark:8078
8079 - Remove failed fuse
Remove failed fuse
8078 - Carefully pull or pry the failed fuse from holder.
Carefully pull or pry the failed fuse from holder.
3397 - 3395 - Label faulty component; Remark:3396
3395 - Label faulty component
Label faulty component
3396 - Use tag or tape. Include date of removal, description of failure symptoms, co...
Use tag or tape. Include date of removal, description of failure symptoms, country, site, and lane number. Dispose per Nuclear Smuggling Detection and Deterrence (NSDD) guidance or contractual requirements.
8097 - 8096 - Install New Fuse; Remark:
8096 - Install New Fuse
Install New Fuse
10323 - 10322 - Place the new fuse in the fuse holder.; Remark:
10322 - Place the new fuse in the fuse holder.
Place the new fuse in the fuse holder.
8098 - 8094 - Install cover plate; Remark:
8094 - Install cover plate
Install cover plate
8099 - 8093 - Install four screws; Remark:
8093 - Install four screws
Install four screws
8100 - 8092 - Install switch retaining nut; Remark:
8092 - Install switch retaining nut
Install switch retaining nut
7279 - 7249 - Return equipment to normal operating condition; Remark:
7249 - Return equipment to normal operating condition
Return equipment to normal operating condition
8089 - 8088 - Reconnect upper left connector; Remark:8087
8088 - Reconnect upper left connector
Reconnect upper left connector
8087 - When the connector is reconnected, the AC LED should be lit....
When the connector is reconnected, the AC LED should be lit.

7280 - 7250 - Power on RPM; Remark:7251
7250 - Power on RPM
Power on RPM
7251 - Move LD-260 switch to ON position. The LED PWR ON
Move LD-260 switch to ON position. The LED PWR ON will illuminate.
7281 - 7252 - Verify RPM start-up; Remark:7253
7252 - Verify RPM start-up
Verify RPM start-up
7253 - RPM will perform a power on self-test (POST) and collect a background radiati...
RPM will perform a power on self-test (POST) and collect a background radiation measurement.
7282 - 7254 - Confirm network connection; Remark:7255
7254 - Confirm network connection
Confirm network connection
7255 - Contact operators to confirm communications have been reestablished between RPM ...
7283 - 7256 - Close and lock all RPM doors; Remark:
7256 - Close and lock all RPM doors
Close and lock all RPM doors
7842 - 7820 - Inform system operators upon completion of maintenance action; Remark:
7820 - Inform system operators upon completion of maintenance action
Inform system operators upon completion of maintenance action
322 - 321 - Document maintenance actions; Remark:
321 - Document maintenance actions
Document maintenance actions
2869 - 2585 - Document maintenance performed; Remark:2866
2585 - Document maintenance performed
Document maintenance performed
2866 - Record observations, times, and results for the maintenance report.
Record observations, times, and results for the maintenance report.
4706 - 4705 - Submit report; Remark:4864
4705 - Submit report
Submit report
4864 - As specified by management or contractual obligations.
As specified by management or contractual obligations.