Last Updated: 06/17/2025 3:34 PM
The following table lists all the components that make up the document.
Replace SCA-775 Single Channel Analyzer (SCA) Module.
Coordinate site access with system operators
7264 - 1401 - Establish Initial Conditions; Remark:
1401 - Establish Initial Conditions
Establish Initial Conditions
7622 - 7592 - Inform system operators; Remark:11335
7592 - Inform system operators
Inform system operators
11335 - Upon arrival, brief system operators on expected work, duration, anticipated ...
Upon arrival, brief system operators on expected work, duration, anticipated alarms, and fault indications before starting work.
7452 - 7231 - Close lane; Remark:7415
7231 - Close lane
Close lane
7415 - Re-route pedestrian traffic.
Re-route pedestrian traffic.
7268 - 7231 - Close lane; Remark:7233
9053 - Warning : Traffic should temporarily be rerouted or halted during conduction of this pr...
Traffic should temporarily be rerouted or halted during conduction of this procedure to ensure maintenance provider safety and to prevent unscreened vehicles from passing.
7231 - Close lane
Close lane
7233 - Use orange safety (traffic control) cones to setup barriers. Practice establi...
Use orange safety (traffic control) cones to setup barriers. Practice established safety protocols.
7269 - 7232 - Open RPM door; Remark:7234
7232 - Open RPM door
Open RPM door
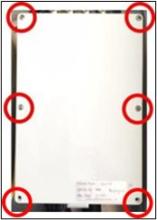
7234 - Open all doors needed to access components.
Open all doors needed to access components.
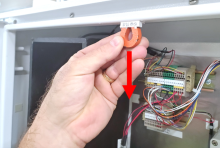
7755 - 7679 - Disconnect Ethernet; Remark:11336
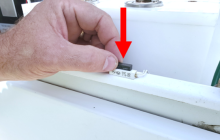
7680 - Caution : Make sure to press release button on back of Ethernet cable before removing.
Make sure to press release button on back of Ethernet cable before removing.
7679 - Disconnect Ethernet
Disconnect Ethernet
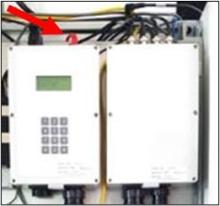
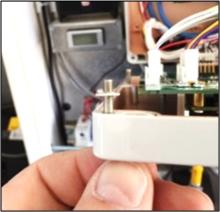
11336 - Locate Ethernet connector on top of SC-770 controller. Press release button o...
Locate Ethernet connector on top of SC-770 controller. Press release button on back of connector. Pull connector.
7270 - 7235 - Power off RPM; Remark:7236
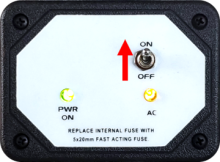
7235 - Power off RPM
Power off RPM
7236 - Move LD-260 switch to OFF position. The PWR ON
Move LD-260 switch to OFF position. The PWR ON LED will turn off.

7454 - 7290 - Disable tamper switches; Remark:7416
7290 - Disable tamper switches
Disable tamper switches
7416 - Use a magnet to disable tamper switches for all open doors. Use adhesive tape...
Use a magnet to disable tamper switches for all open doors. Use adhesive tape to disable older mechanical switches.
8561 - 7291 - Disable both infrared occupancy sensors; Remark:8514
5291 - Note : It is good practice to verify all cables and connectors are labeled prior to ...
It is good practice to verify all cables and connectors are labeled prior to disconnection.
7291 - Disable both infrared occupancy sensors
Disable both infrared occupancy sensors
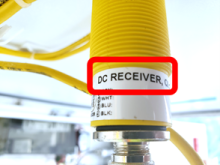
8514 - Verify sensors mounted in control pillar door are receivers.
Verify sensors mounted in control pillar door are receivers.

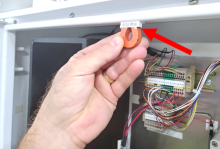
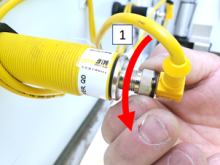
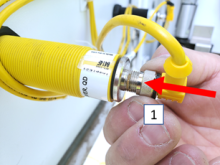
9205 - To disconnect sensor cable, turn collar counterclockwise and pull away from s...
To disconnect sensor cable, turn collar counterclockwise and pull away from sensor.
7850 - 7848 - Removal of SCA-775 Module; Remark:
7848 - Removal of SCA-775 Module
Removal of SCA-775 Module
7852 - 7849 - Disconnect two cables on bottom of SCA-775 module; Remark:7851
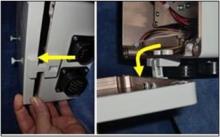
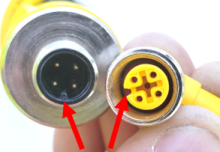
7849 - Disconnect two cables on bottom of SCA-775 module
Disconnect two cables on bottom of SCA-775 module
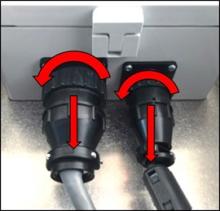
7851 - Connectors are disconnected by turning lock ring multiple times and then pull...
Connectors are disconnected by turning lock ring multiple times and then pulling straight down.
7855 - 7853 - Disconnect all BNC and miniature high voltage (MHV) cables on top of SCA-775 ...; Remark:7854
7792 - Note : It is good engineering practice to ensure all cables and connectors are label...
It is good engineering practice to ensure all cables and connectors are labeled before disconnecting them.
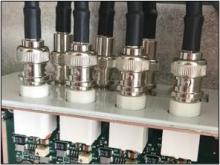
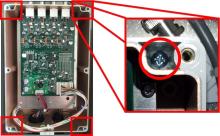
7853 - Disconnect all BNC and miniature high voltage (MHV) cables on top of SCA-775 ...
Disconnect all BNC and miniature high voltage (MHV) cables on top of SCA-775 module
7854 - BNC Connectors
7857 - 7856 - Loosen screws in each corner (4) using medium Phillips screwdriver, and open ...; Remark:7797
7795 - Caution : If you rotate cover of the SCA-775 down without first pulling out from the bo...
If you rotate cover of the SCA-775 down without first pulling out from the box, the hinge will break.
7856 - Loosen screws in each corner (4) using medium Phillips screwdriver, and open ...
Loosen screws in each corner (4) using medium Phillips screwdriver, and open SCA-775 controller module
7797 - Normally the cover screws are captured and should not come out of cover. ...
Normally the cover screws are captured and should not come out of cover.
9467 - To prevent breaking the hinge on the module / door, once the retainer screws ...
To prevent breaking the hinge on the module / door, once the retainer screws are loosened, take care to gently pull the bottom of the cover away from the module approximately ¼ʺ before letting the door open.
7861 - 7859 - Remove 4 mounting screws; Remark:7860
7858 - Note : Most replaceable bit type screwdrivers will be too large in diameter to fit i...
Most replaceable bit type screwdrivers will be too large in diameter to fit into the hole.
7859 - Remove 4 mounting screws
Remove 4 mounting screws
7860 - The screws to be removed are located in the bottom of the irregularly shaped ...
The screws to be removed are located in the bottom of the irregularly shaped hole next to the round hole. Insert the long shaft small Phillips screwdriver into each of the four corner pockets and loosen/remove screws.
7863 - 7862 - Remove SCA-775 module from back plate; Remark:
7862 - Remove SCA-775 module from back plate
Remove SCA-775 module from back plate
3397 - 3395 - Label faulty component; Remark:3396
3395 - Label faulty component
Label faulty component
3396 - Use tag or tape. Include date of removal, description of failure symptoms, co...
Use tag or tape. Include date of removal, description of failure symptoms, country, site, and lane number. Dispose per Nuclear Smuggling Detection and Deterrence (NSDD) guidance or contractual requirements.
7865 - 7864 - Install New SCA-775 Module; Remark:
7864 - Install New SCA-775 Module
Install New SCA-775 Module
7868 - 7866 - Reinstall all four corner screws to mount replacement module; Remark:7867
7866 - Reinstall all four corner screws to mount replacement module
Reinstall all four corner screws to mount replacement module
7867 - Install all screws loosely at first to facillitate easy mounting, then gently...
Install all screws loosely at first to facillitate easy mounting, then gently but firmly tighten all four screws.
7879 - 7878 - Reattach two connectors on bottom of SCA-775 module; Remark:7870
7878 - Reattach two connectors on bottom of SCA-775 module
Reattach two connectors on bottom of SCA-775 module
7870 - The cable connectors are different sizes and keyed so they cannot be reinstal...
The cable connectors are different sizes and keyed so they cannot be reinstalled incorrectly.
7874 - 7872 - Reconnect BNC and MHV cables on top of SCA-775 module; Remark:7873
7811 - Caution : Proper connection of cables is critical.
Proper connection of cables is critical.
7872 - Reconnect BNC and MHV cables on top of SCA-775 module
Reconnect BNC and MHV cables on top of SCA-775 module
7873 - Verify each cable is connected to the appropriate connector.
Verify each cable is connected to the appropriate connector.
7837 - 7814 - Close SCA-775 module cover and tighten 4 screws; Remark:7815
7814 - Close SCA-775 module cover and tighten 4 screws
Close SCA-775 module cover and tighten 4 screws
7815 - If the follow-on alignment and functional compliance test procedures are to b...
If the follow-on alignment and functional compliance test procedures are to be completed immediately, there is no need to close the SCA-775 module cover; if not, close the cover and tighten the screws.
7280 - 7250 - Power on RPM; Remark:7251
7250 - Power on RPM
Power on RPM
7251 - Move LD-260 switch to ON position. The LED PWR ON
Move LD-260 switch to ON position. The LED PWR ON will illuminate.
7281 - 7252 - Verify RPM start-up; Remark:7253
7252 - Verify RPM start-up
Verify RPM start-up
7253 - RPM will perform a power on self-test (POST) and collect a background radiati...
RPM will perform a power on self-test (POST) and collect a background radiation measurement.
7279 - 7249 - Return equipment to normal operating condition; Remark:
7249 - Return equipment to normal operating condition
Return equipment to normal operating condition
7280 - 7250 - Power on RPM; Remark:7251
7250 - Power on RPM
Power on RPM
7251 - Move LD-260 switch to ON position. The LED PWR ON
Move LD-260 switch to ON position. The LED PWR ON will illuminate.
7281 - 7252 - Verify RPM start-up; Remark:7253
7252 - Verify RPM start-up
Verify RPM start-up
7253 - RPM will perform a power on self-test (POST) and collect a background radiati...
RPM will perform a power on self-test (POST) and collect a background radiation measurement.
8587 - 7305 - Enable both infrared occupancy sensors; Remark:8559
5553 - Caution : Correct placement of connectors and wiring is critical to proper operation.
Correct placement of connectors and wiring is critical to proper operation.
7305 - Enable both infrared occupancy sensors
Enable both infrared occupancy sensors
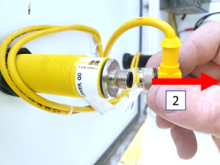
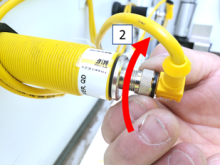
8559 - To reconnect sensor cable, align connectors, push towards sensor, and turn co...
To reconnect sensor cable, align connectors, push towards sensor, and turn collar clockwise.
7474 - 7310 - Enable tamper switches; Remark:7451
7310 - Enable tamper switches
Enable tamper switches
7451 - Remove magnets and/or adhesive tape from door tamper switches.
Remove magnets and/or adhesive tape from door tamper switches.

7781 - 7730 - Reconnect Ethernet; Remark:7731
7730 - Reconnect Ethernet
Reconnect Ethernet
7731 - Insert Ethernet connector at top of SC-770 module. Connector will audibly "cl...
Insert Ethernet connector at top of SC-770 module. Connector will audibly "click" when seated properly.
7282 - 7254 - Confirm network connection; Remark:7255
7254 - Confirm network connection
Confirm network connection
7255 - Contact operators to confirm communications have been reestablished between RPM ...
9385 - 319 - Perform operational test; Remark:9347
319 - Perform operational test
Perform operational test
9347 - DET-RPM-RAP-RM03 RPM Operational Test.
DET-RPM-RAP-RM03 RPM Operational Test.
7283 - 7256 - Close and lock all RPM doors; Remark:
7256 - Close and lock all RPM doors
Close and lock all RPM doors
8260 - 8250 - Reopen Lane; Remark:8249
8250 - Reopen Lane
Reopen Lane
8249 - Remove orange safety (traffic control) cones
Remove orange safety (traffic control) cones
7842 - 7820 - Inform system operators upon completion of maintenance action; Remark:
7820 - Inform system operators upon completion of maintenance action
Inform system operators upon completion of maintenance action
322 - 321 - Document maintenance actions; Remark:
321 - Document maintenance actions
Document maintenance actions
2869 - 2585 - Document maintenance performed; Remark:2866
2585 - Document maintenance performed
Document maintenance performed
2866 - Record observations, times, and results for the maintenance report.
Record observations, times, and results for the maintenance report.
4706 - 4705 - Submit report; Remark:4864
4705 - Submit report
Submit report
4864 - As specified by management or contractual obligations.
As specified by management or contractual obligations.