Last Updated: 06/18/2025 1:43 AM
The following table lists all the components that make up the document.
Replace PMFX Box.
Prior to arrival, notify operators concerning expected work, duration, and anticipated alarms and fault indications.
7264 - 1401 - Establish Initial Conditions; Remark:
1401 - Establish Initial Conditions
Establish Initial Conditions
7622 - 7592 - Inform system operators; Remark:11335
7592 - Inform system operators
Inform system operators
11335 - Upon arrival, brief system operators on expected work, duration, anticipated ...
Upon arrival, brief system operators on expected work, duration, anticipated alarms, and fault indications before starting work.
7268 - 7231 - Close lane; Remark:7233
9053 - Warning : Traffic should temporarily be rerouted or halted during conduction of this pr...
Traffic should temporarily be rerouted or halted during conduction of this procedure to ensure maintenance provider safety and to prevent unscreened vehicles from passing.
7231 - Close lane
Close lane
7233 - Use orange safety (traffic control) cones to setup barriers. Practice establi...
Use orange safety (traffic control) cones to setup barriers. Practice established safety protocols.
7269 - 7232 - Open RPM door; Remark:7234
7232 - Open RPM door
Open RPM door
7234 - Open all doors needed to access components.
Open all doors needed to access components.
7755 - 7679 - Disconnect Ethernet; Remark:11336
7680 - Caution : Make sure to press release button on back of Ethernet cable before removing.
Make sure to press release button on back of Ethernet cable before removing.
7679 - Disconnect Ethernet
Disconnect Ethernet
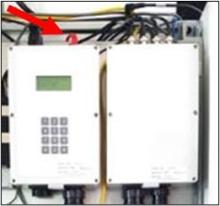
11336 - Locate Ethernet connector on top of SC-770 controller. Press release button o...
Locate Ethernet connector on top of SC-770 controller. Press release button on back of connector. Pull connector.
7270 - 7235 - Power off RPM; Remark:7236
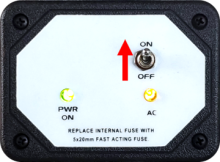
7235 - Power off RPM
Power off RPM
7236 - Move LD-260 switch to OFF position. The PWR ON
Move LD-260 switch to OFF position. The PWR ON LED will turn off.

7454 - 7290 - Disable tamper switches; Remark:7416
7290 - Disable tamper switches
Disable tamper switches
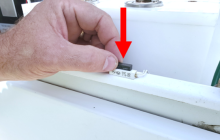
7416 - Use a magnet to disable tamper switches for all open doors. Use adhesive tape...
Use a magnet to disable tamper switches for all open doors. Use adhesive tape to disable older mechanical switches.
8561 - 7291 - Disable both infrared occupancy sensors; Remark:8514
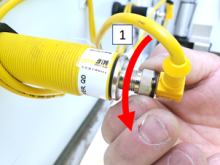
5291 - Note : It is good practice to verify all cables and connectors are labeled prior to ...
It is good practice to verify all cables and connectors are labeled prior to disconnection.
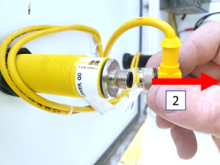
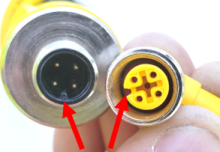
7291 - Disable both infrared occupancy sensors
Disable both infrared occupancy sensors
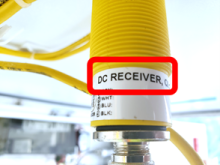
8514 - Verify sensors mounted in control pillar door are receivers.
Verify sensors mounted in control pillar door are receivers.

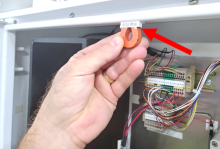
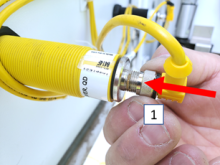
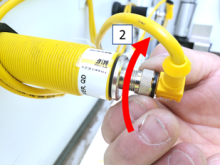
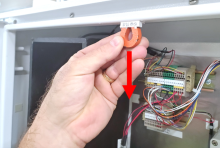
9205 - To disconnect sensor cable, turn collar counterclockwise and pull away from s...
To disconnect sensor cable, turn collar counterclockwise and pull away from sensor.
9265 - 9223 - Remove PMFX Box; Remark:
9223 - Remove PMFX Box
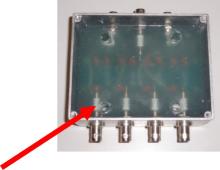
9262 - 9224 - Disconnect all signal (BNC) and miniature high voltage (MHV) cables from PMFX...; Remark:
7792 - Note : It is good engineering practice to ensure all cables and connectors are label...
It is good engineering practice to ensure all cables and connectors are labeled before disconnecting them.
9224 - Disconnect all signal (BNC) and miniature high voltage (MHV) cables from PMFX...
Disconnect all signal (BNC) and miniature high voltage (MHV) cables from PMFX box

9264 - 445 - Remove four (4) mounting screws; Remark:9232
445 - Remove four (4) mounting screws
Remove four (4) mounting screws
9232 - Non-potted version

9233 - Potted version
Potted version
9234 - Access holes for retaining screws.
Access holes for retaining screws.
3397 - 3395 - Обозначьте неисправный компонент.; Remark:3396
3395 - Обозначьте неисправный компонент.
Обозначьте неисправный компонент.
3396 - Используйте клейкую ленту или поместите метку. Включите дату извлечения, описани...
Используйте клейкую ленту или поместите метку. Включите дату извлечения, описание признаков неисправности, страну, объект и номер полосы. Утилизируйте в соответствии с инструкциями или контрактными требованиями Программы по обнаружению и предотвращению контрабанды ядерных материалов (NSDD).
9261 - 9225 - Install New PMFX Box; Remark:
9225 - Install New PMFX Box
9257 - 9226 - Mount PMFX with four screws; Remark:7807
9226 - Mount PMFX with four screws
7807 - Use screws previously removed.
Use screws previously removed.
9258 - 9227 - Reinstall four (4) cover screws; Remark:7807
9227 - Reinstall four (4) cover screws
Reinstall four (4) cover screws
7807 - Use screws previously removed.
Use screws previously removed.
9259 - 9228 - Reconnect BNC and MHV connectors to PMFX box; Remark:
9228 - Reconnect BNC and MHV connectors to PMFX box
Reconnect BNC and MHV connectors to PMFX box
7279 - 7249 - Return equipment to normal operating condition; Remark:
7249 - Return equipment to normal operating condition
Return equipment to normal operating condition
7280 - 7250 - Power on RPM; Remark:7251
7250 - Power on RPM
Power on RPM
7251 - Move LD-260 switch to ON position. The LED PWR ON
Move LD-260 switch to ON position. The LED PWR ON will illuminate.
7281 - 7252 - Verify RPM start-up; Remark:7253
7252 - Verify RPM start-up
Verify RPM start-up
7253 - RPM will perform a power on self-test (POST) and collect a background radiati...
RPM will perform a power on self-test (POST) and collect a background radiation measurement.
8587 - 7305 - Enable both infrared occupancy sensors; Remark:8559
5553 - Caution : Correct placement of connectors and wiring is critical to proper operation.
Correct placement of connectors and wiring is critical to proper operation.
7305 - Enable both infrared occupancy sensors
Enable both infrared occupancy sensors
8559 - To reconnect sensor cable, align connectors, push towards sensor, and turn co...
To reconnect sensor cable, align connectors, push towards sensor, and turn collar clockwise.
7474 - 7310 - Enable tamper switches; Remark:7451
7310 - Enable tamper switches
Enable tamper switches
7451 - Remove magnets and/or adhesive tape from door tamper switches.
Remove magnets and/or adhesive tape from door tamper switches.

9254 - 9229 - Verify neutron counts; Remark:9231
9229 - Verify neutron counts
Verify neutron counts
9231 - Neutron counts can be verified by placing Cf-252 source near front of neutron...
Neutron counts can be verified by placing Cf-252 source near front of neutron detector and observing the SHOW COUNTS or by observing the SHOW COUNTS until there is a value other than “0.”
To access neutron SHOW COUNTS:
Enter Program Mode by pressing “0.”
Enter the password 1234 and press “#” (enter); press:
2: NEUTRON
2: FUNCTIONS
1: SHOW COUNTS
7781 - 7730 - Reconnect Ethernet; Remark:7731
7730 - Reconnect Ethernet
Reconnect Ethernet
7731 - Insert Ethernet connector at top of SC-770 module. Connector will audibly "cl...
Insert Ethernet connector at top of SC-770 module. Connector will audibly "click" when seated properly.
7282 - 7254 - Confirm network connection; Remark:7255
7254 - Confirm network connection
Confirm network connection
7255 - Contact operators to confirm communications have been reestablished between RPM ...
9385 - 319 - Perform operational test; Remark:9347
319 - Perform operational test
Perform operational test
9347 - DET-RPM-RAP-RM03 RPM Operational Test.
DET-RPM-RAP-RM03 RPM Operational Test.
7283 - 7256 - Close and lock all RPM doors; Remark:
7256 - Close and lock all RPM doors
Close and lock all RPM doors
8260 - 8250 - Reopen Lane; Remark:8249
8250 - Reopen Lane
Reopen Lane
8249 - Remove orange safety (traffic control) cones
Remove orange safety (traffic control) cones
7842 - 7820 - Inform system operators upon completion of maintenance action; Remark:
7820 - Inform system operators upon completion of maintenance action
Inform system operators upon completion of maintenance action
322 - 321 - Задокументируйте действия по техническому обслуживанию; Remark:
321 - Задокументируйте действия по техническому обслуживанию
Задокументируйте действия по техническому обслуживанию
2869 - 2585 - Документируйте выполненное техническое обслуживание; Remark:2866
2585 - Документируйте выполненное техническое обслуживание
Документируйте выполненное техническое обслуживание
2866 - Зафиксируйте наблюдения и результаты для отчета о корректирующем техобслуживании...
Зафиксируйте наблюдения и результаты для отчета о корректирующем техобслуживании.
4706 - 4705 - Submit report; Remark:4864
4705 - Submit report
Submit report
4864 - As specified by management or contractual obligations.
As specified by management or contractual obligations.