Last Updated: 06/18/2025 1:42 AM
The following table lists all the components that make up the document.
Replace the ethernet-to-fiber media converter (GarrettCom Magnum CS14P) on the radiation portal monitor (RPM).
Prior to arrival, notify operators concerning expected work, duration, and anticipated alarms and fault indications.
7264 - 1401 - Establish Initial Conditions; Remark:
1401 - Establish Initial Conditions
Establish Initial Conditions
7622 - 7592 - Inform system operators; Remark:11335
7592 - Inform system operators
Inform system operators
11335 - Upon arrival, brief system operators on expected work, duration, anticipated ...
Upon arrival, brief system operators on expected work, duration, anticipated alarms, and fault indications before starting work.
7268 - 7231 - Close lane; Remark:7233
9053 - Warning : Traffic should temporarily be rerouted or halted during conduction of this pr...
Traffic should temporarily be rerouted or halted during conduction of this procedure to ensure maintenance provider safety and to prevent unscreened vehicles from passing.
7231 - Close lane
Close lane
7233 - Use orange safety (traffic control) cones to setup barriers. Practice establi...
Use orange safety (traffic control) cones to setup barriers. Practice established safety protocols.
7269 - 7232 - Open RPM door; Remark:7234
7232 - Open RPM door
Open RPM door
7234 - Open all doors needed to access components.
Open all doors needed to access components.
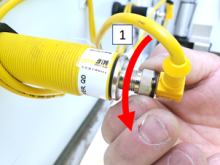
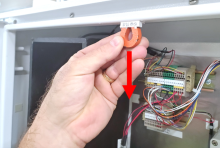
7755 - 7679 - Disconnect Ethernet; Remark:11336
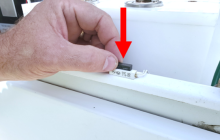
7680 - Caution : Make sure to press release button on back of Ethernet cable before removing.
Make sure to press release button on back of Ethernet cable before removing.
7679 - Disconnect Ethernet
Disconnect Ethernet
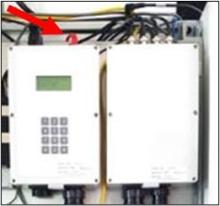
11336 - Locate Ethernet connector on top of SC-770 controller. Press release button o...
Locate Ethernet connector on top of SC-770 controller. Press release button on back of connector. Pull connector.
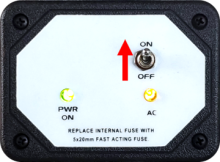
7270 - 7235 - Power off RPM; Remark:7236
7235 - Power off RPM
Power off RPM
7236 - Move LD-260 switch to OFF position. The PWR ON
Move LD-260 switch to OFF position. The PWR ON LED will turn off.

7454 - 7290 - Disable tamper switches; Remark:7416
7290 - Disable tamper switches
Disable tamper switches
7416 - Use a magnet to disable tamper switches for all open doors. Use adhesive tape...
Use a magnet to disable tamper switches for all open doors. Use adhesive tape to disable older mechanical switches.
8561 - 7291 - Disable both infrared occupancy sensors; Remark:8514
5291 - Note : It is good practice to verify all cables and connectors are labeled prior to ...
It is good practice to verify all cables and connectors are labeled prior to disconnection.
7291 - Disable both infrared occupancy sensors
Disable both infrared occupancy sensors
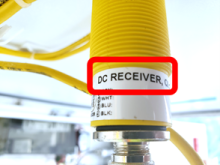
8514 - Verify sensors mounted in control pillar door are receivers.
Verify sensors mounted in control pillar door are receivers.

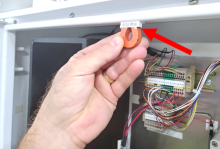
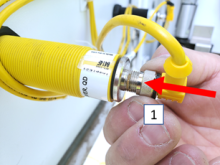
9205 - To disconnect sensor cable, turn collar counterclockwise and pull away from s...
To disconnect sensor cable, turn collar counterclockwise and pull away from sensor.
7375 - 7356 - Uninstall Faulty Media Converter; Remark:
7356 - Uninstall Faulty Media Converter
Uninstall Faulty Media Converter
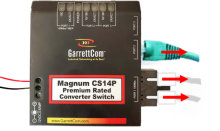
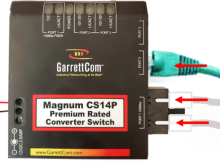
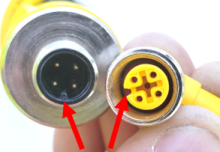
7376 - 7357 - Disconnect Ethernet and optical cables; Remark:7358
5291 - Note : It is good practice to verify all cables and connectors are labeled prior to ...
It is good practice to verify all cables and connectors are labeled prior to disconnection.
7357 - Disconnect Ethernet and optical cables
7358 - Magnum CS14P Premium Rated Converter Switch
Magnum CS14P Premium Rated Converter Switch
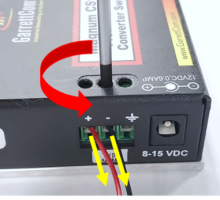
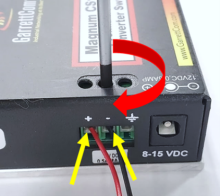
7377 - 7295 - Disconnect power wires; Remark:7359
7295 - Disconnect power wires
Disconnect power wires
7359 - Use a small precision screwdriver to loosen the screw
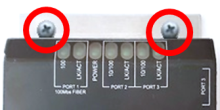
7378 - 5405 - Remove two (2) mounting screws; Remark:7360
5405 - Remove two (2) mounting screws
Remove two (2) mounting screws
7360 - Use medium Phillips head (PH2) screwdriver. Retain screws.

7379 - 7361 - Remove faulty media converter; Remark:
7361 - Remove faulty media converter
3397 - 3395 - وضع علامة على المكون المعطّل; Remark:3396
3395 - وضع علامة على المكون المعطّل
وضع علامة على المكون المعطّل
3396 - استخدم ملصق او شريط. اكتب تاريخ الإزالة، ووصف أعراض العطل، والدولة والموقع ورقم ...
استخدم ملصق او شريط. اكتب تاريخ الإزالة، ووصف أعراض العطل، والدولة والموقع ورقم المسرب. تخلص من القطع حسب توجيهات هيئة الكشف عن تهريب المواد النووية وردعه (NSDD) أو المتطلبات التعاقدية.
7381 - 7362 - Install New Ethernet-to-Fiber Media Converter; Remark:
7362 - Install New Ethernet-to-Fiber Media Converter
Install New Ethernet-to-Fiber Media Converter
7382 - 7363 - Mount new media converter with two (2) screws; Remark:7396
7363 - Mount new media converter with two (2) screws
7396 - Use retained screws. Use medium Phillips (PH2) screwdriver.
Use retained screws. Use medium Phillips (PH2) screwdriver.
7383 - 7301 - Reconnect power wires; Remark:7364
462 - Caution : Correct placement of connectors and wiring is critical to proper operation.
Correct placement of connectors and wiring is critical to proper operation.
7301 - Reconnect power wires
Reconnect power wires
7364 - Insert power wires and use a small precision screwdriver to tighten the screw.
7384 - 7365 - Reconnect Ethernet and fiber cables; Remark:7366
462 - Caution : Correct placement of connectors and wiring is critical to proper operation.
Correct placement of connectors and wiring is critical to proper operation.
7365 - Reconnect Ethernet and fiber cables
7279 - 7249 - Return equipment to normal operating condition; Remark:
7249 - Return equipment to normal operating condition
Return equipment to normal operating condition
7280 - 7250 - Power on RPM; Remark:7251
7250 - Power on RPM
Power on RPM
7251 - Move LD-260 switch to ON position. The LED PWR ON
Move LD-260 switch to ON position. The LED PWR ON will illuminate.
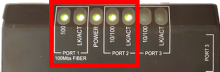
7387 - 7368 - Verify power and connectivity; Remark:7369
7368 - Verify power and connectivity
7369 - POWER and communications LEDs will be constantly on or blinking.
7281 - 7252 - Verify RPM start-up; Remark:7253
7252 - Verify RPM start-up
Verify RPM start-up
7253 - RPM will perform a power on self-test (POST) and collect a background radiati...
RPM will perform a power on self-test (POST) and collect a background radiation measurement.
8587 - 7305 - Enable both infrared occupancy sensors; Remark:8559
5553 - Caution : Correct placement of connectors and wiring is critical to proper operation.
Correct placement of connectors and wiring is critical to proper operation.
7305 - Enable both infrared occupancy sensors
Enable both infrared occupancy sensors
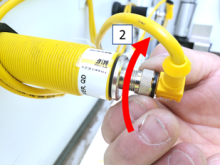
8559 - To reconnect sensor cable, align connectors, push towards sensor, and turn co...
To reconnect sensor cable, align connectors, push towards sensor, and turn collar clockwise.
7474 - 7310 - Enable tamper switches; Remark:7451
7310 - Enable tamper switches
Enable tamper switches
7451 - Remove magnets and/or adhesive tape from door tamper switches.
Remove magnets and/or adhesive tape from door tamper switches.

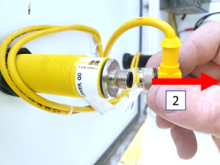
7781 - 7730 - Reconnect Ethernet; Remark:7731
7730 - Reconnect Ethernet
Reconnect Ethernet
7731 - Insert Ethernet connector at top of SC-770 module. Connector will audibly "cl...
Insert Ethernet connector at top of SC-770 module. Connector will audibly "click" when seated properly.
7282 - 7254 - Confirm network connection; Remark:7255
7254 - Confirm network connection
Confirm network connection
7255 - Contact operators to confirm communications have been reestablished between RPM ...
9385 - 319 - Perform operational test; Remark:9347
319 - Perform operational test
Perform operational test
9347 - DET-RPM-RAP-RM03 RPM Operational Test.
DET-RPM-RAP-RM03 RPM Operational Test.
7283 - 7256 - Close and lock all RPM doors; Remark:
7256 - Close and lock all RPM doors
Close and lock all RPM doors
8260 - 8250 - Reopen Lane; Remark:8249
8250 - Reopen Lane
Reopen Lane
8249 - Remove orange safety (traffic control) cones
Remove orange safety (traffic control) cones
7842 - 7820 - Inform system operators upon completion of maintenance action; Remark:
7820 - Inform system operators upon completion of maintenance action
Inform system operators upon completion of maintenance action
322 - 321 - توثيق إجراءات الصيانة; Remark:
321 - توثيق إجراءات الصيانة
توثيق إجراءات الصيانة
2869 - 2585 - توثيق الصيانة المنفذة; Remark:2866
2585 - توثيق الصيانة المنفذة
توثيق الصيانة المنفذة
2866 - سجل الملاحظات والأوقات والنتائج لتقرير الصيانة التصحيحية.
سجل الملاحظات والأوقات والنتائج لتقرير الصيانة التصحيحية.
4706 - 4705 - إرسال تقرير; Remark:4864
4705 - إرسال تقرير
إرسال تقرير
4864 - كما هو محدد من قبل الإدارة او حسب الالتزامات التعاقدية
كما هو محدد من قبل الإدارة او حسب الالتزامات التعاقدية