Last Updated: 04/24/2025 1:34 AM
The following table lists all the components that make up the document.
Controllare tutti i collegamenti e riposizionare le schede sul PRM-470 CG.
Prima dell'arrivo, comunicare agli addetti le attività da eseguire e la durata prevista
247 - 214 - Predisporre lo strumento per il funzionamento; Remark:
257 - Preparare lo strumento
Preparare lo strumento
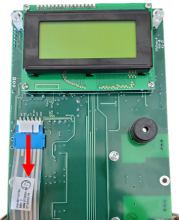
607 - 205 - Scollegare il caricatore; Remark:
205 - Scollegare il caricatore
Scollegare il caricatore
260 - 313 - Spegnere lo strumento; Remark:
313 - Spegnere lo strumento
Spegnere lo strumento
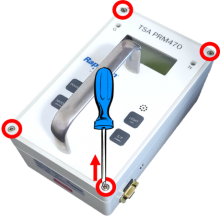
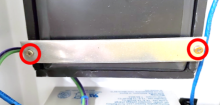
275 - 65 - Allentare le quattro (4) viti sul coperchio; Remark:264
65 - Allentare le quattro (4) viti sul coperchio
Allentare le quattro (4) viti sul coperchio
264 - Utilizzare un cacciavite a croce medio (PH2). Non è necessario rimuovere complet...
Utilizzare un cacciavite a croce medio (PH2). Non è necessario rimuovere completamente le viti.
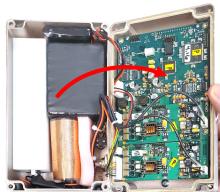
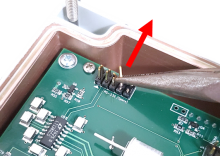
263 - 262 - Rimuovere il coperchio dallo strumento; Remark:413
2771-Nota : All'interno dello strumento sono presenti schede a circuiti di rilevamento ad al...
All'interno dello strumento sono presenti schede a circuiti di rilevamento ad alta tensione; tuttavia, queste trasportano una corrente estremamente ridotta che non pone rischi per la salute.
262 - Rimuovere il coperchio dallo strumento
Rimuovere il coperchio dallo strumento
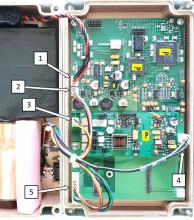
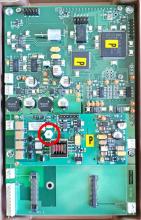
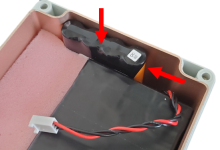
267 - 266 - Individuare i collegamenti della batteria; Remark:272
3033-Nota : I modelli PRM-470 CGN hanno una scheda e dei connettori aggiuntivi non raffigura...
I modelli PRM-470 CGN hanno una scheda e dei connettori aggiuntivi non raffigurati nelle immagini delle note.
266 - Individuare i collegamenti della batteria
Individuare i collegamenti della batteria
272 - Il collegamento della batteria è etichettato 1.
Il collegamento della batteria è etichettato 1.
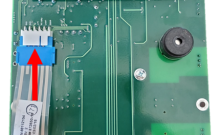
271 - 270 - Scollegare la batteria; Remark:414
1345-Nota : È buona norma assicurarsi che tutti i cavi e i connettori siano contrassegnati p...
È buona norma assicurarsi che tutti i cavi e i connettori siano contrassegnati prima di scollegarli.
270 - Scollegare la batteria
Scollegare la batteria

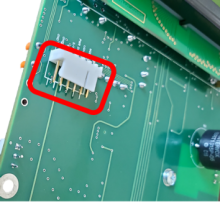
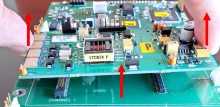
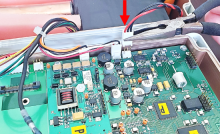
443 - 442 - Scollegare gli altri connettori; Remark:
442 - Scollegare gli altri connettori
Scollegare gli altri connettori
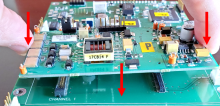
446 - 445 - Rimuovere le quattro (4) viti di fissaggio; Remark:444
445 - Rimuovere le quattro (4) viti di fissaggio
Rimuovere le quattro (4) viti di fissaggio
444 - Utilizzi un cacciavite a croce piccolo (PH1). Tenere da parte le viti.
Utilizzi un cacciavite a croce piccolo (PH1). Tenere da parte le viti.
450 - 449 - Sollevare il bordo della scheda PRCB-472 per accedere alla parte sottostante; Remark:448
447-Attenzione : Non danneggiare il cavo a nastro collegato al lato inferiore del PRCB-472.
Non danneggiare il cavo a nastro collegato al lato inferiore del PRCB-472.
449 - Sollevare il bordo della scheda PRCB-472 per accedere alla parte sottostante
Sollevare il bordo della scheda PRCB-472 per accedere alla parte sottostante
453 - 452 - Scollegare il connettore del pulsante di overlay; Remark:451
452 - Scollegare il connettore del pulsante di overlay
Scollegare il connettore del pulsante di overlay
455 - 454 - Pulire il connettore di overlay; Remark:
454 - Pulire il connettore di overlay
Pulire il connettore di overlay
458 - 456 - Pulire i contatti; Remark:457
456 - Pulire i contatti
Pulire i contatti
457 - Utilizzare un detergente per contatti elettrici o alcool.
Utilizzare un detergente per contatti elettrici o alcool.
461 - 459 - Collegare e scollare il connettore del pulsante di overlay; Remark:460
459 - Collegare e scollare il connettore del pulsante di overlay
Collegare e scollare il connettore del pulsante di overlay
460 - Ripetere l'operazione più volte per rimuovere l'ossidazione.
Ripetere l'operazione più volte per rimuovere l'ossidazione.

465 - 463 - Ricollegare il connettore del pulsante di overlay; Remark:464
462-Attenzione : Il corretto posizionamento dei connettori è fondamentale per il corretto funzion...
Il corretto posizionamento dei connettori è fondamentale per il corretto funzionamento.
463 - Ricollegare il connettore del pulsante di overlay
Ricollegare il connettore del pulsante di overlay
467 - 466 - Rimontare la scheda PRCB-472; Remark:
466 - Rimontare la scheda PRCB-472
Rimontare la scheda PRCB-472
470 - 468 - Posizionare la scheda PRCB-472 sui supporti di fissaggio; Remark:469
468 - Posizionare la scheda PRCB-472 sui supporti di fissaggio
Posizionare la scheda PRCB-472 sui supporti di fissaggio
469 - Posizionare il cavo a nastro per evitare di ostruire il foro di montaggio del PR...
Posizionare il cavo a nastro per evitare di ostruire il foro di montaggio del PRCB-472.
473 - 471 - Riposizionare le quattro (4) viti di fissaggio; Remark:472
471 - Riposizionare le quattro (4) viti di fissaggio
Riposizionare le quattro (4) viti di fissaggio
472 - Utilizzare un piccolo cacciavite a croce (PH1).
Utilizzare un piccolo cacciavite a croce (PH1).

3394 - 474 - Riposizionare la scheda gamma GHA-472; Remark:
474 - Riposizionare la scheda gamma GHA-472
Riposizionare la scheda gamma GHA-472
478 - 476 - Rimuovere il dado di fissaggio; Remark:477
476 - Rimuovere il dado di fissaggio
Rimuovere il dado di fissaggio
477 - PRM-470 - Removing GHA-472 mounting nut
481 - 479 - Rimuovere la scheda GHA-472; Remark:480
479 - Rimuovere la scheda GHA-472
Rimuovere la scheda GHA-472
480 - Sollevare delicatamente la scheda GHA-472 dalla scheda PRCB-472.
Sollevare delicatamente la scheda GHA-472 dalla scheda PRCB-472.
484 - 482 - Sostituire la scheda GHA-472; Remark:483
482 - Sostituire la scheda GHA-472
Sostituire la scheda GHA-472
483 - Verificare che i connettori siano allineati correttamente, quindi premere verso ...
Verificare che i connettori siano allineati correttamente, quindi premere verso il basso.

490 - 488 - Rimontare il dado di fissaggio della scheda GHA-472; Remark:489
504-Attenzione : Non serrare eccessivamente il dado di fissaggio.
Non serrare eccessivamente il dado di fissaggio.
488 - Rimontare il dado di fissaggio della scheda GHA-472
Rimontare il dado di fissaggio della scheda GHA-472
3046 - 3044 - Riposizionare la scheda neutroni GHA-472 (solo per il modello CGN); Remark:3045
3044 - Riposizionare la scheda neutroni GHA-472 (solo per il modello CGN)
Riposizionare la scheda neutroni GHA-472 (solo per il modello CGN)
3045 - Ripetere la procedura di riposizionamento della scheda GHA-472.
Ripetere la procedura di riposizionamento della scheda GHA-472.
492 - 491 - Controlli supplementari; Remark:
491 - Controlli supplementari
Controlli supplementari
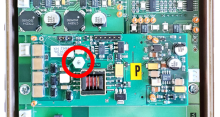
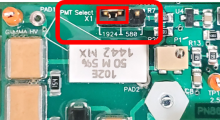
495 - 493 - Verificare la posizione del ponticello PMT Select X1; Remark:494
493 - Verificare la posizione del ponticello PMT Select X1
Verificare la posizione del ponticello PMT Select X1
494 - Il ponticello si trova sulla scheda GHA-472. Di solito è collegato al contatto 1...
Il ponticello si trova sulla scheda GHA-472. Di solito è collegato al contatto 1924. Documentare la posizione del ponticello per finalità di diagnosi.
299 - 298 - Individuare RS-232 (ricambio); Remark:287
298 - Individuare RS-232 (ricambio)
Individuare RS-232 (ricambio)
287 - I pin di riserva RS-232 si trovano sulla scheda di circuito principale (PRCB-472...
I pin di riserva RS-232 si trovano sulla scheda di circuito principale (PRCB-472).


297 - 296 - Rimuovere i pin di RS-232; Remark:288
296 - Rimuovere i pin di RS-232
Rimuovere i pin di RS-232
288 - Utilizzare le pinze per piegare i pin avanti e indietro fino a romperli. Elimina...
Utilizzare le pinze per piegare i pin avanti e indietro fino a romperli. Eliminare i pin. Questo eviterà di danneggiare il gruppo batteria.
497 - 496 - Verificare la posizione della batteria; Remark:274
496 - Verificare la posizione della batteria
Verificare la posizione della batteria
274 - Per ridurre al minimo i danni al cablaggio, inserire il gruppo batteria con il l...
Per ridurre al minimo i danni al cablaggio, inserire il gruppo batteria con il lato del cablaggio rivolto verso il basso. Spingere la batteria il più possibile verso sinistra.
303 - 302 - Riassemblare lo strumento; Remark:
302 - Riassemblare lo strumento
Riassemblare lo strumento
500 - 498 - Ricollegare tutti i connettori, eccetto la batteria; Remark:499
498 - Ricollegare tutti i connettori, eccetto la batteria
Ricollegare tutti i connettori, eccetto la batteria
499 - Non collegare la posizione 1.
Non collegare la posizione 1.

503 - 305 - Ricollegare la batteria; Remark:502
305 - Ricollegare la batteria
Ricollegare la batteria
308 - 307 - Riposizionare il coperchio anteriore; Remark:
304-Attenzione : Assicurarsi che tutto il cablaggio sia all'interno dello strumento mentre si sos...
Assicurarsi che tutto il cablaggio sia all'interno dello strumento mentre si sostituisce il coperchio.
307 - Riposizionare il coperchio anteriore
Riposizionare il coperchio anteriore
310 - 309 - Serrare le quattro (4) viti del coperchio; Remark:417
569-Attenzione : Non serrare eccessivamente le viti.
Non serrare eccessivamente le viti.
309 - Serrare le quattro (4) viti del coperchio
Serrare le quattro (4) viti del coperchio
417 - Utilizzi un cacciavite a croce medio (PH2).
Utilizzi un cacciavite a croce medio (PH2).

312 - 311 - Verificare che lo strumento sia correttamente in carica; Remark:
311 - Verificare che lo strumento sia correttamente in carica
Verificare che lo strumento sia correttamente in carica
260 - 313 - Spegnere lo strumento; Remark:
313 - Spegnere lo strumento
Spegnere lo strumento
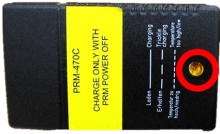
316 - 315 - Collegare il caricatore; Remark:289
315 - Collegare il caricatore
Collegare il caricatore
289 - Colleghi il caricatore allo strumento e alla presa di corrente CA (alternata)
Colleghi il caricatore allo strumento e alla presa di corrente CA (alternata)
318 - 317 - Osservare lo stato della carica; Remark:290
317 - Osservare lo stato della carica
Osservare lo stato della carica
290 - Questo caricatore ha una spia gialla lampeggiante quando è in carica.
Questo caricatore ha una spia gialla lampeggiante quando è in carica.
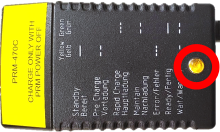
291 - Questo caricatore ha una spia fissa quando è in carica.
Questo caricatore ha una spia fissa quando è in carica.
253 - 242 - Documentare e riferire eventuali problemi irrisolti; Remark:
242 - Documentare e riferire eventuali problemi irrisolti
Documentare e riferire eventuali problemi irrisolti