Last Updated: 04/24/2025 1:42 AM
The following table lists all the components that make up the document.
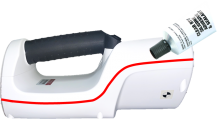
Replacement of the stabilization module in the VeriFinder SN-20 or SN-23. This procedure should only be performed by experienced technicians who are also familiar with disposal of radioactive sources.
Det-HHD-SYM-VER-RM01 VeriFinder Operational Test
Notify operators concerning expected work and duration prior to arrival.
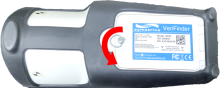
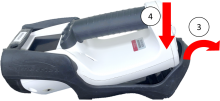
5710 - 5270 - Remove battery; Remark:
5270 - Remove battery
Remove battery
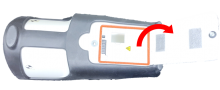
6191 - 6190 - Unclasp and open battery compartment; Remark:6195
6190 - Unclasp and open battery compartment
Unclasp and open battery compartment
6193 - 6188 - Close and reclasp battery compartment.; Remark:6194
6188 - Close and reclasp battery compartment.
Close and reclasp battery compartment.
6074 - 6073 - Disassemble VeriFinder; Remark:
6073 - Disassemble VeriFinder
Disassemble VeriFinder
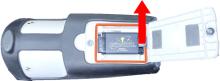
6172 - 6171 - Remove rubber boot; Remark:6170
6171 - Remove rubber boot
Remove rubber boot
6170 - Separate boot edges from top sides of VeriFinder. Pull back on rear of boot a...
Separate boot edges from top sides of VeriFinder. Pull back on rear of boot and lift VeriFinder out via handle.

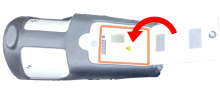
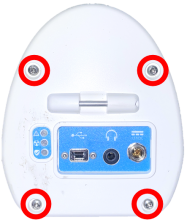
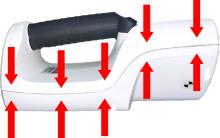
6173 - 6169 - Remove four (4) rear cover screws; Remark:6168
6169 - Remove four (4) rear cover screws
Remove four (4) rear cover screws
6168 - Use a T10 Torx screwdriver. Retain screws.
Use a T10 Torx screwdriver. Retain screws.
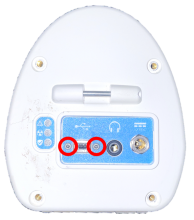
6174 - 6167 - Remove two (2) USB [Universal Serial Bus] jack screws; Remark:6166
6167 - Remove two (2) USB [Universal Serial Bus] jack screws
Remove two (2) USB [Universal Serial Bus] jack screws
6166 - Use a T6 Torx screwdriver. Retain screws.
Use a T6 Torx screwdriver. Retain screws.
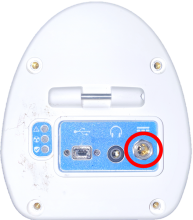
6175 - 6165 - Remove charging port nut and washer; Remark:6164
6165 - Remove charging port nut and washer
Remove charging port nut and washer
6164 - Use a 10 mm nut driver. Retain nut and washer.
Use a 10 mm nut driver. Retain nut and washer.
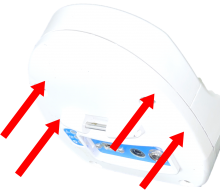
6185 - 6182 - Remove rear cover; Remark:6181
6183 - Caution : Internal components are sealed with RTV adhesive. Use care when separating se...
Internal components are sealed with RTV adhesive. Use care when separating sealed components.
6184 - Note : Upon removing the rear case, there is a flat washer under the headphone jack ...
Upon removing the rear case, there is a flat washer under the headphone jack and a black O-ring on the 12 VDC [volts direct current] jack. Use care to retain.
6182 - Remove rear cover
Remove rear cover
6181 - Set aside cover.
Set aside cover.

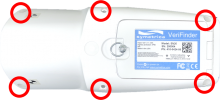
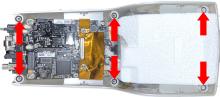
6186 - 6180 - Remove six (6) bottom cover screws; Remark:6179
6180 - Remove six (6) bottom cover screws
Remove six (6) bottom cover screws
6179 - Use a T10 Torx screwdriver. Retain screws.
Use a T10 Torx screwdriver. Retain screws.
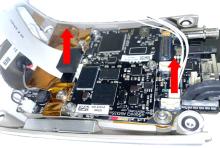
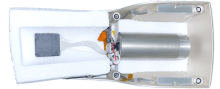
6187 - 6177 - Separate top and bottom enclosures; Remark:6176
6183 - Caution : Internal components are sealed with RTV adhesive. Use care when separating se...
Internal components are sealed with RTV adhesive. Use care when separating sealed components.
5291 - Note : It is good practice to verify all cables and connectors are labeled prior to ...
It is good practice to verify all cables and connectors are labeled prior to disconnection.
6178 - Note : Ensure the six (6) black O-rings are retained in place when separating enclos...
Ensure the six (6) black O-rings are retained in place when separating enclosures.
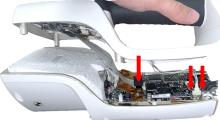
6177 - Separate top and bottom enclosures
Separate top and bottom enclosures
6176 - Disconnect two (2) cables prior to separating enclosures.
Disconnect two (2) cables prior to separating enclosures.

6072 - 6071 - Uninstall Faulty Stabilization Module; Remark:
6071 - Uninstall Faulty Stabilization Module
Uninstall Faulty Stabilization Module
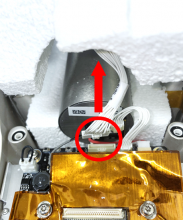
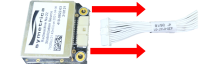
6160 - 6159 - Disconnect stabilization module cable; Remark:6158
6152 - Warning : Do not disassemble the stabilization source module. The expired stabilization...
Do not disassemble the stabilization source module. The expired stabilization module still contains low level amounts of radioactive Na-22. Dispose of the expired stabilization module per local regulations.
1345 - Note : It is good practice to ensure all cables and connectors are labeled prior to ...
It is good practice to ensure all cables and connectors are labeled prior to disconnection.
6159 - Disconnect stabilization module cable
Disconnect stabilization module cable
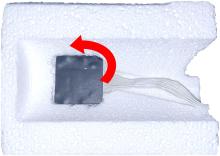
6161 - 5387 - Remove Styrofoam covers; Remark:6157
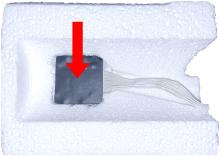
5387 - Remove Styrofoam covers
Remove Styrofoam covers
6157 - IO VeriFinder Open Styrofoam
6162 - 6156 - Remove stabilization module; Remark:6155
6156 - Remove stabilization module
Remove stabilization module
6155 - Gently separate from Styrofoam.
Gently separate from Styrofoam.
6163 - 6154 - Remove cable from stabilization module; Remark:6153
6154 - Remove cable from stabilization module
Remove cable from stabilization module
5350 - 5349 - Install New Stabilization Module; Remark:
5349 - Install New Stabilization Module
Install New Stabilization Module
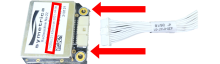
6148 - 6147 - Connect cable; Remark:6146
5553 - Caution : Correct placement of connectors and wiring is critical to proper operation.
Correct placement of connectors and wiring is critical to proper operation.
6147 - Connect cable
Connect cable
6146 - Connect stabilization module cable to new stabilization module.
Connect stabilization module cable to new stabilization module.
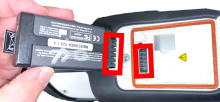
6149 - 6145 - Record component Information; Remark:6144
6145 - Record component Information
Record component Information
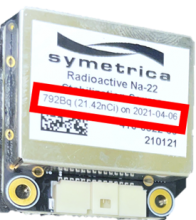
6144 - Record in the Corrective Maintenance Report the date and activity printed on ...
Record in the Corrective Maintenance Report the date and activity printed on the new module.
6150 - 6143 - Insert component; Remark:6142
6143 - Insert component
Insert component
6142 - Insert stabilization module into Styrofoam and reseat over gamma detector.
Insert stabilization module into Styrofoam and reseat over gamma detector.
6151 - 6141 - Reconnect cable; Remark:6140
6141 - Reconnect cable
Reconnect cable
6140 - Reconnect stabilization module cable to circuit boards.
Reconnect stabilization module cable to circuit boards.

6070 - 6069 - Reassemble VeriFinder; Remark:
6069 - Reassemble VeriFinder
Reassemble VeriFinder
6117 - 6116 - Reconnect two (2) cables; Remark:6115
5553 - Caution : Correct placement of connectors and wiring is critical to proper operation.
Correct placement of connectors and wiring is critical to proper operation.
5895 - Caution : Verify all wiring is inside the instrument while replacing cover.
Verify all wiring is inside the instrument while replacing cover.
6116 - Reconnect two (2) cables
Reconnect two (2) cables
6115 - Snap into place and secure top and bottom enclosures together.
Snap into place and secure top and bottom enclosures together.
6118 - 6114 - Reinstall six (6) bottom cover screws; Remark:6113
569 - Caution : Do not overtighten screws.
Do not overtighten screws.
6106 - Standard : Torque all screws to 1 N-m.
Torque all screws to 1 N-m.
6114 - Reinstall six (6) bottom cover screws
Reinstall six (6) bottom cover screws
6113 - Use a T10 Torx screwdriver.
Use a T10 Torx screwdriver.
6119 - 6112 - Reseal top and bottom enclosures; Remark:6111
6107 - Caution : The enclosure must be properly sealed when it is reassembled.
The enclosure must be properly sealed when it is reassembled.
6112 - Reseal top and bottom enclosures
Reseal top and bottom enclosures
6111 - Seal around entirety of VeriFinder where top and bottom enclosures join with ...
Seal around entirety of VeriFinder where top and bottom enclosures join with RTV.
6120 - 6110 - Reinstall headphone jack washer and charging port O-ring; Remark:6109
5895 - Caution : Verify all wiring is inside the instrument while replacing cover.
Verify all wiring is inside the instrument while replacing cover.
6110 - Reinstall headphone jack washer and charging port O-ring
Reinstall headphone jack washer and charging port O-ring
6129 - 6128 - Set rear cover in place; Remark:6127
569 - Caution : Do not overtighten screws.
Do not overtighten screws.
6106 - Standard : Torque all screws to 1 N-m.
Torque all screws to 1 N-m.
6128 - Set rear cover in place
Set rear cover in place
6130 - 6126 - Reinstall charging port washer and nut; Remark:6125
6126 - Reinstall charging port washer and nut
Reinstall charging port washer and nut
6131 - 6124 - Reinstall two (2) USB port screws; Remark:6123
569 - Caution : Do not overtighten screws.
Do not overtighten screws.
6106 - Standard : Torque all screws to 1 N-m.
Torque all screws to 1 N-m.
6124 - Reinstall two (2) USB port screws
Reinstall two (2) USB port screws
6123 - Use a T6 Torx screwdriver.
Use a T6 Torx screwdriver.
6137 - 6136 - Reinstall four (4) rear cover screws; Remark:6135
569 - Caution : Do not overtighten screws.
Do not overtighten screws.
6106 - Standard : Torque all screws to 1 N-m.
Torque all screws to 1 N-m.
6136 - Reinstall four (4) rear cover screws
Reinstall four (4) rear cover screws
6135 - Use a T10 Torx screwdriver.
Use a T10 Torx screwdriver.
6138 - 6134 - Reseal rear cover; Remark:6133
6107 - Caution : The enclosure must be properly sealed when it is reassembled.
The enclosure must be properly sealed when it is reassembled.
6134 - Reseal rear cover
Reseal rear cover
6133 - Seal around entirety of VeriFinder rear cover with RTV.
Seal around entirety of VeriFinder rear cover with RTV.
6139 - 6132 - Reinstall rubber boot; Remark:6103
6132 - Reinstall rubber boot
Reinstall rubber boot
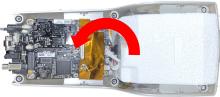
6103 - Insert front of VeriFinder into boot and rotate bottom end of VeriFinder down...
Insert front of VeriFinder into boot and rotate bottom end of VeriFinder downward.
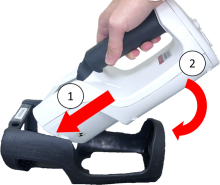
6104 - Pull back the bottom of boot and push VeriFinder into boot.
Pull back the bottom of boot and push VeriFinder into boot.
6105 - Secure top corners.
Secure top corners.

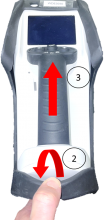
6068 - 6067 - Reinstall Battery; Remark:
6067 - Reinstall Battery
Reinstall Battery
6100 - 6099 - Unclasp and open battery compartment; Remark:6098
6099 - Unclasp and open battery compartment
Unclasp and open battery compartment

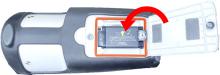
6102 - 6096 - Close and reclasp battery compartment; Remark:6095
6096 - Close and reclasp battery compartment
Close and reclasp battery compartment
6066 - 6065 - Complete Stabilization; Remark:
6065 - Complete Stabilization
Complete Stabilization
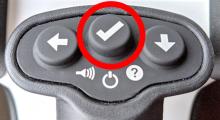
6088 - 220 - Power on instrument; Remark:6087
220 - Power on instrument
Power on instrument
6087 - Hold down the Select button. The VeriFinder will initialize ...
Hold down the Select button. The VeriFinder will initialize and complete stabilization automatically.
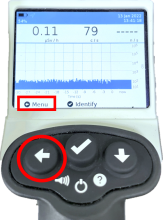
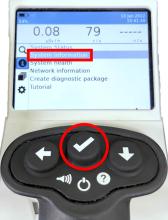
6089 - 6086 - Select information menu; Remark:6085
6086 - Select information menu
Select information menu
6085 - Navigate to the MENU using the LEFT arrow b...
Navigate to the MENU using the LEFT arrow button, and then to the Information submenu using the DOWN arrow.
6090 - 6084 - Access system information; Remark:6083
6084 - Access system information
Access system information
6083 - Press the SELECT button twice to enter System Inform...
Press the SELECT button twice to enter System Information.
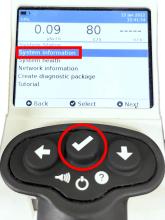
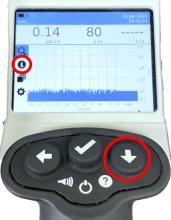
6091 - 6082 - Locate stabilization information; Remark:6081
6082 - Locate stabilization information
Locate stabilization information
6081 - Use the DOWN arrow to scroll until reaching the Stabilizatio...
Use the DOWN arrow to scroll until reaching the Stabilization information.

6092 - 6080 - Confirm stabilization module date; Remark:6079
6080 - Confirm stabilization module date
Confirm stabilization module date
6079 - Verify the activity and date displayed match what was printed on the installe...
Verify the activity and date displayed match what was printed on the installed stabilization module.
6093 - 6078 - Document stabilization information; Remark:6077
6078 - Document stabilization information
Document stabilization information
6077 - Include stabilization information in Corrective Maintenance Report.
Include stabilization information in Corrective Maintenance Report.
6094 - 319 - Perform operational test; Remark:6076
319 - Perform operational test
Perform operational test
6076 - DET-HHD-SYM-VER-RM01, VeriFinder Operational Test.
DET-HHD-SYM-VER-RM01, VeriFinder Operational Test.
322 - 321 - Document maintenance actions; Remark:
321 - Document maintenance actions
Document maintenance actions
2869 - 2585 - Document maintenance performed; Remark:2866
2585 - Document maintenance performed
Document maintenance performed
2866 - Record observations, times, and results for the maintenance report.
Record observations, times, and results for the maintenance report.
4706 - 4705 - Submit report; Remark:4864
4705 - Submit report
Submit report
4864 - As specified by management or contractual obligations.
As specified by management or contractual obligations.