Last Updated: 04/26/2025 1:37 AM
The following table lists all the components that make up the document.
Search for and identify radioactive material
247 - 257 - Prepare instrument; Remark:
257 - Prepare instrument
Prepare instrument
786 - 219 - Verify there are no sources of radiation near instrument; Remark:7
219 - Verify there are no sources of radiation near instrument
Verify there are no sources of radiation near instrument

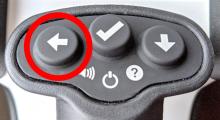
2426 - 2391 - Press and hold POWER/SELECT button for 3 seconds; Remark:652
2391 - Press and hold POWER/SELECT button for 3 seconds
Press and hold POWER/SELECT button for 3 seconds

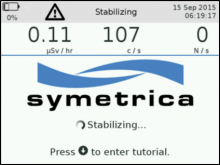
2427 - 612 - Wait for instrument to complete start-up sequence; Remark:2393
2418 - Note : You can press the POWER/SELECT button at any time during the start-up sequenc...
You can press the POWER/SELECT button at any time during the start-up sequence to view a tutorial.
612 - Wait for instrument to complete start-up sequence
Wait for instrument to complete start-up sequence
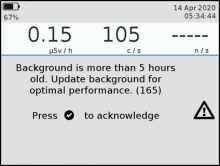
2428 - 2390 - Press POWER/SELECT button to acknowledge “New Background Needed” message,...; Remark:2392
2390 - Press POWER/SELECT button to acknowledge “New Background Needed” message,...
Press POWER/SELECT button to acknowledge “New Background Needed” message, if applicable
2392 - The instrument will display a reminder during the start-up sequence if it has...
The instrument will display a reminder during the start-up sequence if it has been several hours since the last background collection.
2429 - 2295 - Verify sufficient battery charge; Remark:651
2419 - Note : The VeriFinder comes with an adaptor to install standard AA batteries to oper...
The VeriFinder comes with an adaptor to install standard AA batteries to operate the VeriFinder. This can be used as a backup if needed.
2295 - Verify sufficient battery charge
Verify sufficient battery charge
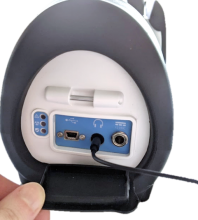
2430 - 2206 - Connect headphones (optional); Remark:2394
2206 - Connect headphones (optional)
Connect headphones (optional)
10828 - 3494 - Collect background measurement; Remark:
3494 - Collect background measurement
Collect background measurement
2432 - 2209 - Verify instrument is in a suitable background radiation area; Remark:2395
2209 - Verify instrument is in a suitable background radiation area
Verify instrument is in a suitable background radiation area
2395 - The instrument should be located near the secondary inspection area, in simil...
The instrument should be located near the secondary inspection area, in similar surroundings, but not directly adjacent to the conveyance, object, or person.
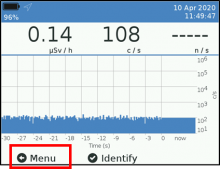
2433 - 2389 - Press BACK button to open the menu bar; Remark:2396
2389 - Press BACK button to open the menu bar
Press BACK button to open the menu bar
2434 - 2388 - Press DOWN button to scroll to user settings icon; Remark:2397
2388 - Press DOWN button to scroll to user settings icon
Press DOWN button to scroll to user settings icon
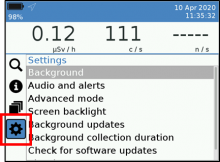

2435 - 2387 - Press POWER/SELECT button to select user settings; Remark:
2387 - Press POWER/SELECT button to select user settings
Press POWER/SELECT button to select user settings
2436 - 2386 - Press POWER/SELECT button to select Background; Remark:2399
2386 - Press POWER/SELECT button to select Background
Press POWER/SELECT button to select Background

2437 - 2385 - Press POWER/SELECT button to start background collection; Remark:2400
2385 - Press POWER/SELECT button to start background collection
Press POWER/SELECT button to start background collection
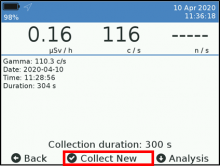
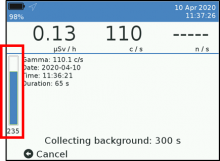
2438 - 2220 - Wait for measurement to complete; Remark:2401
2220 - Wait for measurement to complete
Wait for measurement to complete
2401 - The blue bar on the left shows the time remaining.
The blue bar on the left shows the time remaining.
2439 - 2384 - Press DOWN button to view analysis; Remark:2402
2384 - Press DOWN button to view analysis
Press DOWN button to view analysis
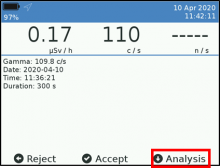
2440 - 2383 - Press BACK button after viewing analysis; Remark:2403
2383 - Press BACK button after viewing analysis
Press BACK button after viewing analysis
2403 - This analysis only shows naturally occurring isotopes and can be accepted.
This analysis only shows naturally occurring isotopes and can be accepted.

2404 - This analysis shows an industrial isotope and should be rejected.
This analysis shows an industrial isotope and should be rejected.
2441 - 2382 - Press POWER/SELECT button to accept background or press BACK button to reject...; Remark:2405
2420 - Note : If the background is rejected, move away from the source of radiation and col...
If the background is rejected, move away from the source of radiation and collect a new background.
2382 - Press POWER/SELECT button to accept background or press BACK button to reject...
Press POWER/SELECT button to accept background or press BACK button to reject analysis

2252 - 2213 - Search for Radioactive Material; Remark:
2213 - Search for Radioactive Material
Search for Radioactive Material
2442 - 2381 - Enable audible indicator by pressing and holding BACK button until clicking s...; Remark:653
2381 - Enable audible indicator by pressing and holding BACK button until clicking s...
Enable audible indicator by pressing and holding BACK button until clicking sound is heard (optional)
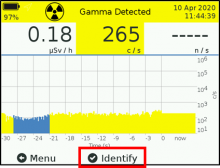
2443 - 2215 - Survey slowly over entire item; Remark:2406
2215 - Survey slowly over entire item
Survey slowly over entire item
2406 - Keep the instrument close to the conveyance, object, or person being assessed...
Keep the instrument close to the conveyance, object, or person being assessed, but not touching.

2444 - 2380 - Observe display and listen to audible indicator (if enabled); Remark:655
2380 - Observe display and listen to audible indicator (if enabled)
Observe display and listen to audible indicator (if enabled)

2445 - 2379 - Acknowledge instrument alarm by pressing POWER/SELECT button (as needed and o...; Remark:2407
2379 - Acknowledge instrument alarm by pressing POWER/SELECT button (as needed and o...
Acknowledge instrument alarm by pressing POWER/SELECT button (as needed and only if primary alarm feature is enabled)
2407 - Acknowledging the alarm will stop the sound and vibration.
Acknowledging the alarm will stop the sound and vibration.

405 - 368 - Mark point(s) of interest; Remark:4277
368 - Mark point(s) of interest
Mark point(s) of interest
4277 - Place a marker (tape, pencil, etc.) on points exhibiting elevated radiation. ...
Place a marker (tape, pencil, etc.) on points exhibiting elevated radiation. There may be more than one point of interest.
2251 - 2217 - Perform Identification Measurement; Remark:
2217 - Perform Identification Measurement
Perform Identification Measurement
2446 - 2218 - Place instrument close to measurement location; Remark:
2218 - Place instrument close to measurement location
Place instrument close to measurement location
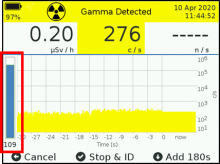
2447 - 2378 - Press POWER/SELECT button to start identification; Remark:657
2378 - Press POWER/SELECT button to start identification
Press POWER/SELECT button to start identification
2448 - 2220 - Wait for measurement to complete; Remark:2408
2421 - Note : To add additional time to the identification measurement, press the DOWN butt...
To add additional time to the identification measurement, press the DOWN button. You can also end the identification at any time by pressing the BACK button. Pressing the POWER/SELECT button will stop the measurement early and display results (not recommended).
2220 - Wait for measurement to complete
Wait for measurement to complete
2408 - The blue bar on the left shows the time remaining.
The blue bar on the left shows the time remaining.
2449 - 2377 - Press POWER/SELECT to acknowledge alarm, if necessary; Remark:2409
2377 - Press POWER/SELECT to acknowledge alarm, if necessary
Press POWER/SELECT to acknowledge alarm, if necessary
2409 - If an identification is made, the VeriFinder generates an alarm (threat or in...
If an identification is made, the VeriFinder generates an alarm (threat or innocent).

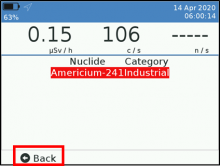
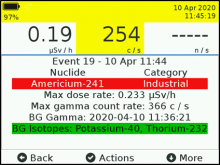
2450 - 2221 - Observe identification results; Remark:659
2221 - Observe identification results
Observe identification results
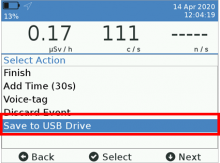
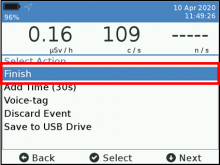
2451 - 2376 - Press POWER/SELECT button to see a list of actions; Remark:664
2376 - Press POWER/SELECT button to see a list of actions
Press POWER/SELECT button to see a list of actions
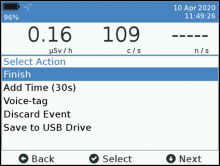
2410 - Finish will return to th...
Finish will return to the Locate screen.
Email allows the results to be sent to expert support (only if connected to the Internet).
Add Time (30 seconds) allows the user to add more time for identification.
Voice-tag allows the user to record a short audio memo for the event.
Discard Event returns the VeriFinder to the locate screen, and moves the event data to the archive.
Save to USB Drive saves the event to a USB flash memory drive (if attached). This is the quickest way to offload the results to send to expert support.
2367 - 2365 - Offload Spectra Onto Computer; Remark:
2365 - Offload Spectra Onto Computer
Offload Spectra Onto Computer
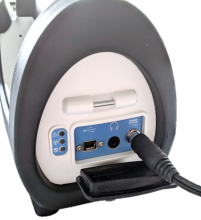
2452 - 2375 - Connect USB flash memory drive to instrument using accessory cable; Remark:2411
2375 - Connect USB flash memory drive to instrument using accessory cable
Connect USB flash memory drive to instrument using accessory cable

2453 - 2374 - Press DOWN button to highlight Save to USB Drive and press P...; Remark:2412
2374 - Press DOWN button to highlight Save to USB Drive and press P...
Press DOWN button to highlight Save to USB Drive and press POWER/SELECT button
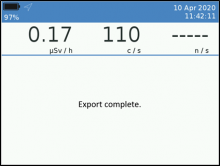
2454 - 2373 - Wait for files to save; Remark:2413
2422 - Note : This will only save the spectrum from the most recent identification measurem...
This will only save the spectrum from the most recent identification measurement. To upload additional spectra, the VeriFinder must be connected to the computer using a USB cable. More information can be found in the vendor operator manual.
2373 - Wait for files to save
Wait for files to save
2413 - When files are saved, the screen will briefly display “Export complete.” ...
When files are saved, the screen will briefly display “Export complete.” and then return to the previous screen.
2455 - 2424 - Press POWER/SELECT button to Finish and return to Locate scr...; Remark:2414
2424 - Press POWER/SELECT button to Finish and return to Locate scr...
Press POWER/SELECT button to Finish and return to Locate screen
2456 - 2372 - Remove USB flash drive from VeriFinder and connect to computer to obtain spec...; Remark:2415
2372 - Remove USB flash drive from VeriFinder and connect to computer to obtain spec...
Remove USB flash drive from VeriFinder and connect to computer to obtain spectra files
2415 - The file can then be attached to the corresponding event in the central alarm...
The file can then be attached to the corresponding event in the central alarm station software, or sent to expert support.
2366 - 2364 - Shut Down Instrument; Remark:
2364 - Shut Down Instrument
Shut Down Instrument
2457 - 2371 - Press and hold POWER/SELECT button for 5 seconds; Remark:652
2371 - Press and hold POWER/SELECT button for 5 seconds
Press and hold POWER/SELECT button for 5 seconds
2458 - 2370 - Connect to charger; Remark:2416
2423 - Note : The VeriFinder also comes with an external battery charger. This may be used ...
The VeriFinder also comes with an external battery charger. This may be used to charge the main battery while the AA battery adaptor is being used in the instrument.
2370 - Connect to charger
Connect to charger
2416 - The battery requires about 2.5 hours to fully recharge.
The battery requires about 2.5 hours to fully recharge.
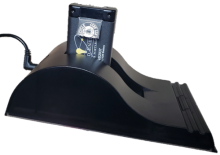
2417 - Optional external battery charger
Optional external battery charger