Last Updated: 04/24/2025 1:45 AM
The following table lists all the components that make up the document.
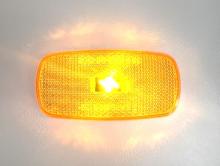
Safely removing an LED fault light assembly and correctly installing a new one
Prior to arrival, notify operators concerning expected work, duration, and anticipated alarms and fault indications.
Updated pillar names
9418 - 1401 - Establish Initial Conditions; Remark:
9341 - Note : If only replacing the fault LED bulb, twist connector one-quarter turn counte...
If only replacing the fault LED bulb, twist connector one-quarter turn counterclockwise and gently pull socket from fault light housing. Replace bulb in the socket, insert the socket into the housing, and twist connector one-quarter turn clockwise to secure.
1401 - Establish Initial Conditions
Establish Initial Conditions
7268 - 7231 - Close lane; Remark:7233
9053 - Warning : Traffic should temporarily be rerouted or halted during conduction of this pr...
Traffic should temporarily be rerouted or halted during conduction of this procedure to ensure maintenance provider safety and to prevent unscreened vehicles from passing.
7231 - Close lane
Close lane
7233 - Use orange safety (traffic control) cones to setup barriers. Practice establi...
Use orange safety (traffic control) cones to setup barriers. Practice established safety protocols.
7269 - 7232 - Open RPM door; Remark:7234
7232 - Open RPM door
Open RPM door
7234 - Open all doors needed to access components.
Open all doors needed to access components.
7270 - 7235 - Power off RPM; Remark:7236
7235 - Power off RPM
Power off RPM
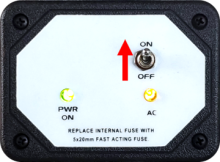
7236 - Move LD-260 switch to OFF position. The PWR ON
Move LD-260 switch to OFF position. The PWR ON LED will turn off.

9412 - 9350 - Disconnect LED Fault Light Wiring; Remark:
9350 - Disconnect LED Fault Light Wiring
Disconnect LED Fault Light Wiring
9406 - 9351 - Open Control door to access terminal block (TB4) on the back of the door ...; Remark:8674
8675 - Note : If repairing a pedestrian monitor, go to Step 2-4
If repairing a pedestrian monitor, go to Step 2-4
9351 - Open Control door to access terminal block (TB4) on the back of the door ...
Open Control door to access terminal block (TB4) on the back of the door
8674 - For vehicle monitors: Open the upper RPM door
For vehicle monitors: Open the upper RPM door
For train monitors: Open the control cabinet
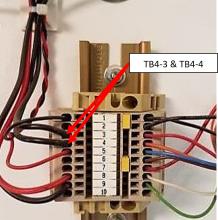
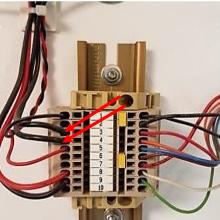
9407 - 9352 - Remove black wire (TB4-3) and black wire (TB4-4) from TB4 using a small flath...; Remark:9530
9352 - Remove black wire (TB4-3) and black wire (TB4-4) from TB4 using a small flath...
Remove black wire (TB4-3) and black wire (TB4-4) from TB4 using a small flathead screwdriver
9530 -
9408 - 9353 - Remove any wire ties securing red and black wires using side cutter pliers; Remark:
9353 - Remove any wire ties securing red and black wires using side cutter pliers
Remove any wire ties securing red and black wires using side cutter pliers
9409 - 9354 - Open Control RPM door to identify wiring connections (for pedestrian monitors...; Remark:9529
9354 - Open Control RPM door to identify wiring connections (for pedestrian monitors...
Open Control RPM door to identify wiring connections (for pedestrian monitors)
9529 -
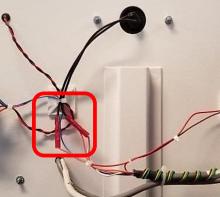
9410 - 9355 - Remove connectors by cutting wires as close as possible to end of each connec...; Remark:
9355 - Remove connectors by cutting wires as close as possible to end of each connec...
Remove connectors by cutting wires as close as possible to end of each connector using side cutter pliers
9411 - 9356 - Remove any wire ties securing wires using side cutter pliers; Remark:
9356 - Remove any wire ties securing wires using side cutter pliers
Remove any wire ties securing wires using side cutter pliers
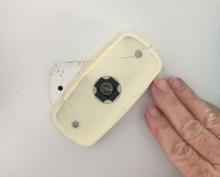
9405 - 9357 - Uninstall Fault Light Hardware; Remark:
9357 - Uninstall Fault Light Hardware
Uninstall Fault Light Hardware

9401 - 9359 - Install new fault light housing to front of door; Remark:9343
9359 - Install new fault light housing to front of door
Install new fault light housing to front of door
9343 - Use a medium Phillips screwdriver for the front of the door and a 7 mm nut dr...
Use a medium Phillips screwdriver for the front of the door and a 7 mm nut driver or wrench for the back of the door. Reserve the two screws and associated hardware for installing the new fault light back plate.


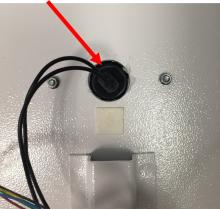
9402 - 9360 - Remove fault light back plate by rotating it 45 degrees counterclockwise and ...; Remark:9527
9360 - Remove fault light back plate by rotating it 45 degrees counterclockwise and ...
Remove fault light back plate by rotating it 45 degrees counterclockwise and gently pulling away from door
9527 -
9403 - 9361 - Pull fault light socket through hole in door; Remark:
9361 - Pull fault light socket through hole in door
Pull fault light socket through hole in door
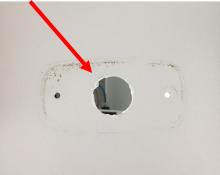
9404 - 9362 - Remove any leftover silicone from hole in door using flathead screwdriver...; Remark:9526
9362 - Remove any leftover silicone from hole in door using flathead screwdriver...
Remove any leftover silicone from hole in door using flathead screwdriver
9526 -
9399 - 9363 - Install New Fault Light Hardware; Remark:
9363 - Install New Fault Light Hardware
Install New Fault Light Hardware
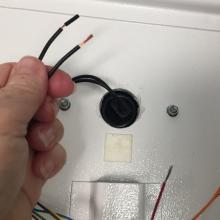
9395 - 9364 - Feed wires of new fault light assembly through hole in door; Remark:
9364 - Feed wires of new fault light assembly through hole in door
Feed wires of new fault light assembly through hole in door
9396 - 9365 - Install new fault light housing to front of door; Remark:9344
569 - Caution : Do not overtighten screws.
Do not overtighten screws.
9365 - Install new fault light housing to front of door
Install new fault light housing to front of door
9344 - Use a medium Phillips screwdriver for the front of the door and a 7 mm nut dr...
Use a medium Phillips screwdriver for the front of the door and a 7 mm nut driver or wrench for the back of the door.
9397 - 9366 - Apply silicone around the rim of socket on back of door; Remark:9536
8701 - Warning : Use protective gloves when handling silicone.
Use protective gloves when handling silicone.
9366 - Apply silicone around the rim of socket on back of door
Apply silicone around the rim of socket on back of door
9536 -
9398 - 9367 - Install new fault light cover to front of door; Remark:
9367 - Install new fault light cover to front of door
Install new fault light cover to front of door
9394 - 9368 - Reconnect LED Fault Light Wiring; Remark:
9368 - Reconnect LED Fault Light Wiring
Reconnect LED Fault Light Wiring
9387 - 9369 - Open Control pillar door to access terminal block (TB4) on back of door; Remark:8674
8712 - Note : If repairing a pedestrian monitor, go to Step 5-4
If repairing a pedestrian monitor, go to Step 5-4
9369 - Open Control pillar door to access terminal block (TB4) on back of door
Open Control pillar door to access terminal block (TB4) on back of door
8674 - For vehicle monitors: Open the upper RPM door
For vehicle monitors: Open the upper RPM door
For train monitors: Open the control cabinet
9388 - 9370 - Reinstall black wire (TB4-3) and black wire (TB4-4) wiring into TB4 using a s...; Remark:9535
9370 - Reinstall black wire (TB4-3) and black wire (TB4-4) wiring into TB4 using a s...
Reinstall black wire (TB4-3) and black wire (TB4-4) wiring into TB4 using a small flathead screwdriver
9535 -
9389 - 9371 - Add ties to secure wires where needed; Remark:
9371 - Add ties to secure wires where needed
Add ties to secure wires where needed
9390 - 9372 - Open Control RPM door to access fault light connections (for pedestrian monit...; Remark:9534
9372 - Open Control RPM door to access fault light connections (for pedestrian monit...
Open Control RPM door to access fault light connections (for pedestrian monitors)
9534 -
9391 - 9373 - Strip 1 cm from end of connecting wires using crimping tool; Remark:9533
9373 - Strip 1 cm from end of connecting wires using crimping tool
Strip 1 cm from end of connecting wires using crimping tool
9533 -
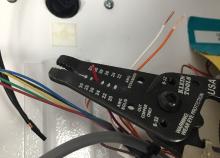
9392 - 9374 - Remove sheathing from end of fault light wires using crimping tool; Remark:9532
9374 - Remove sheathing from end of fault light wires using crimping tool
Remove sheathing from end of fault light wires using crimping tool
9532 -
9393 - 9375 - Crimp union connectors to appropriate wires using a crimping tool; Remark:9345
9375 - Crimp union connectors to appropriate wires using a crimping tool
Crimp union connectors to appropriate wires using a crimping tool
9345 - Join the related wires back together with union connectors. Connect red and w...
Join the related wires back together with union connectors. Connect red and white wires to one fault light wire using a union connector. Connect the orange wire to the other fault light wire using a union connector.

7279 - 7249 - Return equipment to normal operating condition; Remark:
7249 - Return equipment to normal operating condition
Return equipment to normal operating condition
7280 - 7250 - Power on RPM; Remark:7251
7250 - Power on RPM
Power on RPM
7251 - Move LD-260 switch to ON position. The LED PWR ON
Move LD-260 switch to ON position. The LED PWR ON will illuminate.
7281 - 7252 - Verify RPM start-up; Remark:7253
7252 - Verify RPM start-up
Verify RPM start-up
7253 - RPM will perform a power on self-test (POST) and collect a background radiati...
RPM will perform a power on self-test (POST) and collect a background radiation measurement.
9385 - 319 - Perform operational test; Remark:9347
319 - Perform operational test
Perform operational test
9347 - DET-RPM-RAP-RM03 RPM Operational Testing.
DET-RPM-RAP-RM03 RPM Operational Testing.
7282 - 7254 - Confirm network connection; Remark:7255
7254 - Confirm network connection
Confirm network connection
7255 - Contact operators to confirm communications have been reestablished between RPM ...
7283 - 7256 - Close and lock all RPM doors; Remark:
7256 - Close and lock all RPM doors
Close and lock all RPM doors
7842 - 7820 - Inform system operators upon completion of maintenance action; Remark:
7820 - Inform system operators upon completion of maintenance action
Inform system operators upon completion of maintenance action
322 - 321 - Consignez les actions de maintenance; Remark:
321 - Consignez les actions de maintenance
Consignez les actions de maintenance
2869 - 2585 - Consignez la maintenance effectuée; Remark:2866
2585 - Consignez la maintenance effectuée
Consignez la maintenance effectuée
2866 - Enregistrez les observations, les horodatages et les résultats dans le rapport d...
Enregistrez les observations, les horodatages et les résultats dans le rapport de maintenance corrective.
4706 - 4705 - Soumettez le rapport; Remark:4864
4705 - Soumettez le rapport
Soumettez le rapport
4864 - Comme spécifié par l’encadrement ou les obligations contractuelles.
Comme spécifié par l’encadrement ou les obligations contractuelles.