Last Updated: 04/24/2025 1:45 AM
The following table lists all the components that make up the document.
Replace, align, or repair a magnetic tamper switch
Duration: 15 to 60 minutes
Open and close each door and confirm that the fault light turns on with a door opened and off with the door closed
Prior to arrival, notify operators concerning expected work, duration, and anticipated alarms and fault indications.
Updated pillar names
9339 - 1401 - Establish Initial Conditions; Remark:
1401 - Establish Initial Conditions
Establish Initial Conditions
7268 - 7231 - Close lane; Remark:7233
9053 - Warning : Traffic should temporarily be rerouted or halted during conduction of this pr...
Traffic should temporarily be rerouted or halted during conduction of this procedure to ensure maintenance provider safety and to prevent unscreened vehicles from passing.
7231 - Close lane
Close lane
7233 - Use orange safety (traffic control) cones to setup barriers. Practice establi...
Use orange safety (traffic control) cones to setup barriers. Practice established safety protocols.
7269 - 7232 - Open RPM door; Remark:7234
7232 - Open RPM door
Open RPM door
7234 - Open all doors needed to access components.
Open all doors needed to access components.
7270 - 7235 - Power off RPM; Remark:7236
7235 - Power off RPM
Power off RPM
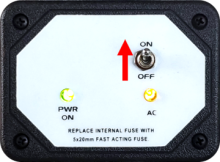
7236 - Move LD-260 switch to OFF position. The PWR ON
Move LD-260 switch to OFF position. The PWR ON LED will turn off.

9333 - 9237 - Verify Alignment of Tamper Switch and Magnet; Remark:
9291 - Note : Depending on the age and model of RPM, the tamper switch may be held in place by...
9292 - Note : The troubleshooting process should determine if the reed switch is bad, or if th...
9237 - Verify Alignment of Tamper Switch and Magnet
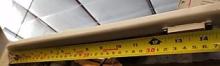
9329 - 9238 - Measure distance from inside edge of cabinet to edge of tamper switch; Remark:9296
9238 - Measure distance from inside edge of cabinet to edge of tamper switch
9296 - There is no predetermined position of a tamper switch. The switch may be located...
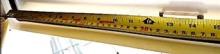
9330 - 9239 - Measure distance from inside edge of door to edge of magnet; Remark:9297
9239 - Measure distance from inside edge of door to edge of magnet
9297 - The location of the magnet is determined by the location of the tamper switch.
9331 - 9240 - Verify alignment of tamper switch and mag...; Remark:9298
9240 - Verify alignment of tamper switch and magnet
9298 - The alignment of the magnet and the tamper switch need to be within 6 mm (1/4 in...
9332 - 9241 - Relocate tamper switch or magnet to corre...; Remark:9299
9293 - Note : Consider relocating the tamper switch, rather than the magnet, to minimize numbe...
9294 - Caution : Wear safety glasses as appropriate.
9241 - Relocate tamper switch or magnet to correct any misalignment, if necessary
9299 - Drill and tap new holes that align the tamper switch to the magnet using a porta...
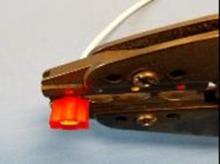
9328 - 9242 - Tamper Switch Replacement and Wiring Connection; Remark:
9242 - Tamper Switch Replacement and Wiring Connection
9322 - 9304 - Remove two screws of tamper switch using a medium Phillips screwdriver; Remark:9524
9304 - Remove two screws of tamper switch using a medium Phillips screwdriver
9524 -

9323 - 9305 - Install new tamper switch with two screws...; Remark:9300
9305 - Install new tamper switch with two screws using a medium Phillips screwdriver
9300 - Reseal holes with RTV following tamper switch installation.
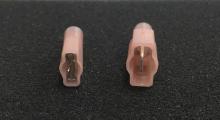
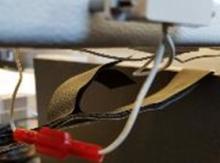
9324 - 9306 - Determine if replacement terminal ends match existing terminal ends; Remark:9301
9306 - Determine if replacement terminal ends match existing terminal ends
9301 - If the replacement terminal ends do not match the existing terminal ends, it may...
9325 - 9307 - Remove ¼ inch (6mm) of insulation from tamper switch wire end using wire stripp...; Remark:9523
9307 - Remove ¼ inch (6mm) of insulation from tamper switch wire end using wire stripp...
9523 -
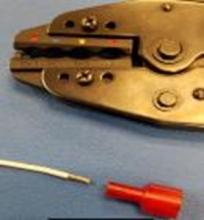
9326 - 9308 - Insert tamper switch wire into terminal end and crimp using crimping tool; Remark:9522
9308 - Insert tamper switch wire into terminal end and crimp using crimping tool
9522 -
9327 - 9309 - Connect tamper switch to existing wiring using terminal end connectors; Remark:9521
9309 - Connect tamper switch to existing wiring using terminal end connectors
9521 -
7279 - 7249 - Return equipment to normal operating condition; Remark:
7249 - Return equipment to normal operating condition
Return equipment to normal operating condition
7280 - 7250 - Power on RPM; Remark:7251
7250 - Power on RPM
Power on RPM
7251 - Move LD-260 switch to ON position. The LED PWR ON
Move LD-260 switch to ON position. The LED PWR ON will illuminate.
9318 - 9312 - Verify Control pillar tamper switch is operational; Remark:9302
9312 - Verify Control pillar tamper switch is operational
9302 - Open and close each door of the Control pillar, ensuring that the LED fault ligh...
9319 - 9313 - Verify Auxiliary pillar tamper switch is ...; Remark:9303
9313 - Verify Auxiliary pillar tamper switch is operational
9303 - Open and close each door of the Auxiliary pillar, ensuring that the LED fault li...
7281 - 7252 - Verify RPM start-up; Remark:7253
7252 - Verify RPM start-up
Verify RPM start-up
7253 - RPM will perform a power on self-test (POST) and collect a background radiati...
RPM will perform a power on self-test (POST) and collect a background radiation measurement.
7282 - 7254 - Confirm network connection; Remark:7255
7254 - Confirm network connection
Confirm network connection
7255 - Contact operators to confirm communications have been reestablished between RPM ...
7283 - 7256 - Close and lock all RPM doors; Remark:
7256 - Close and lock all RPM doors
Close and lock all RPM doors
7842 - 7820 - Inform system operators upon completion of maintenance action; Remark:
7820 - Inform system operators upon completion of maintenance action
Inform system operators upon completion of maintenance action
322 - 321 - Document maintenance actions; Remark:
321 - Document maintenance actions
Document maintenance actions
2869 - 2585 - Document maintenance performed; Remark:2866
2585 - Document maintenance performed
Document maintenance performed
2866 - Record observations, times, and results for the maintenance report.
Record observations, times, and results for the maintenance report.
4706 - 4705 - Submit report; Remark:4864
4705 - Submit report
Submit report
4864 - As specified by management or contractual obligations.
As specified by management or contractual obligations.