Last Updated: 04/24/2025 1:45 AM
The following table lists all the components that make up the document.
Replace ELK audible siren driver.
Hour
Prior to arrival, notify operators concerning expected work, duration, and anticipated alarms and fault indications.
Updated pillar names
8489 - 1401 - Establish Initial Conditions; Remark:
7265 - Warning : Traffic should temporarily be rerouted or halted during this procedure to ens...
Traffic should temporarily be rerouted or halted during this procedure to ensure safety and prevent unscreened vehicles from passing.
1401 - Establish Initial Conditions
Establish Initial Conditions
8490 - 7592 - Inform system operators; Remark:
7592 - Inform system operators
Inform system operators
8221 - 7676 - Brief system operators on expected work, duration, anticipated alarms, and fa...; Remark:
7676 - Brief system operators on expected work, duration, anticipated alarms, and fa...
Brief system operators on expected work, duration, anticipated alarms, and fault indications before starting work
8818 - 8817 - Disconnect ELK Audible Board Wiring; Remark:
8817 - Disconnect ELK Audible Board Wiring
Disconnect ELK Audible Board Wiring
8820 - 8819 - Locate terminal block TB2; Remark:8674
8819 - Locate terminal block TB2
Locate terminal block TB2
8674 - For vehicle monitors: Open the upper RPM door
For vehicle monitors: Open the upper RPM door
For train monitors: Open the control cabinet
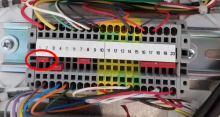
8824 - 8821 - Disconnect wiring from terminal block TB2; Remark:8822
8821 - Disconnect wiring from terminal block TB2
Disconnect wiring from terminal block TB2
8822 - Using a small flathead screwdriver, remove wi...
Using a small flathead screwdriver, remove wires:
Red wire - Pin 1
Yellow wire - Pin 3
Black wire - Pin 14

8826 - 8678 - Release wiring harness from fasteners; Remark:8825
8678 - Release wiring harness from fasteners
Release wiring harness from fasteners
8825 - Wire ties securing Pin 1, Pin 3, and
Wire ties securing Pin 1, Pin 3, and Pin 14 from terminal block TB2 should be removed.
8831 - 8828 - Disconnect ELK audible driver board wiring; Remark:8827
8828 - Disconnect ELK audible driver board wiring
Disconnect ELK audible driver board wiring
8827 - Using a small Phillips (PH1) screwdriver, disconnect wir...
Using a small Phillips (PH1) screwdriver, disconnect wires:
White wire - SPKR
Green wire - LOW
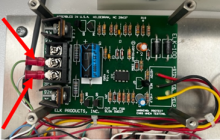
8830 - 8829 - Uninstall Faulty ELK Audible Driver Board; Remark:
8829 - Uninstall Faulty ELK Audible Driver Board
Uninstall Faulty ELK Audible Driver Board
8834 - 8832 - Unmount ELK audible driver board; Remark:8833
8832 - Unmount ELK audible driver board
Unmount ELK audible driver board
8833 - Use a small Phillips (PH1) screwdriver to remove the four mounting screws.
Use a small Phillips (PH1) screwdriver to remove the four mounting screws.
3397 - 3395 - Contrassegnare il componente difettoso; Remark:3396
3395 - Contrassegnare il componente difettoso
Contrassegnare il componente difettoso
3396 - Utilizzare un'etichetta o un nastro adesivo. Indicare la data di rimozione, la d...
Utilizzare un'etichetta o un nastro adesivo. Indicare la data di rimozione, la descrizione del guasto, il Paese, il sito e il numero di corsia. Smaltire secondo la guida del Nuclear Smuggling Detection and Deterrence (NSDD) o i requisiti contrattuali.
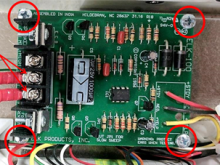
8836 - 8835 - Install New ELK Audible Driver Board; Remark:
8835 - Install New ELK Audible Driver Board
Install New ELK Audible Driver Board
8839 - 8837 - Mount new ELK audible driver board; Remark:8838
8837 - Mount new ELK audible driver board
Mount new ELK audible driver board
8838 - Use a small Phillips (PH1) screwdriver to install and tighten the four screws...
Use a small Phillips (PH1) screwdriver to install and tighten the four screws.
8841 - 8840 - Connect ELK Audible Board Wiring; Remark:
8840 - Connect ELK Audible Board Wiring
Connect ELK Audible Board Wiring
8844 - 8842 - Reconnect wires to terminal block TB2; Remark:8843
462 - Caution : Correct placement of connectors and wiring is critical to proper operation.
Correct placement of connectors and wiring is critical to proper operation.
8842 - Reconnect wires to terminal block TB2
Reconnect wires to terminal block TB2
8843 - Using a small flathead screwdriver, reconnect wires:...
Using a small flathead screwdriver, reconnect wires:
Red wire - Pin 1
Yellow wire - Pin 3
Black wire - Pin 14
8845 - 8714 - Add wire fasteners where removed; Remark:
8714 - Add wire fasteners where removed
Add wire fasteners where removed
8848 - 8846 - Reconnect ELK audible driver board wiring; Remark:8847
462 - Caution : Correct placement of connectors and wiring is critical to proper operation.
Correct placement of connectors and wiring is critical to proper operation.
8846 - Reconnect ELK audible driver board wiring
Reconnect ELK audible driver board wiring
8847 - Using a small Phillips screwdriver, reconenct...
Using a small Phillips screwdriver, reconenct wires:
White wire - SPKR
Green wire - LOW
7279 - 7249 - Return equipment to normal operating condition; Remark:
7249 - Return equipment to normal operating condition
Return equipment to normal operating condition
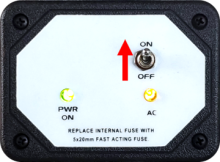
8503 - 7250 - Power on RPM; Remark:7251
7250 - Power on RPM
Power on RPM
7251 - Move LD-260 switch to ON position. The LED PWR ON
Move LD-260 switch to ON position. The LED PWR ON will illuminate.
8851 - 8849 - As the RPM powers on, listen for the "steady" siren.; Remark:
8849 - As the RPM powers on, listen for the "steady" siren.
As the RPM powers on, listen for the "steady" siren.
8221 - 7676 - Brief system operators on expected work, duration, anticipated alarms, and fa...; Remark:
7676 - Brief system operators on expected work, duration, anticipated alarms, and fa...
Brief system operators on expected work, duration, anticipated alarms, and fault indications before starting work
8854 - 8852 - Remove jumper in terminal block TB2; Remark:8853
8852 - Remove jumper in terminal block TB2
Remove jumper in terminal block TB2
8853 - Pull jumper from terminal block TB2 Pin 1 and Pin 2
Pull jumper from terminal block TB2 Pin 1 and Pin 2. This will disable the gamma audio and force the neutron alarm to activate.
8874 - 7250 - Power on RPM; Remark:7251
7250 - Power on RPM
Power on RPM
7251 - Move LD-260 switch to ON position. The LED PWR ON
Move LD-260 switch to ON position. The LED PWR ON will illuminate.
8856 - 8855 - Listen for the neutron alarm; Remark:
8855 - Listen for the neutron alarm
Listen for the neutron alarm
8858 - 8857 - Reinsert jumper in terminal block TB2 Pin 1 and Pin 2; Remark:
8857 - Reinsert jumper in terminal block TB2 Pin 1 and Pin 2
Reinsert jumper in terminal block TB2 Pin 1 and Pin 2
8506 - 7254 - Confirm network connection; Remark:7255
7254 - Confirm network connection
Confirm network connection
7255 - Contact operators to confirm communications have been reestablished between RPM ...
8507 - 7256 - Close and lock all RPM doors; Remark:
7256 - Close and lock all RPM doors
Close and lock all RPM doors
7842 - 7820 - Inform system operators upon completion of maintenance action; Remark:
7820 - Inform system operators upon completion of maintenance action
Inform system operators upon completion of maintenance action
322 - 321 - Documentare le attività di manutenzione; Remark:
321 - Documentare le attività di manutenzione
Documentare le attività di manutenzione
2869 - 2585 - Documentare la manutenzione eseguita; Remark:2866
2585 - Documentare la manutenzione eseguita
Documentare la manutenzione eseguita
2866 - Annotare le osservazioni e i risultati per il Rapporto di manutenzione correttiv...
Annotare le osservazioni e i risultati per il Rapporto di manutenzione correttiva.
4706 - 4705 - Inoltrare il report; Remark:4864
4705 - Inoltrare il report
Inoltrare il report
4864 - Inviare il file di valutazione HATS elettronicamente con il Rapporto di manutenz...
Inviare il file di valutazione HATS elettronicamente con il Rapporto di manutenzione ordinaria.