Last Updated: 06/08/2025 1:44 AM
The following table lists all the components that make up the document.
Replace ELK audible siren
Prior to arrival, notify operators concerning expected work, duration, and anticipated alarms and fault indications.
Updated pillar names
8468 - 1401 - Establish Initial Conditions; Remark:
1401 - Establish Initial Conditions
Establish Initial Conditions
8490 - 7592 - Inform system operators; Remark:
7592 - Inform system operators
Inform system operators
8221 - 7676 - Brief system operators on expected work, duration, anticipated alarms, and fa...; Remark:
7676 - Brief system operators on expected work, duration, anticipated alarms, and fa...
Brief system operators on expected work, duration, anticipated alarms, and fault indications before starting work
10267 - 7967 - Close lane and set up barriers or establish a safety watch; Remark:7571
7678 - Warning : Traffic should temporarily be rerouted or halted during conduction of this pr...
Traffic should temporarily be rerouted or halted during conduction of this procedure to ensure maintenance provider safety and prevent unscreened conveyances from passing.
7967 - Close lane and set up barriers or establish a safety watch
Close lane and set up barriers or establish a safety watch
7571 - Use orange safety cones or equivalent based on site-specific safety practices...
Use orange safety cones or equivalent based on site-specific safety practices.
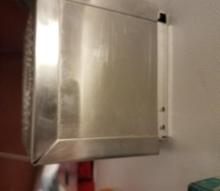
10268 - 9235 - Open Control pillar RPM door; Remark:
9235 - Open Control pillar RPM door
7270 - 7235 - Power off RPM; Remark:7236
7235 - Power off RPM
Power off RPM
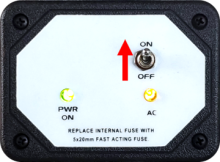
7236 - Move LD-260 switch to OFF position. The PWR ON
Move LD-260 switch to OFF position. The PWR ON LED will turn off.

8748 - 8747 - Disconnect ELK Siren Wiring; Remark:
8747 - Disconnect ELK Siren Wiring
Disconnect ELK Siren Wiring
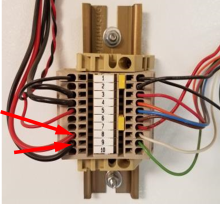
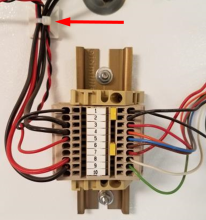
8803 - 8673 - Locate terminal block TB4; Remark:8674
7792 - Note : It is good engineering practice to ensure all cables and connectors are label...
It is good engineering practice to ensure all cables and connectors are labeled before disconnecting them.
8673 - Locate terminal block TB4
Locate terminal block TB4
8674 - For vehicle monitors: Open the upper RPM door
For vehicle monitors: Open the upper RPM door
For train monitors: Open the control cabinet
8751 - 8749 - Disconnect wires from terminal block TB4; Remark:8750
8749 - Disconnect wires from terminal block TB4
Disconnect wires from terminal block TB4
8750 - Using a flathead screwdriver, disconnect wires: Red wire - ...
Using a flathead screwdriver, disconnect wires:
Red wire - Pin 8
Black wire - Pin 9
8753 - 8678 - Release wiring harness from fasteners; Remark:8752
8678 - Release wiring harness from fasteners
Release wiring harness from fasteners
8752 - Using cutter pliers, remove associated fasteners from TB4 Pin 8
Using cutter pliers, remove associated fasteners from TB4 Pin 8 and Pin 9.
8755 - 8754 - Uninstall Faulty ELK Siren and Housing; Remark:
8754 - Uninstall Faulty ELK Siren and Housing
Uninstall Faulty ELK Siren and Housing
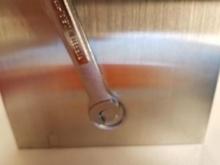
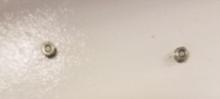
8758 - 8756 - Remove screw located on bottom of ELK siren housing; Remark:8757
8756 - Remove screw located on bottom of ELK siren housing
Remove screw located on bottom of ELK siren housing
8757 - Turn screw counterclockwise using an 11 mm wrench.
Turn screw counterclockwise using an 11 mm wrench.
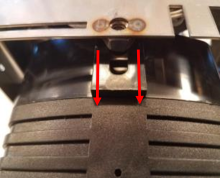
8761 - 8759 - Remove outer casing of ELK siren; Remark:8760
8759 - Remove outer casing of ELK siren
Remove outer casing of ELK siren
8760 - Lower outer casing approximately ½” (12 mm), pull casing away from door ap...
Lower outer casing approximately ½” (12 mm), pull casing away from door approximately ½” (12 mm), and lift outer casing up and away from housing assembly.
8764 - 8762 - Remove ELK siren; Remark:8763
8762 - Remove ELK siren
Remove ELK siren
8763 - Pull the siren away from the housing assembly. Ensure when removing to pull s...
Pull the siren away from the housing assembly. Ensure when removing to pull straight away from the housing.
8766 - 8765 - Carefully pull ELK siren thorugh door without losing grommet; Remark:
8765 - Carefully pull ELK siren thorugh door without losing grommet
Carefully pull ELK siren thorugh door without losing grommet
8770 - 8767 - Remove screws and nuts; Remark:8769
8768 - Caution : While removing the hardware, the enclosure mount will come loose. Take care n...
While removing the hardware, the enclosure mount will come loose. Take care not to drop the equipment.
8767 - Remove screws and nuts
Remove screws and nuts
8769 - Using an adjustable wrench, hold nuts on the inside of the door while using a...
Using an adjustable wrench, hold nuts on the inside of the door while using a medium Phillips screwdriver to turn hardware counterclockwise.
8771 - 8693 - Remove residue off RPM door; Remark:
8693 - Remove residue off RPM door
Remove residue off RPM door
3397 - 3395 - Label faulty component; Remark:3396
3395 - Label faulty component
Label faulty component
3396 - Use tag or tape. Include date of removal, description of failure symptoms, co...
Use tag or tape. Include date of removal, description of failure symptoms, country, site, and lane number. Dispose per Nuclear Smuggling Detection and Deterrence (NSDD) guidance or contractual requirements.
8773 - 8772 - Install New ELK Siren Housing and Siren; Remark:
8772 - Install New ELK Siren Housing and Siren
Install New ELK Siren Housing and Siren
8776 - 8774 - Attach new ELK siren mount; Remark:
8774 - Attach new ELK siren mount
Attach new ELK siren mount
8777 - 8775 - Apply a light amount of silicone around nuts on back side of door; Remark:
8701 - Warning : Use protective gloves when handling silicone.
Use protective gloves when handling silicone.
8775 - Apply a light amount of silicone around nuts on back side of door
Apply a light amount of silicone around nuts on back side of door
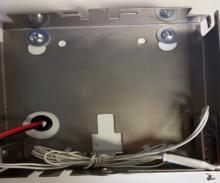
8780 - 8778 - Feed ELK siren wires through grommet located in door; Remark:8779
8778 - Feed ELK siren wires through grommet located in door
Feed ELK siren wires through grommet located in door
8779 - ELK Siren Wires
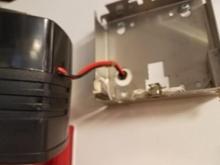
8783 - 8781 - Slide new ELK siren onto ELK siren housing tab; Remark:8782
8781 - Slide new ELK siren onto ELK siren housing tab
Slide new ELK siren onto ELK siren housing tab

8785 - 8784 - Apply a light amount of silicone around wires and grommet on back side of doo...; Remark:
8701 - Warning : Use protective gloves when handling silicone.
Use protective gloves when handling silicone.
8784 - Apply a light amount of silicone around wires and grommet on back side of doo...
Apply a light amount of silicone around wires and grommet on back side of door
8788 - 8786 - Reinstall ELK siren housing outer case; Remark:8787
8786 - Reinstall ELK siren housing outer case
Reinstall ELK siren housing outer case
8787 - The tabs on the outer casing must fit in the U-shaped slot on the housing ass...
The tabs on the outer casing must fit in the U-shaped slot on the housing assembly. Slide the outer casing onto the assembly until it is approximately 1/2” (12 mm) from the face of the door. Then drop the casing down approximately 1/2” (12 mm), push casing toward door so that it is flush with the door surface (approximately ½” or 12 mm), and lift the casing approximately ½” (12 mm).
8791 - 8789 - Install screw located on bottom of ELK siren housing.; Remark:8790
8789 - Install screw located on bottom of ELK siren housing.
Install screw located on bottom of ELK siren housing.
8794 - 8793 - Reconnect ELK Siren Wiring; Remark:
8793 - Reconnect ELK Siren Wiring
Reconnect ELK Siren Wiring
8792 - 8673 - Locate terminal block TB4; Remark:8674
8673 - Locate terminal block TB4
Locate terminal block TB4
8674 - For vehicle monitors: Open the upper RPM door
For vehicle monitors: Open the upper RPM door
For train monitors: Open the control cabinet
8797 - 8795 - Connect wires to terminal block TB4; Remark:8796
8795 - Connect wires to terminal block TB4
Connect wires to terminal block TB4
8796 - Using a flathead screwdriver, connect wires: Red wire - Pin...
Using a flathead screwdriver, connect wires:
Red wire - Pin 8
Black wire - Pin 9
8799 - 8714 - Add wire fasteners where removed; Remark:8798
8714 - Add wire fasteners where removed
Add wire fasteners where removed
7279 - 7249 - Return equipment to normal operating condition; Remark:
7249 - Return equipment to normal operating condition
Return equipment to normal operating condition
8503 - 7250 - Power on RPM; Remark:7251
7250 - Power on RPM
Power on RPM
7251 - Move LD-260 switch to ON position. The LED PWR ON
Move LD-260 switch to ON position. The LED PWR ON will illuminate.
8801 - 8800 - Listen for the siren to activate; Remark:
8800 - Listen for the siren to activate
Listen for the siren to activate
8670 - 319 - Perform operational test; Remark:8669
319 - Perform operational test
Perform operational test
8669 - DET-RPM-RAP-RM03, RPM Operational Testing
DET-RPM-RAP-RM03, RPM Operational Testing
8506 - 7254 - Confirm network connection; Remark:7255
7254 - Confirm network connection
Confirm network connection
7255 - Contact operators to confirm communications have been reestablished between RPM ...
8507 - 7256 - Close and lock all RPM doors; Remark:
7256 - Close and lock all RPM doors
Close and lock all RPM doors
7842 - 7820 - Inform system operators upon completion of maintenance action; Remark:
7820 - Inform system operators upon completion of maintenance action
Inform system operators upon completion of maintenance action
322 - 321 - Document maintenance actions; Remark:
321 - Document maintenance actions
Document maintenance actions
2869 - 2585 - Document maintenance performed; Remark:2866
2585 - Document maintenance performed
Document maintenance performed
2866 - Record observations, times, and results for the maintenance report.
Record observations, times, and results for the maintenance report.
4706 - 4705 - Submit report; Remark:4864
4705 - Submit report
Submit report
4864 - As specified by management or contractual obligations.
As specified by management or contractual obligations.