Last Updated: 04/24/2025 1:42 AM
The following table lists all the components that make up the document.
Check the internal connections of the power supply module of the Thermo Scientific FHT 1377 PackEye.
Prior to arrival, notify operators concerning expected work, duration, and anticipated alarms and fault indications.
5662 - 5661 - Uninstall Power Supply Module; Remark:
5661 - Uninstall Power Supply Module
Uninstall Power Supply Module
5660 - 313 - Power off instrument; Remark:4086
313 - Power off instrument
Power off instrument
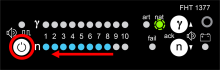
4086 - Press and hold the power button for approximately 10 seconds until indicator ...
Press and hold the power button for approximately 10 seconds until indicator lights are off.
5666 - 4222 - Place instrument on flat surface; Remark:4221
4222 - Place instrument on flat surface
Place instrument on flat surface
4221 - Shoulder straps should be facing down.
Shoulder straps should be facing down.
5667 - 3876 - Open top of backpack; Remark:5665
3876 - Open top of backpack
Open top of backpack
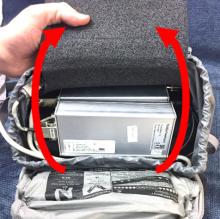
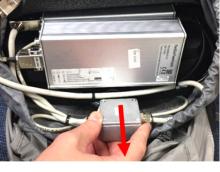
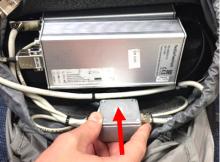
5668 - 4219 - Remove distribution box; Remark:4218
4219 - Remove distribution box
Remove distribution box
4218 - The distribution box is usually located in the top of the backpack.
The distribution box is usually located in the top of the backpack.
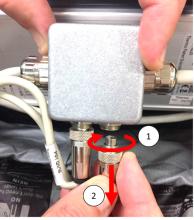
5669 - 4217 - Disconnect battery cable; Remark:4216
5664 - Note : The other cord connected to the distribution box is the headphone plug.
The other cord connected to the distribution box is the headphone plug.
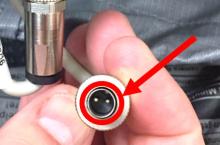
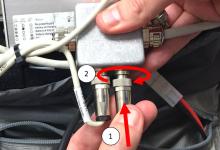
4217 - Disconnect battery cable
Disconnect battery cable
4216 - Rotate the collar counterclockwise and pull straight out. The battery cable c...
Rotate the collar counterclockwise and pull straight out. The battery cable can be identified by the two (2) interior prongs. Pliers may be needed.
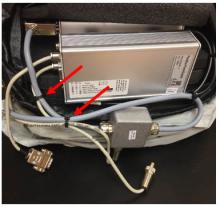
5673 - 5672 - Disconnect RS232 jumper; Remark:5670
5672 - Disconnect RS232 jumper
Disconnect RS232 jumper
5670 - Use small, slotted screwdriver.
Use small, slotted screwdriver.

5680 - 5679 - Disconnect Bluetooth adapter cable; Remark:5670
5679 - Disconnect Bluetooth adapter cable
Disconnect Bluetooth adapter cable
5670 - Use small, slotted screwdriver.
Use small, slotted screwdriver.

5681 - 5677 - Remove wire ties; Remark:5676
5677 - Remove wire ties
Remove wire ties
5676 - Note location of wire ties for reassembly. Use wire cutter or scissors.
Note location of wire ties for reassembly. Use wire cutter or scissors.
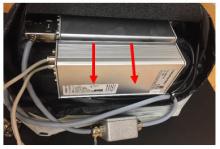
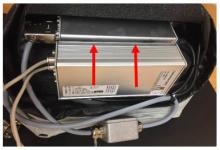
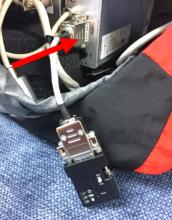
5682 - 5675 - Remove power supply module; Remark:5674
5675 - Remove power supply module
Remove power supply module
5674 - There are Velcro strips securing the power supply module to the FHT 681 ampli...
There are Velcro strips securing the power supply module to the FHT 681 amplifier. A slotted screwdriver might be needed to pry them apart.
5783 - 5782 - Inspect Internal Components; Remark:
5782 - Inspect Internal Components
Inspect Internal Components
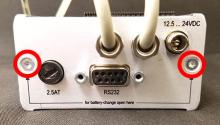
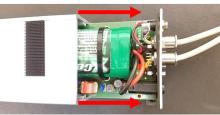
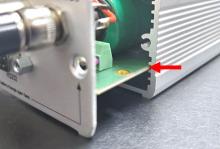
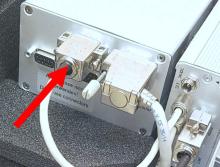
5821 - 5309 - Remove two (2) screws; Remark:5819
5309 - Remove two (2) screws
Remove two (2) screws
5819 - Only remove the screws on the side with the charger connector. Use T-10 Torx ...
Only remove the screws on the side with the charger connector. Use T-10 Torx screwdriver. Retain screws.
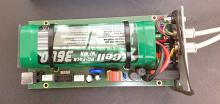
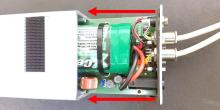
5822 - 5702 - Remove electronics; Remark:5818
5702 - Remove electronics
Remove electronics
5818 - Components will slide out of the housing.
Components will slide out of the housing.
5823 - 5817 - Inspect internal board for damage; Remark:5816
5817 - Inspect internal board for damage
Inspect internal board for damage
5816 - Check for loose connections, burn marks, and debris. Check battery for leakag...
Check for loose connections, burn marks, and debris. Check battery for leakage, bulging, burn marks, and any signs of overheating.
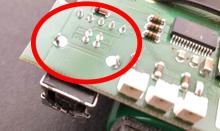
5824 - 5815 - Inspect underside of circuit board; Remark:5814
5815 - Inspect underside of circuit board
Inspect underside of circuit board
5814 - Check for loose connections, burn marks, and debris. Check USB port for damag...
Check for loose connections, burn marks, and debris. Check USB port for damage or loose connections.
5825 - 5813 - Disconnect spade connectors; Remark:5812
5813 - Disconnect spade connectors
Disconnect spade connectors
5812 - If wires are soldered to the board, skip this step.
If wires are soldered to the board, skip this step.
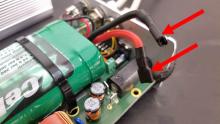
5826 - 5811 - Reconnect spade connectors from battery to internal board; Remark:5810
5553 - Caution : Correct placement of connectors and wiring is critical to proper operation.
Correct placement of connectors and wiring is critical to proper operation.
5811 - Reconnect spade connectors from battery to internal board
Reconnect spade connectors from battery to internal board
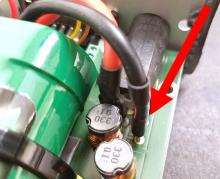
5810 - Ensure the black wire is connected closest to the edge of the board.
Ensure the black wire is connected closest to the edge of the board.
5827 - 5720 - Replace electronics; Remark:5719
5721 - Caution : Circuit board must be inserted correctly to prevent damage to components....
Circuit board must be inserted correctly to prevent damage to components.
5720 - Replace electronics
Replace electronics
5719 - Align circuit board with third slot from bottom of enclosure and slide into p...
Align circuit board with third slot from bottom of enclosure and slide into place.
5828 - 5718 - Align gasket; Remark:5717
5718 - Align gasket
Align gasket
5717 - Verify gasket is aligned between housing and end panel before inserting screw...
Verify gasket is aligned between housing and end panel before inserting screws.
5829 - 5716 - Reinstall two (2) enclosure screws; Remark:5714
5716 - Reinstall two (2) enclosure screws
Reinstall two (2) enclosure screws
5714 - Use T-10 Torx screwdriver.
Use T-10 Torx screwdriver.
5780 - 5779 - Reinstall Power Supply Module; Remark:
5779 - Reinstall Power Supply Module
Reinstall Power Supply Module
5834 - 5775 - Secure power supply module to FHT 681; Remark:5774
5775 - Secure power supply module to FHT 681
Secure power supply module to FHT 681
5774 - The module will snap into place.
The module will snap into place.
5835 - 5773 - Reconnect battery cable; Remark:5772
5773 - Reconnect battery cable
Reconnect battery cable
5772 - Align the connector and push in. Rotate collar clockwise and hand-tighten.
Align the connector and push in. Rotate collar clockwise and hand-tighten.
5836 - 5771 - Install wire ties; Remark:5769
5771 - Install wire ties
Install wire ties
5769 - If desired, install new wire ties and cut off excess.
If desired, install new wire ties and cut off excess.
5837 - 4237 - Replace distribution box; Remark:4236
4237 - Replace distribution box
Replace distribution box
5838 - 5788 - Reconnect Bluetooth adapter cable; Remark:5787
5788 - Reconnect Bluetooth adapter cable
Reconnect Bluetooth adapter cable
5839 - 5786 - Reconnect RS232 jumper; Remark:5670
5786 - Reconnect RS232 jumper
Reconnect RS232 jumper
5670 - Use small, slotted screwdriver.
Use small, slotted screwdriver.
322 - 321 - Zdokumentujte postupy údržby; Remark:
321 - Zdokumentujte postupy údržby
Zdokumentujte postupy údržby
2869 - 2585 - Zdokumentujte vykonané činnosti údržby; Remark:2866
2585 - Zdokumentujte vykonané činnosti údržby
Zdokumentujte vykonané činnosti údržby
2866 - Zaznamenajte pozorovania a výsledky pre správu o nápravnej údržbe.
Zaznamenajte pozorovania a výsledky pre správu o nápravnej údržbe.
4706 - 4705 - Submit report; Remark:4864
4705 - Submit report
Submit report
4864 - As specified by management or contractual obligations.
As specified by management or contractual obligations.