Last Updated: 04/25/2025 1:40 AM
The following table lists all the components that make up the document.
Replace power supply module in Thermo Scientific FHT 1377 PackEye.
Prior to arrival, notify operators concerning expected work, duration, and anticipated alarms and fault indications.
5767 - 5766 - Uninstall Faulty Power Supply Module; Remark:
5766 - Uninstall Faulty Power Supply Module
Uninstall Faulty Power Supply Module
5660 - 313 - Power off instrument; Remark:4086
313 - Power off instrument
Power off instrument
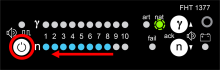
4086 - Press and hold the power button for approximately 10 seconds until indicator ...
Press and hold the power button for approximately 10 seconds until indicator lights are off.
5666 - 4222 - Place instrument on flat surface; Remark:4221
4222 - Place instrument on flat surface
Place instrument on flat surface
4221 - Shoulder straps should be facing down.
Shoulder straps should be facing down.
5667 - 3876 - Open top of backpack; Remark:5665
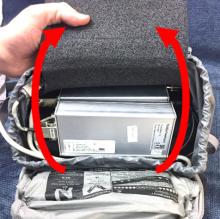
3876 - Open top of backpack
Open top of backpack
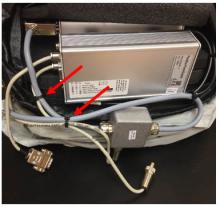
5668 - 4219 - Remove distribution box; Remark:4218
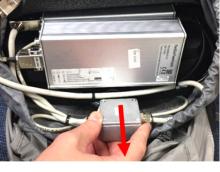
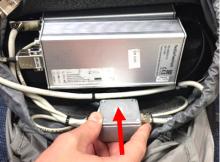
4219 - Remove distribution box
Remove distribution box
4218 - The distribution box is usually located in the top of the backpack.
The distribution box is usually located in the top of the backpack.
5669 - 4217 - Disconnect battery cable; Remark:4216
5664 - Note : The other cord connected to the distribution box is the headphone plug.
The other cord connected to the distribution box is the headphone plug.
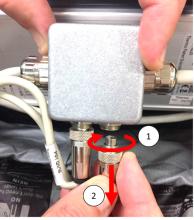
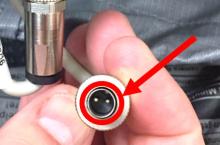
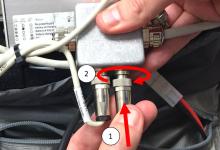
4217 - Disconnect battery cable
Disconnect battery cable
4216 - Rotate the collar counterclockwise and pull straight out. The battery cable c...
Rotate the collar counterclockwise and pull straight out. The battery cable can be identified by the two (2) interior prongs. Pliers may be needed.
5673 - 5672 - Disconnect RS232 jumper; Remark:5670
5672 - Disconnect RS232 jumper
Disconnect RS232 jumper
5670 - Use small, slotted screwdriver.
Use small, slotted screwdriver.

5680 - 5679 - Disconnect Bluetooth adapter cable; Remark:5670
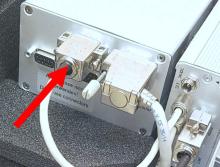
5679 - Disconnect Bluetooth adapter cable
Disconnect Bluetooth adapter cable
5670 - Use small, slotted screwdriver.
Use small, slotted screwdriver.

5681 - 5677 - Remove wire ties; Remark:5676
5677 - Remove wire ties
Remove wire ties
5676 - Note location of wire ties for reassembly. Use wire cutter or scissors.
Note location of wire ties for reassembly. Use wire cutter or scissors.
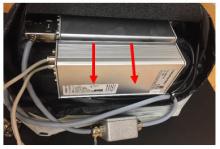
5682 - 5675 - Remove power supply module; Remark:5674
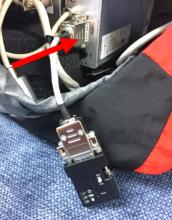
5675 - Remove power supply module
Remove power supply module
5674 - There are Velcro strips securing the power supply module to the FHT 681 ampli...
There are Velcro strips securing the power supply module to the FHT 681 amplifier. A slotted screwdriver might be needed to pry them apart.
5765 - 5764 - Install New Power Supply Module; Remark:
5764 - Install New Power Supply Module
Install New Power Supply Module
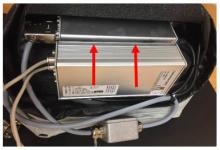
5843 - 5775 - Secure power supply module to FHT 681; Remark:5774
5775 - Secure power supply module to FHT 681
Secure power supply module to FHT 681
5774 - The module will snap into place.
The module will snap into place.
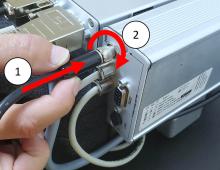
5844 - 5773 - Reconnect battery cable; Remark:5772
5773 - Reconnect battery cable
Reconnect battery cable
5772 - Align the connector and push in. Rotate collar clockwise and hand-tighten.
Align the connector and push in. Rotate collar clockwise and hand-tighten.
5845 - 5771 - Install wire ties; Remark:5769
5771 - Install wire ties
Install wire ties
5769 - If desired, install new wire ties and cut off excess.
If desired, install new wire ties and cut off excess.
5846 - 4237 - Replace distribution box; Remark:4236
4237 - Replace distribution box
Replace distribution box
5847 - 5788 - Reconnect Bluetooth adapter cable; Remark:5787
5788 - Reconnect Bluetooth adapter cable
Reconnect Bluetooth adapter cable
5848 - 5786 - Reconnect RS232 jumper; Remark:5785
5786 - Reconnect RS232 jumper
Reconnect RS232 jumper
5785 - Use small, slotted screwdriver to secure connector.
Use small, slotted screwdriver to secure connector.
5763 - 5762 - Check Battery Charging; Remark:
5762 - Check Battery Charging
Check Battery Charging
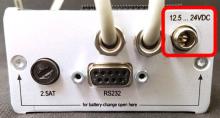
5798 - 4718 - Connect charger; Remark:5797
4718 - Connect charger
Connect charger
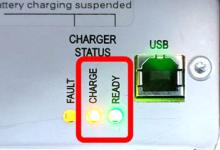
5799 - 4716 - Verify instrument is charging; Remark:5752
4716 - Verify instrument is charging
Verify instrument is charging
5752 - CHARGE (yellow) and READY (green) LEDs will...
CHARGE (yellow) and READY (green) LEDs will be illuminated.
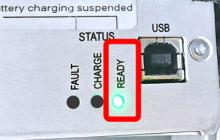
5853 - 5796 - Charge Instrument; Remark:5795
5796 - Charge Instrument
Charge Instrument
5795 - It is recommended to fully charge the battery before first use. Only the gree...
It is recommended to fully charge the battery before first use. Only the green READY LED will be lit.
5761 - 319 - Perform operational test; Remark:5760
319 - Perform operational test
Perform operational test
5760 - DET-HHD-THR-PAK-RM01, PackEye Operational Test
DET-HHD-THR-PAK-RM01, PackEye Operational Test
322 - 321 - Document maintenance actions; Remark:
321 - Document maintenance actions
Document maintenance actions
2869 - 2585 - Document maintenance performed; Remark:2866
2585 - Document maintenance performed
Document maintenance performed
2866 - Record observations, times, and results for the maintenance report.
Record observations, times, and results for the maintenance report.
4706 - 4705 - Submit report; Remark:4864
4705 - Submit report
Submit report
4864 - As specified by management or contractual obligations.
As specified by management or contractual obligations.