Last Updated: 06/09/2025 1:38 AM
The following table lists all the components that make up the document.
Upload spectra from the Smiths Detection RadSeeker CS to computer. Attach spectra to an event in RAVEN central alarm station (CAS).
This procedure is accurate for RAVEN software V2.4.1, Build 116.
Reinserted all pictures in PNG format. Made several small editorial changes throughout. Previous version was COM-RVN-SMD-OP01.
3719 - 3687 - Upload Spectra; Remark:
3687 - Upload Spectra
Upload Spectra
3720 - 220 - Power on instrument; Remark:2303
3666 - Note : Smiths Detection Connection Manager and Detector Controller must be installed...
Smiths Detection Connection Manager and Detector Controller must be installed on the computer before connecting the RadSeeker.
220 - Power on instrument
Power on instrument
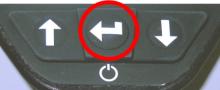
2303 - Press and hold ENTER button until display powers on (3 to 5 ...
Press and hold ENTER button until display powers on (3 to 5 seconds).
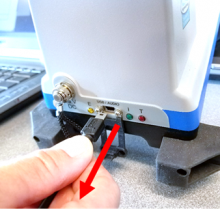
3721 - 3601 - Connect instrument to computer; Remark:3607
3601 - Connect instrument to computer
Connect instrument to computer
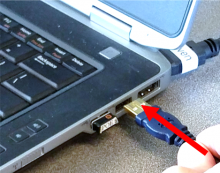
3607 - Use USB-A to mini-USB cable provided with RadSeeker.
Use USB-A to mini-USB cable provided with RadSeeker.

3651 - If Detector Controller software does not start automatically, double click ic...
If Detector Controller software does not start automatically, double click icon. Click File, then Connect and select a COM port to connect to instrument.
3722 - 3635 - Wait for Detector Controller to open; Remark:3652
3635 - Wait for Detector Controller to open
Wait for Detector Controller to open
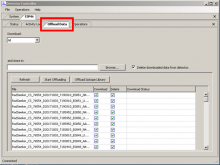
3652 - Detector Controller opens automatically to the Offload Data ...
Detector Controller opens automatically to the Offload Data tab.
5581 - If the computer cannot connect with the RadSeeker, refer to DET-HHD-SMD-OP04,...
If the computer cannot connect with the RadSeeker, refer to DET-HHD-SMD-OP04, RadSeeker Detector Controller Installation.
3723 - 3636 - Select files to transfer; Remark:3653
3667 - Note : RadSeeker stores three files for every identification measurement; it is only...
RadSeeker stores three files for every identification measurement; it is only necessary to upload and attach the N42.n42 file.
3668 - Note : Delete spectra from RadSeeker after upload by selecting Delete downloaded dat...
Delete spectra from RadSeeker after upload by selecting Delete downloaded data from detector.
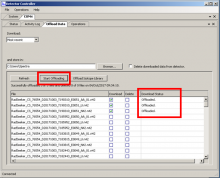
3636 - Select files to transfer
Select files to transfer
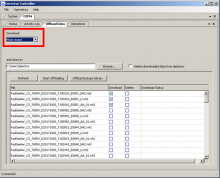
3653 - Under Download, select which files to transfer to computer. ...
Under Download, select which files to transfer to computer. Choose All, Most recent, or Event number range.
3724 - 3637 - Select location to store files; Remark:3654
3637 - Select location to store files
Select location to store files
3654 - Select the location to save the files to by clicking Browse....
Select the location to save the files to by clicking Browse.

3725 - 3638 - Click Start Offloading; Remark:3655
3638 - Click Start Offloading
Click Start Offloading
3655 - The Download Status will display Offloaded when the file upl...
The Download Status will display Offloaded when the file upload is complete.
3700 - 3591 - Disconnect instrument from computer; Remark:3622
3591 - Disconnect instrument from computer
Disconnect instrument from computer
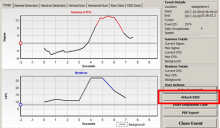
3727 - 3641 - Attach Spectra; Remark:
3641 - Attach Spectra
Attach Spectra
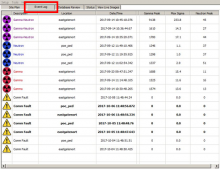
3729 - 3642 - Klikněte na událost alarmu, abyste mohli připojit spektra; Remark:3658
3642 - Click on alarm event to attach spectra
Click on alarm event to attach spectra

3730 - 3643 - Klikněte na Attach RIID (Připojit RIID); Remark:3659
3643 - Click Attach RIID
Click Attach RIID
3731 - 3644 - Click Import File; Remark:3660
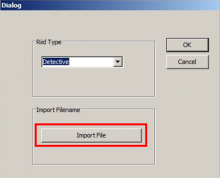
3669 - Note : RadSeeker is not currently available in the Riid Type dropdo...
RadSeeker is not currently available in the Riid Type dropdown menu. Choose Detective or Identifinder option.
3644 - Click Import File
Click Import File
3732 - 3645 - Open spectrum; Remark:3661
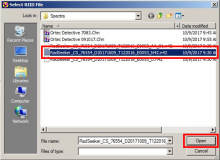
3645 - Open spectrum
Open spectrum
3661 - Locate spectral file previously saved. Select the N42.N42 file (ANSI format)....
Locate spectral file previously saved. Select the N42.N42 file (ANSI format). Click Open.
3733 - 3646 - Kliknutím na tlačítko OK zavřete dialogové okno; Remark:3662
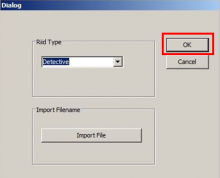
3646 - Click OK to close Dialog window
Click OK to close Dialog window
3734 - 3647 - Click RIID Data tab to verify attachment; Remark:3663
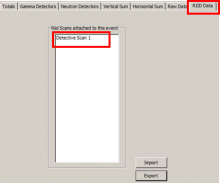
3647 - Click RIID Data tab to verify attachment
Click RIID Data tab to verify attachment
3663 - The attached file(s) will be listed under Riid Scans attached to this...
The attached file(s) will be listed under Riid Scans attached to this event.

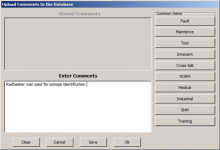
3736 - 3649 - Type a comment; Remark:3665
3649 - Type a comment
Type a comment
3665 - The comment should indicate that a RadSeeker was used to perform identificati...
The comment should indicate that a RadSeeker was used to perform identification.
3737 - 3650 - Click OK; Remark:
3650 - Click OK
Click OK
253 - 242 - Document and report any unresolved problems; Remark:
242 - Document and report any unresolved problems
Document and report any unresolved problems