Last Updated: 04/25/2025 1:35 AM
The following table lists all the components that make up the document.
Sostituire NHA-472 (scheda alta tensione neutroni) sul PRM-470 CGN
Prima dell'arrivo, comunicare agli addetti le attività da eseguire e la durata prevista
247 - 214 - Predisporre lo strumento per il funzionamento; Remark:
257 - Preparare lo strumento
Preparare lo strumento
2548 - 205 - Scollegare il caricatore; Remark:2547
205 - Scollegare il caricatore
Scollegare il caricatore

397 - 313 - Spegnere lo strumento; Remark:398
313 - Spegnere lo strumento
Spegnere lo strumento
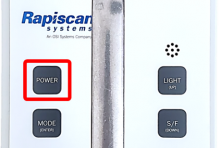
398 - Tenere premuto il pulsante POWER finché lo strumento non si spegne.
Tenere premuto il pulsante POWER finché lo strumento non si spegne.
261 - 65 - Allentare le quattro (4) viti sul coperchio; Remark:264
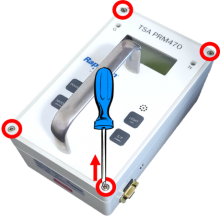
65 - Allentare le quattro (4) viti sul coperchio
Allentare le quattro (4) viti sul coperchio
264 - Utilizzare un cacciavite a croce medio (PH2). Non è necessario rimuovere complet...
Utilizzare un cacciavite a croce medio (PH2). Non è necessario rimuovere completamente le viti.
263 - 262 - Rimuovere il coperchio dallo strumento; Remark:413
2771-Nota : All'interno dello strumento sono presenti schede a circuiti di rilevamento ad al...
All'interno dello strumento sono presenti schede a circuiti di rilevamento ad alta tensione; tuttavia, queste trasportano una corrente estremamente ridotta che non pone rischi per la salute.
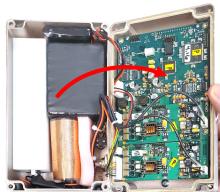
262 - Rimuovere il coperchio dallo strumento
Rimuovere il coperchio dallo strumento
2734 - 266 - Individuare i collegamenti della batteria; Remark:2733
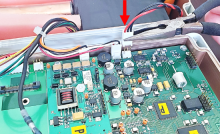
3033-Nota : I modelli PRM-470 CGN hanno una scheda e dei connettori aggiuntivi non raffigura...
I modelli PRM-470 CGN hanno una scheda e dei connettori aggiuntivi non raffigurati nelle immagini delle note.
266 - Individuare i collegamenti della batteria
Individuare i collegamenti della batteria
2733 - Il collegamento della batteria è contrassegnato con 1.
Il collegamento della batteria è contrassegnato con 1.
271 - 270 - Scollegare la batteria; Remark:414
1345-Nota : È buona norma assicurarsi che tutti i cavi e i connettori siano contrassegnati p...
È buona norma assicurarsi che tutti i cavi e i connettori siano contrassegnati prima di scollegarli.
270 - Scollegare la batteria
Scollegare la batteria

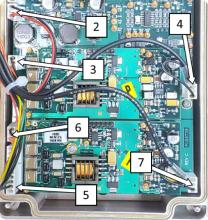
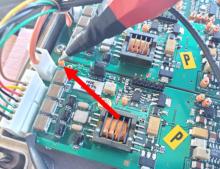
2737 - 2736 - Scollegare il cablaggio della scheda NHA-472; Remark:2735
2736 - Scollegare il cablaggio della scheda NHA-472
Scollegare il cablaggio della scheda NHA-472
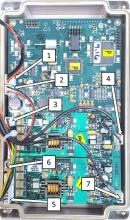
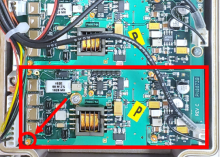
2735 - Rimuovere i connettori in corrispondenza delle posizioni 5, 6 e 7.
Rimuovere i connettori in corrispondenza delle posizioni 5, 6 e 7.

2739 - 2738 - Rimuovere la NHA-472 difettosa; Remark:
2738 - Rimuovere la NHA-472 difettosa
Rimuovere la NHA-472 difettosa
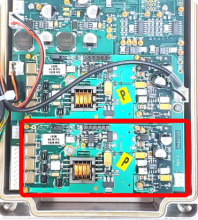
2742 - 2741 - Identificare la scheda NHA-472; Remark:2740
2741 - Identificare la scheda NHA-472
Identificare la scheda NHA-472
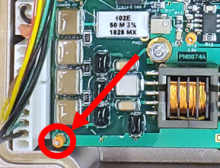
2745 - 2744 - Rimuovere il dado di fissaggio della scheda NHA-472; Remark:2743
2744 - Rimuovere il dado di fissaggio della scheda NHA-472
Rimuovere il dado di fissaggio della scheda NHA-472
2748 - 2747 - Rimuovere la scheda NHA-472; Remark:2746
2747 - Rimuovere la scheda NHA-472
Rimuovere la scheda NHA-472
2746 - Fare delicatamente leva su ogni lato e sollevare
Fare delicatamente leva su ogni lato e sollevare


2750 - 2749 - Installare la nuova NHA-472; Remark:
2749 - Installare la nuova NHA-472
Installare la nuova NHA-472
2753 - 2752 - Fissare la nuova NHA-472; Remark:2751
2752 - Fissare la nuova NHA-472
Fissare la nuova NHA-472
2751 - Verificare che i connettori siano allineati correttamente, quindi premere verso ...
Verificare che i connettori siano allineati correttamente, quindi premere verso il basso.


2756 - 2755 - Riposizionare il dado di fissaggio; Remark:2754
504-Attenzione : Non serrare eccessivamente il dado di fissaggio.
Non serrare eccessivamente il dado di fissaggio.
2755 - Riposizionare il dado di fissaggio
Riposizionare il dado di fissaggio
2758 - 2757 - Ricollegare il cablaggio; Remark:
2757 - Ricollegare il cablaggio
Ricollegare il cablaggio
2761 - 2760 - Ricollegare tutti i connettori tranne la batteria; Remark:2759
2760 - Ricollegare tutti i connettori tranne la batteria
Ricollegare tutti i connettori tranne la batteria
2759 - Non collegare la posizione 1.
Non collegare la posizione 1.
2763 - 305 - Ricollegare la batteria; Remark:2762
305 - Ricollegare la batteria
Ricollegare la batteria
2762 - Reconnect PRM-470 battery

2766 - 2764 - Regolare l'alta tensione dei neutroni; Remark:
2765-Nota : Le stesse schede a circuiti sono utilizzate per i rilevatori di gamma e neutroni...
Le stesse schede a circuiti sono utilizzate per i rilevatori di gamma e neutroni; tuttavia, la scheda del rilevatore di neutroni NHA-472 richiede regolazioni di tensione diverse.
2764 - Regolare l'alta tensione dei neutroni
Regolare l'alta tensione dei neutroni
2770 - 2769 - Identificare il produttore del rilevatore di neutroni; Remark:2767
2769 - Identificare il produttore del rilevatore di neutroni
Identificare il produttore del rilevatore di neutroni
2767 - Per accedere alle informazioni sul rilevatore neutroni, rimuovere il moderatore ...
Per accedere alle informazioni sul rilevatore neutroni, rimuovere il moderatore dalla custodia e far scivolare fuori il rilevatore neutroni.


2768 - Le informazioni sul rilevatore sono stampate sullo stesso. Ci sono due (2) produ...
Le informazioni sul rilevatore sono stampate sullo stesso. Ci sono due (2) produttori di rilevatori di neutroni: GE Reuter-Stokes e LND. RS indica GE Reuter-Stokes.

2772 - 220 - Accendere lo strumento; Remark:228
2771-Nota : All'interno dello strumento sono presenti schede a circuiti di rilevamento ad al...
All'interno dello strumento sono presenti schede a circuiti di rilevamento ad alta tensione; tuttavia, queste trasportano una corrente estremamente ridotta che non pone rischi per la salute.
220 - Accendere lo strumento
Accendere lo strumento
228 - Premere il pulsante POWER finché il display non si accende.
Premere il pulsante POWER finché il display non si accende.
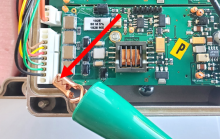
2777 - 2776 - Collegare la sonda HV al DMM; Remark:2774
2776 - Collegare la sonda HV al DMM
Collegare la sonda HV al DMM
2774 - Utilizzare la sonda ad alta tensione Fluke 80K-40 e il DMM Fluke 179. La linguet...
Utilizzare la sonda ad alta tensione Fluke 80K-40 e il DMM Fluke 179. La linguetta GND deve essere allineata con la posizione COM.

2658 - 2566 - Passare il DMM alla corrente continua; Remark:2613
2566 - Passare il DMM alla corrente continua
Passare il DMM alla corrente continua

2785 - 2567 - Individuare il punto di test della terra; Remark:2782
2567 - Individuare il punto di test della terra
Individuare il punto di test della terra
2782 - La terra del neutrone TP38 si trova sulla scheda del neutrone NHA-472 e potrebbe...
La terra del neutrone TP38 si trova sulla scheda del neutrone NHA-472 e potrebbe non essere chiaramente contrassegnata.
2790 - 2789 - Collegare la sonda HV a terra; Remark:2787
2789 - Collegare la sonda HV a terra
Collegare la sonda HV a terra
2787 - Il connettore di terra per la sonda HV può essere collegato direttamente al punt...
Il connettore di terra per la sonda HV può essere collegato direttamente al punto di test di terra.
2788 - Potrebbe essere più semplice utilizzare un cavo di test separato (filo ponticell...
Potrebbe essere più semplice utilizzare un cavo di test separato (filo ponticellato) e collegare la terra della sonda HV al cavo di test.

2794 - 2792 - Individuare il punto di test dell'alta tensione; Remark:2791
2793-Avvertimento : Il punto di test è ad alta tensione. Il contatto con il punto di test deve avven...
Il punto di test è ad alta tensione. Il contatto con il punto di test deve avvenire solo con la sonda ad alta tensione.
2792 - Individuare il punto di test dell'alta tensione
Individuare il punto di test dell'alta tensione
2791 - Il TP34 dell'alta tensione del neutrone si trova sulla scheda del neutrone NHA-4...
Il TP34 dell'alta tensione del neutrone si trova sulla scheda del neutrone NHA-472 e potrebbe non essere chiaramente contrassegnato.

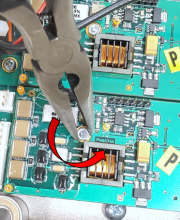
2797 - 2796 - Mettere in contatto la sonda HV con il punto di test; Remark:2795
2796 - Mettere in contatto la sonda HV con il punto di test
Mettere in contatto la sonda HV con il punto di test
2795 - Mettere a contatto TP34 (non etichettato) con la punta della sonda HV rossa.
Mettere a contatto TP34 (non etichettato) con la punta della sonda HV rossa.
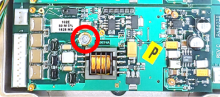
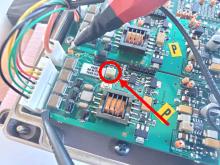
2874 - 2873 - Individuare la regolazione dell'alta tensione dei neutroni; Remark:2872
2873 - Individuare la regolazione dell'alta tensione dei neutroni
Individuare la regolazione dell'alta tensione dei neutroni
2872 - R10 sulla scheda neutroni NHA-472 è utilizzato per regolare l'alta tensione per ...
R10 sulla scheda neutroni NHA-472 è utilizzato per regolare l'alta tensione per il rilevatore di neutroni.
2885 - 2881 - Regolare l'alta tensione dei neutroni; Remark:2875
2884-Standard : L'alta tensione per un rilevatore di neutroni GE Reuter-Stokes è di 990 Volt. L'...
L'alta tensione per un rilevatore di neutroni GE Reuter-Stokes è di 990 Volt. L'alta tensione per un rilevatore di neutroni LND è di 1075 Volt.
2881 - Regolare l'alta tensione dei neutroni
Regolare l'alta tensione dei neutroni
2875 - Utilizzare un cacciavite di precisione a intaglio (tweaker) per regolare R10. La...
Utilizzare un cacciavite di precisione a intaglio (tweaker) per regolare R10. La tensione deve corrispondere a quella raccomandata dal produttore._x000D_
GE Reuter-Stokes: 990 Volt_x000D_
LND: 1075 Volt.

2878 - Il numero indicato sul DMM deve essere moltiplicato per 1000 se si utilizza la s...
Il numero indicato sul DMM deve essere moltiplicato per 1000 se si utilizza la sonda Fluke 80K-40.

2889 - 2888 - Rimuovere i cavi della sonda HV; Remark:
2888 - Rimuovere i cavi della sonda HV
Rimuovere i cavi della sonda HV
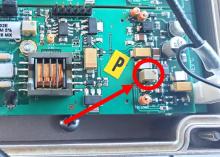
2893 - 2892 - Individuare la regolazione del guadagno della fase 2 del neutrone; Remark:2891
2892 - Individuare la regolazione del guadagno della fase 2 del neutrone
Individuare la regolazione del guadagno della fase 2 del neutrone
2891 - L'R17 sulla scheda neutroni NHA-472 viene utilizzato per regolare il guadagno de...
L'R17 sulla scheda neutroni NHA-472 viene utilizzato per regolare il guadagno della fase 2.
2896 - 2895 - Impostare il guadagno della fase 2 al massimo; Remark:2894
2895 - Impostare il guadagno della fase 2 al massimo
Impostare il guadagno della fase 2 al massimo
2894 - Utilizzare un cacciavite ad intaglio (tweaker) per ruotare R17 di 10 giri comple...
Utilizzare un cacciavite ad intaglio (tweaker) per ruotare R17 di 10 giri completi in senso orario.

303 - 302 - Riassemblare lo strumento; Remark:
302 - Riassemblare lo strumento
Riassemblare lo strumento
2898 - 307 - Riposizionare il coperchio anteriore; Remark:2897
304-Attenzione : Assicurarsi che tutto il cablaggio sia all'interno dello strumento mentre si sos...
Assicurarsi che tutto il cablaggio sia all'interno dello strumento mentre si sostituisce il coperchio.
307 - Riposizionare il coperchio anteriore
Riposizionare il coperchio anteriore

310 - 309 - Serrare le quattro (4) viti del coperchio; Remark:417
569-Attenzione : Non serrare eccessivamente le viti.
Non serrare eccessivamente le viti.
309 - Serrare le quattro (4) viti del coperchio
Serrare le quattro (4) viti del coperchio
417 - Utilizzi un cacciavite a croce medio (PH2).
Utilizzi un cacciavite a croce medio (PH2).

320 - 319 - Eseguire il test funzionale; Remark:347
319 - Eseguire il test funzionale
Eseguire il test funzionale
347 - Eseguire il test operativo DET-HHD-RAP-RM01 PRM-470 .
Eseguire il test operativo DET-HHD-RAP-RM01 PRM-470 .
322 - 321 - Documentare le attività di manutenzione; Remark:
321 - Documentare le attività di manutenzione
Documentare le attività di manutenzione
2869 - 2585 - Documentare la manutenzione eseguita; Remark:2866
2585 - Documentare la manutenzione eseguita
Documentare la manutenzione eseguita
2866 - Annotare le osservazioni e i risultati per il Rapporto di manutenzione correttiv...
Annotare le osservazioni e i risultati per il Rapporto di manutenzione correttiva.
4706 - 4705 - Inoltrare il report; Remark:4864
4705 - Inoltrare il report
Inoltrare il report
4864 - Inviare il file di valutazione HATS elettronicamente con il Rapporto di manutenz...
Inviare il file di valutazione HATS elettronicamente con il Rapporto di manutenzione ordinaria.