Last Updated: 05/12/2025 1:55 AM
The following table lists all the components that make up the document.
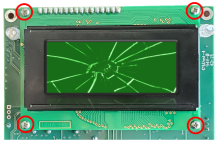
Replace LCD assembly (LCD screen and display circuit board) on PRM-470.
Prior to arrival, notify operators concerning expected work and duration.
247 - 214 - Pregătirea instrumentului pentru operare; Remark:
257 - Demontați instrumentul
Demontați instrumentul
607 - 205 - Deconectați încărcătorul; Remark:
205 - Deconectați încărcătorul
Deconectați încărcătorul
260 - 313 - Opriți instrumentul; Remark:
313 - Opriți instrumentul
Opriți instrumentul
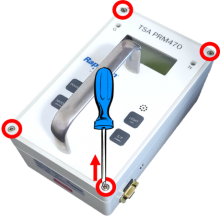
261 - 65 - Deșurubați cele patru (4) șuruburi ale capacului; Remark:264
65 - Deșurubați cele patru (4) șuruburi ale capacului
Deșurubați cele patru (4) șuruburi ale capacului
264 - Folosiți o șurubelniță Phillips (PH2). Șuruburile nu trebuie îndepărta...
Folosiți o șurubelniță Phillips (PH2). Șuruburile nu trebuie îndepărtate complet.
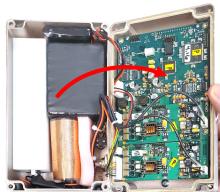
263 - 262 - Îndepărtați capacul instrumentului; Remark:413
2771—Notă : În interiorul instrumentului există plăci de circuite imprimate de înalt�...
În interiorul instrumentului există plăci de circuite imprimate de înaltă tensiune; cu toate acestea, ele transportă curent cu o intensitate foarte mică, ce nu reprezintă un pericol pentru sănătate.
262 - Îndepărtați capacul instrumentului
Îndepărtați capacul instrumentului
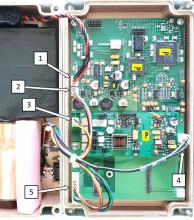
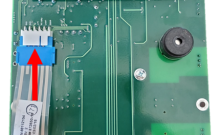
267 - 266 - Localizați conexiunea bateriei; Remark:272
3033—Notă : Modelele PRM-470 CGN au suplimentar o placă și conectori care nu sunt preze...
Modelele PRM-470 CGN au suplimentar o placă și conectori care nu sunt prezentați în imagini.
266 - Localizați conexiunea bateriei
Localizați conexiunea bateriei
272 - Conexiunea bateriei este etichetată cu 1.
Conexiunea bateriei este etichetată cu 1.
271 - 270 - Deconectați bateria; Remark:414
1345—Notă : Este o bună practică inginerească să vă asigurați că toate cablurile �...
Este o bună practică inginerească să vă asigurați că toate cablurile și toți conectorii sunt etichetate înainte de deconectarea lor.
270 - Deconectați bateria
Deconectați bateria

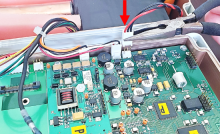
443 - 442 - Odpojte zbývající konektory; Remark:
442 - Disconnect remaining connectors
Disconnect remaining connectors
618 - 615 - Uninstall PRCB-472 board; Remark:
615 - Uninstall PRCB-472 board
Uninstall PRCB-472 board
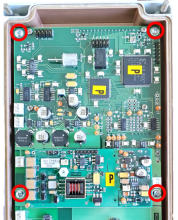
446 - 445 - Remove four (4) mounting screws; Remark:444
445 - Remove four (4) mounting screws
Remove four (4) mounting screws
444 - Use a small Phillips (PH1) screwdriver. Retain screws.
Use a small Phillips (PH1) screwdriver. Retain screws.
450 - 449 - Zvedněte okraj desky PRCB-472, abyste se dostali pod ni; Remark:448
447 - Caution : Do not damage ribbon cable attached to the underside of PRCB-472.
Do not damage ribbon cable attached to the underside of PRCB-472.
449 - Raise edge of PRCB-472 board to access underside
Raise edge of PRCB-472 board to access underside
756 - 452 - Odpojte konektor překryvného tlačítka; Remark:754
452 - Disconnect overlay button connector
Disconnect overlay button connector
757 - 711 - Uninstall faulty LCD assembly; Remark:
711 - Uninstall faulty LCD assembly
Uninstall faulty LCD assembly
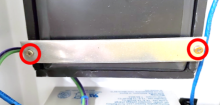
758 - 632 - Remove four (4) LCD assembly mounting screws; Remark:755
632 - Remove four (4) LCD assembly mounting screws
Remove four (4) LCD assembly mounting screws
755 - Use a small Phillips (PH1) screwdriver. Retain screws.
Use a small Phillips (PH1) screwdriver. Retain screws.
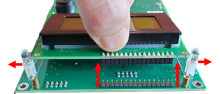
761 - 638 - Odpojte sestavu LCD; Remark:759
638 - Disconnect LCD assembly
Disconnect LCD assembly
759 - The LEDs on either side of LCD assembly may need to be slightly spread to all...
The LEDs on either side of LCD assembly may need to be slightly spread to allow for removal.
3397 - 3395 - Označte vadnou součástku; Remark:3396
3395 - Label faulty component
Label faulty component
3396 - Use tag or tape. Include date of removal, description of failure symptoms, co...
Use tag or tape. Include date of removal, description of failure symptoms, country, site, and lane number. Dispose per Nuclear Smuggling Detection and Deterrence (NSDD) guidance or contractual requirements.
764 - 713 - Install new LCD assembly; Remark:
713 - Install new LCD assembly
Install new LCD assembly
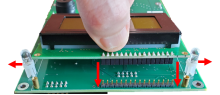
762 - 647 - Set LCD assembly in place; Remark:760
647 - Set LCD assembly in place
Set LCD assembly in place
760 - LEDs on either side of the display may need to be slightly spread to allow fo...
LEDs on either side of the display may need to be slightly spread to allow for placement.
763 - 649 - Zašroubujte zpět čtyři (4) montážní šrouby; Remark:753
649 - Reinstall four (4) mounting screws
Reinstall four (4) mounting screws
753 - Use a small Phillips (PH1) screwdriver.
Use a small Phillips (PH1) screwdriver.
465 - 463 - Znovu připojte konektor překryvného tlačítka; Remark:464
462 - Caution : Correct placement of connectors and wiring is critical to proper operation.
Correct placement of connectors and wiring is critical to proper operation.
463 - Reconnect overlay button connector
Reconnect overlay button connector
470 - 468 - Set PRCB-472 board over mounting posts; Remark:469
468 - Set PRCB-472 board over mounting posts
Set PRCB-472 board over mounting posts
469 - Position ribbon cable to avoid obstructing PRCB-472 mounting hole.
Position ribbon cable to avoid obstructing PRCB-472 mounting hole.
769 - 471 - Zašroubujte zpět čtyři (4) montážní šrouby; Remark:472
471 - Reinstall four (4) mounting screws
Reinstall four (4) mounting screws
472 - Use a small Phillips (PH1) screwdriver.
Use a small Phillips (PH1) screwdriver.

684 - 683 - Finish instrument assembly; Remark:
683 - Finish instrument assembly
Finish instrument assembly
500 - 498 - Reconnect all connectors except battery; Remark:499
498 - Reconnect all connectors except battery
Reconnect all connectors except battery
499 - Do not connect location 1.
Do not connect location 1.

306 - 305 - Reconectați bateria; Remark:416
305 - Reconectați bateria
Reconectați bateria
308 - 307 - Așezați la loc capacul frontal; Remark:
304—Atenție : Verificați dacă toate cablurile sunt în interiorul instrumentului în timp...
Verificați dacă toate cablurile sunt în interiorul instrumentului în timp ce înlocuiți capacul.
307 - Așezați la loc capacul frontal
Așezați la loc capacul frontal
310 - 309 - Strângeți cele patru (4) șuruburi ale capacului; Remark:417
569—Atenție : Nu strângeți excesiv șuruburile.
Nu strângeți excesiv șuruburile.
309 - Strângeți cele patru (4) șuruburi ale capacului
Strângeți cele patru (4) șuruburi ale capacului

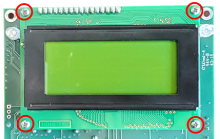
359 - 319 - Perform operational test; Remark:347
319 - Perform operational test
Perform operational test
347 - Perform DET-HHD-RAP-RM01 PRM-470 Operational Test.
Perform DET-HHD-RAP-RM01 PRM-470 Operational Test.
322 - 321 - Documentați acțiunile de întreținere; Remark:
321 - Documentați acțiunile de întreținere
Documentați acțiunile de întreținere
2869 - 2585 - Documentați acțiunile de întreținere întreprinse; Remark:2866
2585 - Documentați acțiunile de întreținere întreprinse
Documentați acțiunile de întreținere întreprinse
2866 - Notați observațiile și rezultatele pentru Raportul de întreținere corect...
Notați observațiile și rezultatele pentru Raportul de întreținere corectivă.
4706 - 4705 - Submit report; Remark:4864
4705 - Submit report
Submit report
4864 - As specified by management or contractual obligations.
As specified by management or contractual obligations.