Last Updated: 04/30/2025 1:39 AM
The following table lists all the components that make up the document.
Replace button overlay on PRM-470
Prior to arrival, notify operators concerning expected work and duration.
247 - 214 - Pregătirea instrumentului pentru operare; Remark:
257 - Demontați instrumentul
Demontați instrumentul
607 - 205 - Deconectați încărcătorul; Remark:
205 - Deconectați încărcătorul
Deconectați încărcătorul
260 - 313 - Opriți instrumentul; Remark:
313 - Opriți instrumentul
Opriți instrumentul
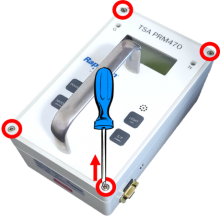
261 - 65 - Deșurubați cele patru (4) șuruburi ale capacului; Remark:264
65 - Deșurubați cele patru (4) șuruburi ale capacului
Deșurubați cele patru (4) șuruburi ale capacului
264 - Folosiți o șurubelniță Phillips (PH2). Șuruburile nu trebuie îndepărta...
Folosiți o șurubelniță Phillips (PH2). Șuruburile nu trebuie îndepărtate complet.
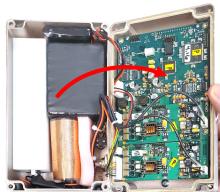
263 - 262 - Îndepărtați capacul instrumentului; Remark:413
2771—Notă : În interiorul instrumentului există plăci de circuite imprimate de înalt�...
În interiorul instrumentului există plăci de circuite imprimate de înaltă tensiune; cu toate acestea, ele transportă curent cu o intensitate foarte mică, ce nu reprezintă un pericol pentru sănătate.
262 - Îndepărtați capacul instrumentului
Îndepărtați capacul instrumentului
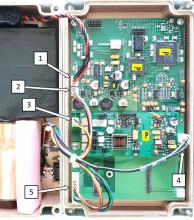
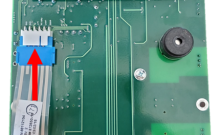
267 - 266 - Localizați conexiunea bateriei; Remark:272
3033—Notă : Modelele PRM-470 CGN au suplimentar o placă și conectori care nu sunt preze...
Modelele PRM-470 CGN au suplimentar o placă și conectori care nu sunt prezentați în imagini.
266 - Localizați conexiunea bateriei
Localizați conexiunea bateriei
272 - Conexiunea bateriei este etichetată cu 1.
Conexiunea bateriei este etichetată cu 1.
271 - 270 - Deconectați bateria; Remark:414
1345—Notă : Este o bună practică inginerească să vă asigurați că toate cablurile �...
Este o bună practică inginerească să vă asigurați că toate cablurile și toți conectorii sunt etichetate înainte de deconectarea lor.
270 - Deconectați bateria
Deconectați bateria

443 - 442 - Disconnect remaining connectors; Remark:
442 - Disconnect remaining connectors
Disconnect remaining connectors
618 - 615 - Uninstall PRCB-472 board; Remark:
615 - Uninstall PRCB-472 board
Uninstall PRCB-472 board
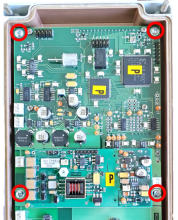
446 - 445 - Remove four (4) mounting screws; Remark:444
445 - Remove four (4) mounting screws
Remove four (4) mounting screws
444 - Use a small Phillips (PH1) screwdriver. Retain screws.
Use a small Phillips (PH1) screwdriver. Retain screws.
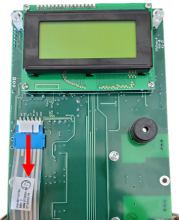
450 - 449 - Raise edge of PRCB-472 board to access underside; Remark:448
447 - Caution : Do not damage ribbon cable attached to the underside of PRCB-472.
Do not damage ribbon cable attached to the underside of PRCB-472.
449 - Raise edge of PRCB-472 board to access underside
Raise edge of PRCB-472 board to access underside
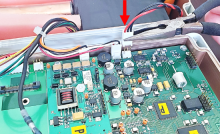
453 - 452 - Disconnect overlay button connector; Remark:451
452 - Disconnect overlay button connector
Disconnect overlay button connector
595 - 572 - Remove four (4) cover screws; Remark:594
572 - Remove four (4) cover screws
Remove four (4) cover screws
594 - Completely remove screws by continuing to thread them out of the front cover....
Completely remove screws by continuing to thread them out of the front cover.
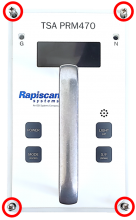
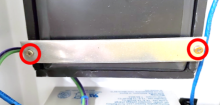
597 - 573 - Remove two (2) handle mounting screws; Remark:593
573 - Remove two (2) handle mounting screws
Remove two (2) handle mounting screws
593 - Use a medium Phillips screwdriver (PH2). Retain screws.
Use a medium Phillips screwdriver (PH2). Retain screws.
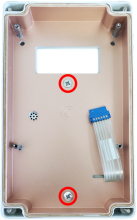
598 - 574 - Uninstall faulty overlay; Remark:
574 - Uninstall faulty overlay
Uninstall faulty overlay
599 - 575 - Peel off faulty overlay; Remark:592
575 - Peel off faulty overlay
Peel off faulty overlay
592 - Use a scraping tool or blade to begin. The overlay has two (2) layers. Verify...
Use a scraping tool or blade to begin. The overlay has two (2) layers. Verify both layers are being removed from the case.
600 - 576 - Clean case cover; Remark:591
576 - Clean case cover
Clean case cover
591 - Use scraper, adhesive remover, and rags to remove excess adhesive.
Use scraper, adhesive remover, and rags to remove excess adhesive.
601 - 580 - Install new button overlay; Remark:
580 - Install new button overlay
Install new button overlay
602 - 577 - Expose adhesive; Remark:590
577 - Expose adhesive
Expose adhesive
590 - Peel protective layer from new overlay.
Peel protective layer from new overlay.
603 - 578 - Feed overlay button connector through slot; Remark:589
578 - Feed overlay button connector through slot
Feed overlay button connector through slot
708 - 579 - Apply overlay to cover; Remark:707
579 - Apply overlay to cover
Apply overlay to cover
707 - Align holes for screws and LEDs.
Align holes for screws and LEDs.
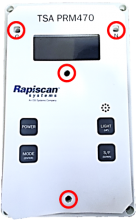
604 - 581 - Pull connector through slot; Remark:587
581 - Pull connector through slot
Pull connector through slot
587 - Overlay should be flat against the case.
Overlay should be flat against the case.
605 - 582 - Verify overlay is securely attached; Remark:586
582 - Verify overlay is securely attached
Verify overlay is securely attached
586 - Apply pressure over entire overlay to ensure contact with cover.
Apply pressure over entire overlay to ensure contact with cover.
303 - 302 - Reasamblați instrumentul; Remark:
302 - Reasamblați instrumentul
Reasamblați instrumentul
709 - 583 - Reattach handle; Remark:585
583 - Reattach handle
Reattach handle
585 - Use a medium Phillips screwdriver (PH2).
Use a medium Phillips screwdriver (PH2).
710 - 584 - Reinsert four (4) assembly screws; Remark:596
584 - Reinsert four (4) assembly screws
Reinsert four (4) assembly screws
465 - 463 - Reconnect overlay button connector; Remark:464
462 - Caution : Correct placement of connectors and wiring is critical to proper operation.
Correct placement of connectors and wiring is critical to proper operation.
463 - Reconnect overlay button connector
Reconnect overlay button connector
470 - 468 - Set PRCB-472 board over mounting posts; Remark:469
468 - Set PRCB-472 board over mounting posts
Set PRCB-472 board over mounting posts
469 - Position ribbon cable to avoid obstructing PRCB-472 mounting hole.
Position ribbon cable to avoid obstructing PRCB-472 mounting hole.
473 - 471 - Reinstall four (4) mounting screws; Remark:472
471 - Reinstall four (4) mounting screws
Reinstall four (4) mounting screws
472 - Use a small Phillips (PH1) screwdriver.
Use a small Phillips (PH1) screwdriver.

500 - 498 - Reconnect all connectors except battery; Remark:499
498 - Reconnect all connectors except battery
Reconnect all connectors except battery
499 - Do not connect location 1.
Do not connect location 1.

306 - 305 - Reconectați bateria; Remark:416
305 - Reconectați bateria
Reconectați bateria
308 - 307 - Așezați la loc capacul frontal; Remark:
304—Atenție : Verificați dacă toate cablurile sunt în interiorul instrumentului în timp...
Verificați dacă toate cablurile sunt în interiorul instrumentului în timp ce înlocuiți capacul.
307 - Așezați la loc capacul frontal
Așezați la loc capacul frontal
310 - 309 - Strângeți cele patru (4) șuruburi ale capacului; Remark:417
569—Atenție : Nu strângeți excesiv șuruburile.
Nu strângeți excesiv șuruburile.
309 - Strângeți cele patru (4) șuruburi ale capacului
Strângeți cele patru (4) șuruburi ale capacului

359 - 319 - Perform operational test; Remark:347
319 - Perform operational test
Perform operational test
347 - Perform DET-HHD-RAP-RM01 PRM-470 Operational Test.
Perform DET-HHD-RAP-RM01 PRM-470 Operational Test.
322 - 321 - Documentați acțiunile de întreținere; Remark:
321 - Documentați acțiunile de întreținere
Documentați acțiunile de întreținere
2869 - 2585 - Documentați acțiunile de întreținere întreprinse; Remark:2866
2585 - Documentați acțiunile de întreținere întreprinse
Documentați acțiunile de întreținere întreprinse
2866 - Notați observațiile și rezultatele pentru Raportul de întreținere corect...
Notați observațiile și rezultatele pentru Raportul de întreținere corectivă.
4706 - 4705 - Submit report; Remark:4864
4705 - Submit report
Submit report
4864 - As specified by management or contractual obligations.
As specified by management or contractual obligations.