Last Updated: 06/13/2025 1:34 AM
The following table lists all the components that make up the document.
Sostituire la scheda principale PRCB-472 sul PRM-470
Prima dell'arrivo, comunicare agli addetti le attività da eseguire e la durata prevista
247 - 214 - Predisporre lo strumento per il funzionamento; Remark:
257 - Preparare lo strumento
Preparare lo strumento
607 - 205 - Scollegare il caricatore; Remark:
205 - Scollegare il caricatore
Scollegare il caricatore
260 - 313 - Spegnere lo strumento; Remark:
313 - Spegnere lo strumento
Spegnere lo strumento
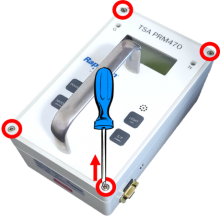
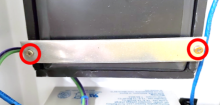
275 - 65 - Allentare le quattro (4) viti sul coperchio; Remark:264
65 - Allentare le quattro (4) viti sul coperchio
Allentare le quattro (4) viti sul coperchio
264 - Utilizzare un cacciavite a croce medio (PH2). Non è necessario rimuovere complet...
Utilizzare un cacciavite a croce medio (PH2). Non è necessario rimuovere completamente le viti.
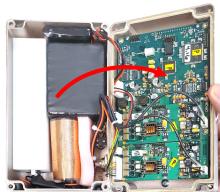
263 - 262 - Rimuovere il coperchio dallo strumento; Remark:413
2771-Nota : All'interno dello strumento sono presenti schede a circuiti di rilevamento ad al...
All'interno dello strumento sono presenti schede a circuiti di rilevamento ad alta tensione; tuttavia, queste trasportano una corrente estremamente ridotta che non pone rischi per la salute.
262 - Rimuovere il coperchio dallo strumento
Rimuovere il coperchio dallo strumento
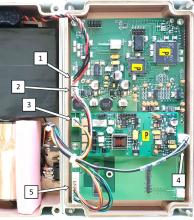
276 - 266 - Individuare i collegamenti della batteria; Remark:265
3033-Nota : I modelli PRM-470 CGN hanno una scheda e dei connettori aggiuntivi non raffigura...
I modelli PRM-470 CGN hanno una scheda e dei connettori aggiuntivi non raffigurati nelle immagini delle note.
266 - Individuare i collegamenti della batteria
Individuare i collegamenti della batteria
265 - Il collegamento della batteria è etichettato 1.
Il collegamento della batteria è etichettato 1.
271 - 270 - Scollegare la batteria; Remark:414
1345-Nota : È buona norma assicurarsi che tutti i cavi e i connettori siano contrassegnati p...
È buona norma assicurarsi che tutti i cavi e i connettori siano contrassegnati prima di scollegarli.
270 - Scollegare la batteria
Scollegare la batteria

443 - 442 - Scollegare gli altri connettori; Remark:
442 - Scollegare gli altri connettori
Scollegare gli altri connettori
3399 - 3398 - Disinstallare la scheda GHA-472; Remark:
3398 - Disinstallare la scheda GHA-472
Disinstallare la scheda GHA-472
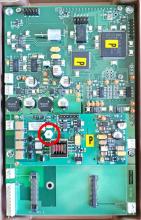
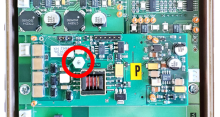
478 - 476 - Rimuovere il dado di fissaggio; Remark:477
476 - Rimuovere il dado di fissaggio
Rimuovere il dado di fissaggio
477 - PRM-470 - Removing GHA-472 mounting nut
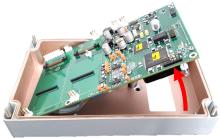
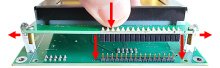
481 - 479 - Rimuovere la scheda GHA-472; Remark:480
479 - Rimuovere la scheda GHA-472
Rimuovere la scheda GHA-472
480 - Sollevare delicatamente la scheda GHA-472 dalla scheda PRCB-472.
Sollevare delicatamente la scheda GHA-472 dalla scheda PRCB-472.
618 - 615 - Disinstallare la scheda PRCB-472; Remark:
615 - Disinstallare la scheda PRCB-472
Disinstallare la scheda PRCB-472
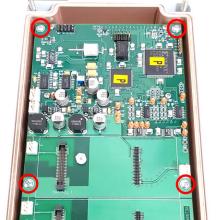
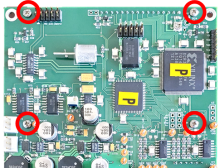
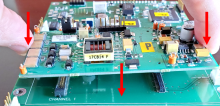
886 - 445 - Rimuovere le quattro (4) viti di fissaggio; Remark:885
445 - Rimuovere le quattro (4) viti di fissaggio
Rimuovere le quattro (4) viti di fissaggio
885 - Utilizzare un piccolo cacciavite a croce (PH1). Conservare le viti.
Utilizzare un piccolo cacciavite a croce (PH1). Conservare le viti.
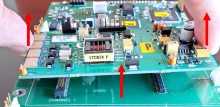
767 - 449 - Sollevare il bordo della scheda PRCB-472 per accedere alla parte sottostante; Remark:766
447-Attenzione : Non danneggiare il cavo a nastro collegato al lato inferiore del PRCB-472.
Non danneggiare il cavo a nastro collegato al lato inferiore del PRCB-472.
449 - Sollevare il bordo della scheda PRCB-472 per accedere alla parte sottostante
Sollevare il bordo della scheda PRCB-472 per accedere alla parte sottostante
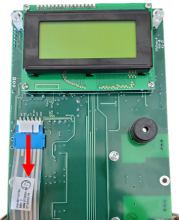
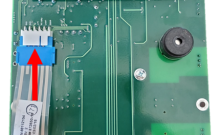
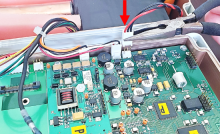
453 - 452 - Scollegare il connettore del pulsante di overlay; Remark:451
452 - Scollegare il connettore del pulsante di overlay
Scollegare il connettore del pulsante di overlay
3397 - 3395 - Contrassegnare il componente difettoso; Remark:3396
3395 - Contrassegnare il componente difettoso
Contrassegnare il componente difettoso
3396 - Utilizzare un'etichetta o un nastro adesivo. Indicare la data di rimozione, la d...
Utilizzare un'etichetta o un nastro adesivo. Indicare la data di rimozione, la descrizione del guasto, il Paese, il sito e il numero di corsia. Smaltire secondo la guida del Nuclear Smuggling Detection and Deterrence (NSDD) o i requisiti contrattuali.
645 - 644 - Installare la nuova scheda PRCB-472; Remark:
644 - Installare la nuova scheda PRCB-472
Installare la nuova scheda PRCB-472
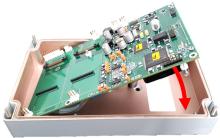
648 - 647 - Posizionare il gruppo LCD; Remark:646
647 - Posizionare il gruppo LCD
Posizionare il gruppo LCD
646 - I LED su entrambi i lati del display potrebbero dover essere leggermente divaric...
I LED su entrambi i lati del display potrebbero dover essere leggermente divaricati per consentire il posizionamento.
668 - 649 - Riposizionare le quattro (4) viti di fissaggio; Remark:663
649 - Riposizionare le quattro (4) viti di fissaggio
Riposizionare le quattro (4) viti di fissaggio
663 - Utilizzare un piccolo cacciavite a croce (PH1).
Utilizzare un piccolo cacciavite a croce (PH1).
465 - 463 - Ricollegare il connettore del pulsante di overlay; Remark:464
462-Attenzione : Il corretto posizionamento dei connettori è fondamentale per il corretto funzion...
Il corretto posizionamento dei connettori è fondamentale per il corretto funzionamento.
463 - Ricollegare il connettore del pulsante di overlay
Ricollegare il connettore del pulsante di overlay
768 - 468 - Posizionare la scheda PRCB-472 sui supporti di fissaggio; Remark:765
468 - Posizionare la scheda PRCB-472 sui supporti di fissaggio
Posizionare la scheda PRCB-472 sui supporti di fissaggio
765 - Posizionare il cavo a nastro per evitare il contatto tra il PRCB-472 e il foro d...
Posizionare il cavo a nastro per evitare il contatto tra il PRCB-472 e il foro di fissaggio.
473 - 471 - Riposizionare le quattro (4) viti di fissaggio; Remark:472
471 - Riposizionare le quattro (4) viti di fissaggio
Riposizionare le quattro (4) viti di fissaggio
472 - Utilizzare un piccolo cacciavite a croce (PH1).
Utilizzare un piccolo cacciavite a croce (PH1).

484 - 482 - Sostituire la scheda GHA-472; Remark:483
482 - Sostituire la scheda GHA-472
Sostituire la scheda GHA-472
483 - Verificare che i connettori siano allineati correttamente, quindi premere verso ...
Verificare che i connettori siano allineati correttamente, quindi premere verso il basso.

490 - 488 - Rimontare il dado di fissaggio della scheda GHA-472; Remark:489
504-Attenzione : Non serrare eccessivamente il dado di fissaggio.
Non serrare eccessivamente il dado di fissaggio.
488 - Rimontare il dado di fissaggio della scheda GHA-472
Rimontare il dado di fissaggio della scheda GHA-472
684 - 683 - Terminare l'assemblaggio dello strumento; Remark:
683 - Terminare l'assemblaggio dello strumento
Terminare l'assemblaggio dello strumento
500 - 498 - Ricollegare tutti i connettori, eccetto la batteria; Remark:499
498 - Ricollegare tutti i connettori, eccetto la batteria
Ricollegare tutti i connettori, eccetto la batteria
499 - Non collegare la posizione 1.
Non collegare la posizione 1.
503 - 305 - Ricollegare la batteria; Remark:502
305 - Ricollegare la batteria
Ricollegare la batteria
308 - 307 - Riposizionare il coperchio anteriore; Remark:
304-Attenzione : Assicurarsi che tutto il cablaggio sia all'interno dello strumento mentre si sos...
Assicurarsi che tutto il cablaggio sia all'interno dello strumento mentre si sostituisce il coperchio.
307 - Riposizionare il coperchio anteriore
Riposizionare il coperchio anteriore
310 - 309 - Serrare le quattro (4) viti del coperchio; Remark:417
569-Attenzione : Non serrare eccessivamente le viti.
Non serrare eccessivamente le viti.
309 - Serrare le quattro (4) viti del coperchio
Serrare le quattro (4) viti del coperchio
417 - Utilizzi un cacciavite a croce medio (PH2).
Utilizzi un cacciavite a croce medio (PH2).

320 - 319 - Eseguire il test funzionale; Remark:347
319 - Eseguire il test funzionale
Eseguire il test funzionale
347 - Eseguire il test operativo DET-HHD-RAP-RM01 PRM-470 .
Eseguire il test operativo DET-HHD-RAP-RM01 PRM-470 .
322 - 321 - Documentare le attività di manutenzione; Remark:
321 - Documentare le attività di manutenzione
Documentare le attività di manutenzione
2869 - 2585 - Documentare la manutenzione eseguita; Remark:2866
2585 - Documentare la manutenzione eseguita
Documentare la manutenzione eseguita
2866 - Annotare le osservazioni e i risultati per il Rapporto di manutenzione correttiv...
Annotare le osservazioni e i risultati per il Rapporto di manutenzione correttiva.
4706 - 4705 - Inoltrare il report; Remark:4864
4705 - Inoltrare il report
Inoltrare il report
4864 - Inviare il file di valutazione HATS elettronicamente con il Rapporto di manutenz...
Inviare il file di valutazione HATS elettronicamente con il Rapporto di manutenzione ordinaria.