Last Updated: 06/12/2025 1:34 AM
The following table lists all the components that make up the document.
Sostituire il gruppo batteria ricaricabile del PRM-470
Prima dell'arrivo, comunicare agli addetti le attività da eseguire e la durata prevista
Diverse modifiche importanti: aggiunti i passaggi per rimuovere i pin RS-232, modificato l'orientamento della batteria, aggiornate tutte le immagini.
247 - 214 - Predisporre lo strumento per il funzionamento; Remark:
257 - Preparare lo strumento
Preparare lo strumento
607 - 205 - Scollegare il caricatore; Remark:
205 - Scollegare il caricatore
Scollegare il caricatore
260 - 313 - Spegnere lo strumento; Remark:
313 - Spegnere lo strumento
Spegnere lo strumento
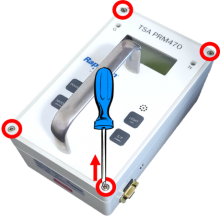
261 - 65 - Allentare le quattro (4) viti sul coperchio; Remark:264
65 - Allentare le quattro (4) viti sul coperchio
Allentare le quattro (4) viti sul coperchio
264 - Utilizzare un cacciavite a croce medio (PH2). Non è necessario rimuovere complet...
Utilizzare un cacciavite a croce medio (PH2). Non è necessario rimuovere completamente le viti.
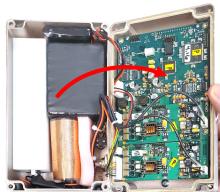
263 - 262 - Rimuovere il coperchio dallo strumento; Remark:413
2771-Nota : All'interno dello strumento sono presenti schede a circuiti di rilevamento ad al...
All'interno dello strumento sono presenti schede a circuiti di rilevamento ad alta tensione; tuttavia, queste trasportano una corrente estremamente ridotta che non pone rischi per la salute.
262 - Rimuovere il coperchio dallo strumento
Rimuovere il coperchio dallo strumento
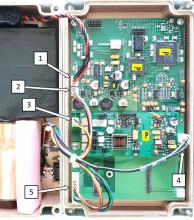
267 - 266 - Individuare i collegamenti della batteria; Remark:272
3033-Nota : I modelli PRM-470 CGN hanno una scheda e dei connettori aggiuntivi non raffigura...
I modelli PRM-470 CGN hanno una scheda e dei connettori aggiuntivi non raffigurati nelle immagini delle note.
266 - Individuare i collegamenti della batteria
Individuare i collegamenti della batteria
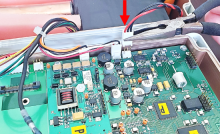
272 - Il collegamento della batteria è etichettato 1.
Il collegamento della batteria è etichettato 1.
271 - 270 - Scollegare la batteria; Remark:414
1345-Nota : È buona norma assicurarsi che tutti i cavi e i connettori siano contrassegnati p...
È buona norma assicurarsi che tutti i cavi e i connettori siano contrassegnati prima di scollegarli.
270 - Scollegare la batteria
Scollegare la batteria

278 - 277 - Sostituire il gruppo batteria; Remark:
277 - Sostituire il gruppo batteria
Sostituire il gruppo batteria
280 - 279 - Rimuovere il gruppo batteria dallo strumento; Remark:268
279 - Rimuovere il gruppo batteria dallo strumento
Rimuovere il gruppo batteria dallo strumento
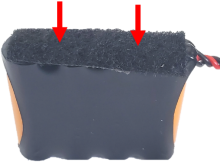
268 - Il gruppo batteria è tenuto in posizione da una striscia di velcro aderente alla...
Il gruppo batteria è tenuto in posizione da una striscia di velcro aderente alla parte inferiore dello strumento.

282 - 281 - Rimuovere la striscia di velcro; Remark:415
281 - Rimuovere la striscia di velcro
Rimuovere la striscia di velcro
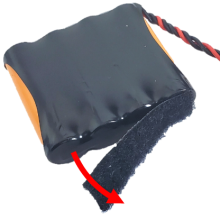
284 - 283 - Far aderire la striscia di velcro sul nuovo gruppo batteria; Remark:273
283 - Far aderire la striscia di velcro sul nuovo gruppo batteria
Far aderire la striscia di velcro sul nuovo gruppo batteria
273 - Il velcro è applicato sul lato cablaggio del gruppo batteria.
Il velcro è applicato sul lato cablaggio del gruppo batteria.
286 - 285 - Inserire il nuovo gruppo batteria; Remark:274
285 - Inserire il nuovo gruppo batteria
Inserire il nuovo gruppo batteria
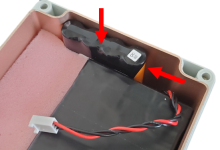
274 - Per ridurre al minimo i danni al cablaggio, inserire il gruppo batteria con il l...
Per ridurre al minimo i danni al cablaggio, inserire il gruppo batteria con il lato del cablaggio rivolto verso il basso. Spingere la batteria il più possibile verso sinistra.
301 - 300 - Rimuovere i perni; Remark:
300 - Rimuovere i perni
Rimuovere i perni
299 - 298 - Individuare RS-232 (ricambio); Remark:287
298 - Individuare RS-232 (ricambio)
Individuare RS-232 (ricambio)
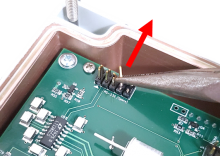
287 - I pin di riserva RS-232 si trovano sulla scheda di circuito principale (PRCB-472...
I pin di riserva RS-232 si trovano sulla scheda di circuito principale (PRCB-472).


297 - 296 - Rimuovere i pin di RS-232; Remark:288
296 - Rimuovere i pin di RS-232
Rimuovere i pin di RS-232
288 - Utilizzare le pinze per piegare i pin avanti e indietro fino a romperli. Elimina...
Utilizzare le pinze per piegare i pin avanti e indietro fino a romperli. Eliminare i pin. Questo eviterà di danneggiare il gruppo batteria.
303 - 302 - Riassemblare lo strumento; Remark:
302 - Riassemblare lo strumento
Riassemblare lo strumento
306 - 305 - Ricollegare la batteria; Remark:416
305 - Ricollegare la batteria
Ricollegare la batteria
308 - 307 - Riposizionare il coperchio anteriore; Remark:
304-Attenzione : Assicurarsi che tutto il cablaggio sia all'interno dello strumento mentre si sos...
Assicurarsi che tutto il cablaggio sia all'interno dello strumento mentre si sostituisce il coperchio.
307 - Riposizionare il coperchio anteriore
Riposizionare il coperchio anteriore
310 - 309 - Serrare le quattro (4) viti del coperchio; Remark:417
569-Attenzione : Non serrare eccessivamente le viti.
Non serrare eccessivamente le viti.
309 - Serrare le quattro (4) viti del coperchio
Serrare le quattro (4) viti del coperchio
417 - Utilizzi un cacciavite a croce medio (PH2).
Utilizzi un cacciavite a croce medio (PH2).

312 - 311 - Verificare che lo strumento sia correttamente in carica; Remark:
311 - Verificare che lo strumento sia correttamente in carica
Verificare che lo strumento sia correttamente in carica
314 - 313 - Spegnere lo strumento; Remark:
313 - Spegnere lo strumento
Spegnere lo strumento
316 - 315 - Collegare il caricatore; Remark:289
315 - Collegare il caricatore
Collegare il caricatore
289 - Colleghi il caricatore allo strumento e alla presa di corrente CA (alternata)
Colleghi il caricatore allo strumento e alla presa di corrente CA (alternata)
318 - 317 - Osservare lo stato della carica; Remark:290
317 - Osservare lo stato della carica
Osservare lo stato della carica
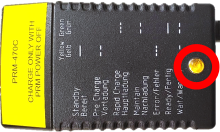
290 - Questo caricatore ha una spia gialla lampeggiante quando è in carica.
Questo caricatore ha una spia gialla lampeggiante quando è in carica.
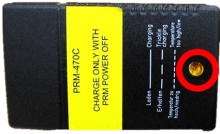
291 - Questo caricatore ha una spia fissa quando è in carica.
Questo caricatore ha una spia fissa quando è in carica.
320 - 319 - Eseguire il test funzionale; Remark:347
319 - Eseguire il test funzionale
Eseguire il test funzionale
347 - Eseguire il test operativo DET-HHD-RAP-RM01 PRM-470 .
Eseguire il test operativo DET-HHD-RAP-RM01 PRM-470 .
322 - 321 - Documentare le attività di manutenzione; Remark:
321 - Documentare le attività di manutenzione
Documentare le attività di manutenzione
2869 - 2585 - Documentare la manutenzione eseguita; Remark:2866
2585 - Documentare la manutenzione eseguita
Documentare la manutenzione eseguita
2866 - Annotare le osservazioni e i risultati per il Rapporto di manutenzione correttiv...
Annotare le osservazioni e i risultati per il Rapporto di manutenzione correttiva.
4706 - 4705 - Inoltrare il report; Remark:4864
4705 - Inoltrare il report
Inoltrare il report
4864 - Inviare il file di valutazione HATS elettronicamente con il Rapporto di manutenz...
Inviare il file di valutazione HATS elettronicamente con il Rapporto di manutenzione ordinaria.