Last Updated: 04/25/2025 1:45 AM
The following table lists all the components that make up the document.
| Title | Type | Status | Last Updated |
|---|---|---|---|
| Sensor Tech TA600 Radiation Pager | Device
|
Published
|
10/28/2024 3:51 PM
|
| 11095 - 313 - Power off instrument; Remark:11093 | Procedure Step
|
Published
|
10/01/2024 3:33 PM
|
| 313 - Power off instrument | Instruction
|
Published
|
07/23/2021 2:41 PM
|
| 11093 - Rotate switch to OFF position. | Remark
|
Published
|
10/01/2024 3:29 PM
|
| 11094 - TA600 Rotate switch to OFF Position | Remark
|
Published
|
10/01/2024 3:33 PM
|
| 11092 - 11091 - Uninstall power knob; Remark: | Procedure Step
|
Published
|
10/01/2024 3:35 PM
|
| 11091 - Uninstall power knob | Instruction
|
Published
|
10/01/2024 3:35 PM
|
| 11089 - 11088 - Remove set screw; Remark:11084 | Procedure Step
|
Published
|
10/01/2024 5:04 PM
|
| 11088 - Remove set screw | Instruction
|
Published
|
10/01/2024 5:00 PM
|
| 11084 - Use 0.05-in. hex driver. Rotate counterclockwise. | Remark
|
Published
|
10/01/2024 5:00 PM
|
| 11085 - Remove set screw | Remark
|
Published
|
10/01/2024 5:02 PM
|
| 11086 - Retain set screw. | Remark
|
Published
|
10/01/2024 5:03 PM
|
| 11087 - Retain set screw | Remark
|
Published
|
10/01/2024 5:04 PM
|
| 11090 - 11083 - Remove knob; Remark:11079 | Procedure Step
|
Published
|
10/01/2024 7:11 PM
|
| 11083 - Remove knob | Instruction
|
Published
|
10/01/2024 5:05 PM
|
| 11079 - If needed, use small, slotted screwdriver. Carefully pry up the knob using small... | Remark
|
Published
|
10/01/2024 5:05 PM
|
| 11080 - TA600 Remove knob | Remark
|
Published
|
10/01/2024 7:08 PM
|
| 11081 - TA600 Carefully pry up the knob | Remark
|
Published
|
10/01/2024 7:09 PM
|
| 11082 - TA600 Knob removed | Remark
|
Published
|
10/01/2024 7:11 PM
|
| 11078 - 11077 - Prepare for reassembly; Remark: | Procedure Step
|
Published
|
10/01/2024 7:12 PM
|
| 11077 - Prepare for reassembly | Instruction
|
Published
|
10/01/2024 7:12 PM
|
| 11074 - 11073 - Clean top housing; Remark:11071 | Procedure Step
|
Published
|
10/01/2024 7:14 PM
|
| 11073 - Clean top housing | Instruction
|
Published
|
10/01/2024 7:12 PM
|
| 11071 - Use cotton swab and alcohol. Verify surfaces are free of debris, oil, and lub... | Remark
|
Published
|
10/01/2024 7:13 PM
|
| 11072 - TA600 Clean top housing | Remark
|
Published
|
10/01/2024 7:14 PM
|
| 11075 - 11070 - Clean knob; Remark:11068 | Procedure Step
|
Published
|
10/01/2024 7:22 PM
|
| 11070 - Clean knob | Instruction
|
Published
|
10/01/2024 7:15 PM
|
| 11068 - Use cotton swab and alcohol. Verify surfaces are free of debris, oil, and lub... | Remark
|
Published
|
10/01/2024 7:15 PM
|
| 11069 - TA600 Clean knob | Remark
|
Published
|
10/01/2024 7:22 PM
|
| 11076 - 11067 - Lubricate O-ring; Remark:11112 | Procedure Step
|
Published
|
10/01/2024 7:23 PM
|
| 11067 - Lubricate O-ring | Instruction
|
Published
|
10/01/2024 7:23 PM
|
| 11112 - Apply small amount of high viscosity silicone O-ring lubricant to O-ring on p... | Remark
|
Published
|
10/01/2024 7:33 PM
|
| 11113 - TA600 Lubricate O-ring | Remark
|
Published
|
10/01/2024 7:35 PM
|
| 11111 - 11110 - Reinstall power knob; Remark: | Procedure Step
|
Published
|
10/01/2024 7:36 PM
|
| 11110 - Reinstall power knob | Instruction
|
Published
|
10/01/2024 7:36 PM
|
| 11107 - 11105 - Place power knob; Remark:11103 | Procedure Step
|
Published
|
10/01/2024 7:43 PM
|
| 11105 - Place power knob | Instruction
|
Published
|
10/01/2024 7:36 PM
|
| 11103 - Set the power knob onto the switch, but do not press down fully. Leave a gap.... | Remark
|
Published
|
10/01/2024 7:37 PM
|
| 11104 - TA600 Set the power knob onto the switch | Remark
|
Published
|
10/01/2024 7:41 PM
|
| 11108 - 11102 - Insert knob spacer; Remark:11100 | Procedure Step
|
Published
|
10/01/2024 7:46 PM
|
| 11106 - Note : If spacer is not available, use about four (4) sheets of paper, cut to fit aroun... | Annotation
|
Published
|
10/01/2024 7:43 PM
|
| 11102 - Insert knob spacer | Instruction
|
Published
|
10/01/2024 7:44 PM
|
| 11100 - Use 0.01-in. knob spacer. Insert spacer tool between knob and Pager housing. | Remark
|
Published
|
10/01/2024 7:44 PM
|
| 11101 - TA600 Insert knob spacer | Remark
|
Published
|
10/01/2024 7:46 PM
|
| 11109 - 11099 - Seat power knob; Remark:11097 | Procedure Step
|
Published
|
10/01/2024 7:48 PM
|
| 11099 - Seat power knob | Instruction
|
Published
|
10/01/2024 7:47 PM
|
| 11097 - 1 – Verify the O (Off) is aligned with the notch on the instrument. ... | Remark
|
Published
|
10/01/2024 7:47 PM
|
| 11098 - TA600 Seat power knob | Remark
|
Published
|
10/01/2024 7:48 PM
|
| 11137 - 11136 - Apply thread locker; Remark:11134 | Procedure Step
|
Published
|
10/01/2024 7:53 PM
|
| 11136 - Apply thread locker | Instruction
|
Published
|
10/01/2024 7:51 PM
|
| 11134 - 1 – To ease application, place set screw onto 0.05-in. hex driver. 2... | Remark
|
Published
|
10/01/2024 7:52 PM
|
| 11135 - TA600 Apply thread locker | Remark
|
Published
|
10/01/2024 7:53 PM
|
| 11138 - 11132 - Insert set screw; Remark:11129 | Procedure Step
|
Published
|
10/01/2024 7:58 PM
|
| 11133 - Caution : Do not overtighten screw. This will make it difficult to turn power knob. | Annotation
|
Published
|
10/01/2024 7:54 PM
|
| 11132 - Insert set screw | Instruction
|
Published
|
10/01/2024 7:54 PM
|
| 11129 - Use 0.05-in. hex driver. Rotate clockwise. Insert set screw fully into knob. If ... | Remark
|
Published
|
10/01/2024 7:55 PM
|
| 11130 - TA600 Insert set screw, rotate clockwise | Remark
|
Published
|
10/01/2024 7:56 PM
|
| 11131 - TA600 Insert set screw, do not overtighten | Remark
|
Published
|
10/01/2024 7:58 PM
|
| 11139 - 11128 - Remove knob spacer; Remark:11126 | Procedure Step
|
Published
|
10/01/2024 8:00 PM
|
| 11128 - Remove knob spacer | Instruction
|
Published
|
10/01/2024 7:58 PM
|
| 11126 - Slide knob spacer out from under power knob. | Remark
|
Published
|
10/01/2024 7:58 PM
|
| 11127 - TA600 Remove knob spacer | Remark
|
Published
|
10/01/2024 8:00 PM
|
| 11125 - 11124 - Verify instrument is operational; Remark: | Procedure Step
|
Published
|
10/01/2024 8:01 PM
|
| 11124 - Verify instrument is operational | Instruction
|
Published
|
10/01/2024 8:00 PM
|
| 11121 - 11120 - Verify knob alignment; Remark:11118 | Procedure Step
|
Published
|
10/01/2024 8:03 PM
|
| 11120 - Verify knob alignment | Instruction
|
Published
|
10/01/2024 8:01 PM
|
| 11118 - The OFF position (0) should be centered on the notch on the instrument. | Remark
|
Published
|
10/01/2024 8:01 PM
|
| 11119 - TA600 Verify knob alignment | Remark
|
Published
|
10/01/2024 8:02 PM
|
| 11122 - 11117 - Verify knob movement; Remark:11115 | Procedure Step
|
Published
|
10/01/2024 8:05 PM
|
| 11117 - Verify knob movement | Instruction
|
Published
|
10/01/2024 8:03 PM
|
| 11115 - The knob should turn easily. The knob should click into place for vibrate and... | Remark
|
Published
|
10/01/2024 8:03 PM
|
| 11116 - TA600 Verify knob movement | Remark
|
Published
|
10/01/2024 8:05 PM
|
| 11123 - 319 - Perform operational test; Remark:11114 | Procedure Step
|
Published
|
10/01/2024 8:09 PM
|
| 319 - Perform operational test | Instruction
|
Published
|
06/10/2021 8:31 PM
|
| 11114 - DET-HHD-STE-TA6-RM01, TA600 Operational Test | Remark
|
Published
|
10/01/2024 8:09 PM
|
| 322 - 321 - Document maintenance actions; Remark: | Procedure Step
|
Published
|
06/17/2021 9:49 AM
|
| 321 - Document maintenance actions | Instruction
|
Published
|
04/21/2025 11:19 AM
|
| 2869 - 2585 - Document maintenance performed; Remark:2866 | Procedure Step
|
Published
|
06/18/2021 5:58 PM
|
| 2585 - Document maintenance performed | Instruction
|
Published
|
07/09/2021 12:15 PM
|
| 2866 - Record observations, times, and results for the maintenance report. | Remark
|
Published
|
04/21/2025 11:39 AM
|
| 4706 - 4705 - Submit report; Remark:4864 | Procedure Step
|
Published
|
06/29/2022 9:50 AM
|
| 4705 - Submit report | Instruction
|
Published
|
06/29/2022 9:50 AM
|
| 4864 - As specified by management or contractual obligations. | Remark
|
Published
|
07/28/2022 1:36 PM
|
| Corrective Maintenance Procedure | Document Type
|
Published
|
03/02/2020 3:32 PM
|
| minutes | Duration
|
Published
|
05/26/2022 11:41 AM
|
| Power knob is difficult to turn | Frequency
|
Published
|
10/02/2024 6:09 AM
|
| As Needed | Frequency
|
Published
|
04/01/2020 11:36 AM
|
| Note | Annotation Type
|
Published
|
03/02/2020 3:25 PM
|
| Caution | Annotation Type
|
Published
|
03/02/2020 3:24 PM
|
| Technician 2 | Skill Level
|
Published
|
04/09/2020 1:17 AM
|
| 0.05-in. hex driver | Replacement Parts
|
Published
|
10/01/2024 7:27 PM
|
| Knob spacer, 0.01-in. U-shaped shim | Replacement Parts
|
Published
|
10/01/2024 7:27 PM
|
| Small slotted screwdriver | Replacement Parts
|
Published
|
10/01/2024 7:27 PM
|
| TA600 Verify Knob Alignment | Image
|
Published
|
10/01/2024 7:27 PM
|
| Remove set screw | Image
|
Published
|
10/01/2024 7:27 PM
|
| Retain set screw. | Image
|
Published
|
10/01/2024 7:27 PM
|
| TA600 Remove knob | Image
|
Published
|
10/01/2024 7:27 PM
|
| TA600 Carefully pry up the knob | Image
|
Published
|
10/01/2024 7:27 PM
|
| TA600 Knob removed | Image
|
Published
|
10/01/2024 7:27 PM
|
| TA600 Clean top housing | Image
|
Published
|
10/01/2024 7:27 PM
|
| TA600 Clean knob | Image
|
Published
|
10/01/2024 7:27 PM
|
| TA600_Lubricate O-Rrng_0.png | Image
|
Published
|
10/02/2024 9:00 AM
|
| TA600 Set the power knob onto the switch | Image
|
Published
|
10/01/2024 7:50 PM
|
| TA600 Insert knob spacer | Image
|
Published
|
10/01/2024 7:50 PM
|
| TA600 Seat power knob | Image
|
Published
|
10/01/2024 7:50 PM
|
| TA600 Apply thread locker | Image
|
Published
|
10/01/2024 8:20 PM
|
| TA600 Insert set screw, rotate clockwise | Image
|
Published
|
10/01/2024 8:20 PM
|
| TA600_Insert_Set_Screw_do_not_overtighten.png | Image
|
Published
|
10/01/2024 8:33 PM
|
| TA600 Remove knob spacer | Image
|
Published
|
10/01/2024 8:20 PM
|
| TA600 Verify knob alignment | Image
|
Published
|
10/01/2024 8:20 PM
|
| TA600 Verify knob movement | Image
|
Published
|
10/01/2024 8:20 PM
|
This procedure provides instructions for repairing power knobs that are too stiff to turn. If the instrument also has a display button that is too difficult to press, then the entire top housing should be replaced; refer to DET-HHD-STE-TA6-CM02, TA600 Top Housing Replacement. The 0.05-in. [inch] hex driver needed to perform this procedure is not a commonly available tool and should be obtained in advance of attempting this procedure. It is also recommended to use a magnifying glass as the components are very small.
Prior to arrival, notify operators concerning expected work and duration.
11095 - 313 - Power off instrument; Remark:11093
313 - Power off instrument
Power off instrument
11093 - Rotate switch to OFF position.
Rotate switch to OFF position.

11092 - 11091 - Uninstall power knob; Remark:
11091 - Uninstall power knob
Uninstall power knob
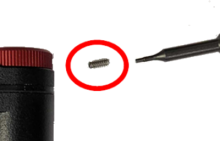
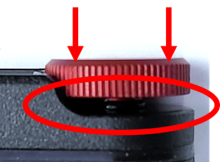
11089 - 11088 - Remove set screw; Remark:11084
11088 - Remove set screw
Remove set screw
11084 - Use 0.05-in. hex driver. Rotate counterclockwise.
Use 0.05-in. hex driver. Rotate counterclockwise.
11085 - Remove set screw
11086 - Retain set screw.
Retain set screw.
11087 - Retain set screw
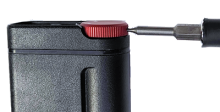
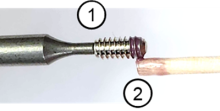
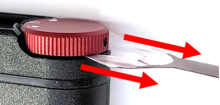
11090 - 11083 - Remove knob; Remark:11079
11083 - Remove knob
11079 - If needed, use small, slotted screwdriver. Carefully pry up the knob using small...

11078 - 11077 - Prepare for reassembly; Remark:
11077 - Prepare for reassembly
Prepare for reassembly
11074 - 11073 - Clean top housing; Remark:11071
11073 - Clean top housing
Clean top housing
11071 - Use cotton swab and alcohol. Verify surfaces are free of debris, oil, and lub...
Use cotton swab and alcohol. Verify surfaces are free of debris, oil, and lubricants.

11075 - 11070 - Clean knob; Remark:11068
11070 - Clean knob
Clean knob
11068 - Use cotton swab and alcohol. Verify surfaces are free of debris, oil, and lub...
Use cotton swab and alcohol. Verify surfaces are free of debris, oil, and lubricants.
11069 - TA600 Clean knob

11076 - 11067 - Lubricate O-ring; Remark:11112
11067 - Lubricate O-ring
Lubricate O-ring
11112 - Apply small amount of high viscosity silicone O-ring lubricant to O-ring on p...
Apply small amount of high viscosity silicone O-ring lubricant to O-ring on power knob.

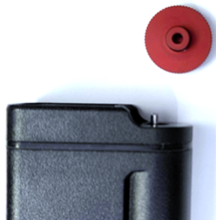
11111 - 11110 - Reinstall power knob; Remark:
11110 - Reinstall power knob
Reinstall power knob
11107 - 11105 - Place power knob; Remark:11103
11105 - Place power knob
Place power knob
11103 - Set the power knob onto the switch, but do not press down fully. Leave a gap....
Set the power knob onto the switch, but do not press down fully. Leave a gap.
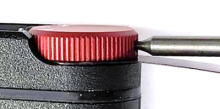
11108 - 11102 - Insert knob spacer; Remark:11100
11106 - Note : If spacer is not available, use about four (4) sheets of paper, cut to fit aroun...
11102 - Insert knob spacer
Insert knob spacer
11100 - Use 0.01-in. knob spacer. Insert spacer tool between knob and Pager housing.

11109 - 11099 - Seat power knob; Remark:11097
11099 - Seat power knob
Seat power knob
11097 - 1 – Verify the O (Off) is aligned with the notch on the instrument. ...
1 – Verify the O (Off) is aligned with the notch on the instrument.
2 – Press the power knob down on to the instrument.

11137 - 11136 - Apply thread locker; Remark:11134
11136 - Apply thread locker
11134 - 1 – To ease application, place set screw onto 0.05-in. hex driver. 2...
1 – To ease application, place set screw onto 0.05-in. hex driver.
2 – Use a swab stick to apply thread locker to the bottom threads of set screw.
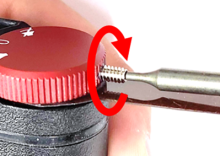
11138 - 11132 - Insert set screw; Remark:11129
11133 - Caution : Do not overtighten screw. This will make it difficult to turn power knob.
11132 - Insert set screw
11129 - Use 0.05-in. hex driver. Rotate clockwise. Insert set screw fully into knob. If ...
11139 - 11128 - Remove knob spacer; Remark:11126
11128 - Remove knob spacer
Remove knob spacer
11126 - Slide knob spacer out from under power knob.
Slide knob spacer out from under power knob.
11125 - 11124 - Verify instrument is operational; Remark:
11124 - Verify instrument is operational
Verify instrument is operational
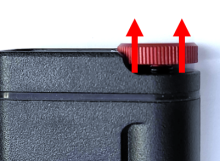
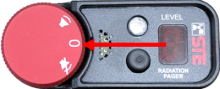
11121 - 11120 - Verify knob alignment; Remark:11118
11120 - Verify knob alignment
Verify knob alignment
11118 - The OFF position (0) should be centered on the notch on the instrument.
11122 - 11117 - Verify knob movement; Remark:11115
11117 - Verify knob movement
11115 - The knob should turn easily. The knob should click into place for vibrate and...
The knob should turn easily. The knob should click into place for vibrate and audible modes.

11123 - 319 - Perform operational test; Remark:11114
319 - Perform operational test
Perform operational test
11114 - DET-HHD-STE-TA6-RM01, TA600 Operational Test
DET-HHD-STE-TA6-RM01, TA600 Operational Test
322 - 321 - Document maintenance actions; Remark:
321 - Document maintenance actions
Document maintenance actions
2869 - 2585 - Document maintenance performed; Remark:2866
2585 - Document maintenance performed
Document maintenance performed
2866 - Record observations, times, and results for the maintenance report.
Record observations, times, and results for the maintenance report.
4706 - 4705 - Submit report; Remark:4864
4705 - Submit report
Submit report
4864 - As specified by management or contractual obligations.
As specified by management or contractual obligations.