Last Updated: 06/13/2025 1:46 AM
The following table lists all the components that make up the document.
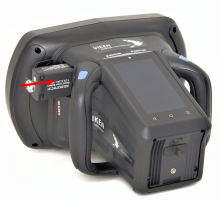
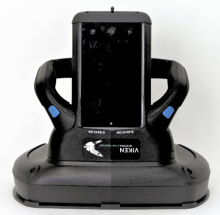
Scan for contraband using the Nighthawk handheld backscatter x-ray device.
10489 - 257 - Prepare instrument; Remark:
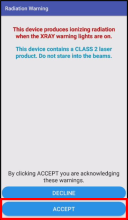
10487 - Warning : Prior to use, the operator should read and understand the complete user’s g...
Prior to use, the operator should read and understand the complete user’s guide.
10488 - Caution : Do not block the air intake vents or outlet vents when the instrument is in u...
Do not block the air intake vents or outlet vents when the instrument is in use.
257 - Prepare instrument
Prepare instrument
10486 - 220 - Power on instrument; Remark:10482
220 - Power on instrument
Power on instrument
10482 - Press and hold the Power button.
Press and hold the Power button.
10498 - 10497 - Select HBI application; Remark:10496
10497 - Select HBI application
Select HBI application
10496 - On the home screen, tap on the Viken icon.
On the home screen, tap on the Viken icon.

10499 - 10494 - Log into the application; Remark:10493
10495 - Note : See the user’s guide to set up the first administrator. Keep a secure recor...
See the user’s guide to set up the first administrator. Keep a secure record of the administrator and password once created.
10494 - Log into the application
Log into the application
10493 - Type in your username and password.
Type in your username and password.

10505 - 10503 - Perform a system check; Remark:
10504 - Note : It is recommended to perform a system check if you have not used the instrume...
It is recommended to perform a system check if you have not used the instrument for 7 days. If a system check is not required, proceed to step 3.
10503 - Perform a system check
Perform a system check
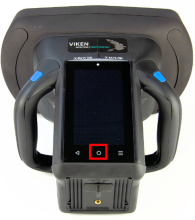
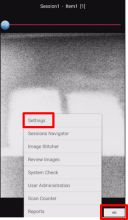
10502 - 10501 - Tap Menu icon, select Settings, if needed; Remark:10518
10501 - Tap Menu icon, select Settings, if needed
Tap Menu icon, select Settings, if needed
10518 - The system check screen will automatically pop-up if it has been more than 7 ...
The system check screen will automatically pop-up if it has been more than 7 days.
10519 - 10517 - Place instrument on sample radiation shield; Remark:10516
10517 - Place instrument on sample radiation shield
Place instrument on sample radiation shield
10516 - Place face down on flat surface.
Place face down on flat surface.

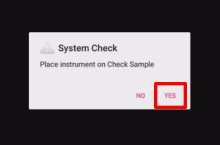
10520 - 10515 - Tap YES on screen; Remark:10514
10515 - Tap YES on screen
Tap YES on screen
10521 - 10513 - Wait for system check to complete; Remark:10512
10513 - Wait for system check to complete
Wait for system check to complete
10512 - This will take approximately 10 seconds.
This will take approximately 10 seconds.


10509 - 10506 - Conduct scan; Remark:
10507 - Warning : The HBI should not be used to scan people directly. Never point the instrumen...
The HBI should not be used to scan people directly. Never point the instrument at yourself or others when the instrument is scanning.
10508 - Warning : Do not stare directly into the red laser beams.
Do not stare directly into the red laser beams.
10506 - Conduct scan
Conduct scan
10539 - 10538 - Position instrument over item to be scanned; Remark:
10538 - Position instrument over item to be scanned
Position instrument over item to be scanned
10540 - 10537 - Swipe slider to the right or touch the right side of the line; Remark:10536
10537 - Swipe slider to the right or touch the right side of the line
Swipe slider to the right or touch the right side of the line
10536 - The blue slider at the top of the screen must be swiped to the right edge of ...
The blue slider at the top of the screen must be swiped to the right edge of the display to arm the x-ray generator.

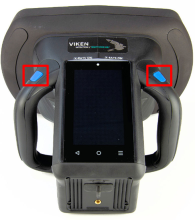
10541 - 10535 - Press and hold the triggers; Remark:10534
10535 - Press and hold the triggers
Press and hold the triggers
10534 - The triggers may be red or blue, depending on the model. The HBI will start t...
The triggers may be red or blue, depending on the model. The HBI will start to collect an x-ray image.
10542 - 10530 - Scan item of interest; Remark:10528
10531 - Note : Longer scan times produce larger image files, shorter scans are preferred.
Longer scan times produce larger image files, shorter scans are preferred.
10532 - Note : There is a 30 second maximum scan time.
There is a 30 second maximum scan time.
10533 - Note : Multiple scans may be required to fully image an item.
Multiple scans may be required to fully image an item.
10530 - Scan item of interest
Scan item of interest
10528 - The instrument must be moved to capture a two (2)-dimensional image. Moving t...
The instrument must be moved to capture a two (2)-dimensional image. Moving the instrument vertically from high to low is usually preferred.
Scan slowly and methodically. The blue arrow will slowly move to the left as the remaining time counts down to zero. Once the blue arrow reaches the left side of the screen, the instrument will no longer be armed.

10543 - 10527 - Start new scan, if needed; Remark:10526
10527 - Start new scan, if needed
Start new scan, if needed
10526 - The instrument will need to be re-armed. Repeat steps 3-2 to 3-4.
The instrument will need to be re-armed. Repeat steps 3-2 to 3-4.
10525 - 313 - Power off instrument; Remark:10523
313 - Power off instrument
Power off instrument
10523 - Press the Power button for 1 second.
Press the Power button for 1 second.