Last Updated: 04/24/2025 1:44 AM
The following table lists all the components that make up the document.
Replace SCA-774 Single Channel Analyzer (SCA) board.
Coordinate access with system operators
7478 - 1401 - Establish Initial Conditions; Remark:
1401 - Establish Initial Conditions
Establish Initial Conditions
7823 - 7592 - Inform system operators; Remark:
7592 - Inform system operators
Inform system operators
7824 - 7676 - Brief system operators on expected work, duration, anticipated alarms, and fa...; Remark:7677
7676 - Brief system operators on expected work, duration, anticipated alarms, and fa...
Brief system operators on expected work, duration, anticipated alarms, and fault indications before starting work
7677 - Operators should expect numerous fault indications and alarms during procedur...
Operators should expect numerous fault indications and alarms during procedure.
7825 - 7594 - Close lane and set up barriers to establish a safety watch; Remark:7595
7678 - Warning : Traffic should temporarily be rerouted or halted during conduction of this pr...
Traffic should temporarily be rerouted or halted during conduction of this procedure to ensure maintenance provider safety and prevent unscreened conveyances from passing.
7594 - Close lane and set up barriers to establish a safety watch
Close lane and set up barriers to establish a safety watch
7595 - Use orange safety (traffic control) cones or equivalent per site-specific saf...
Use orange safety (traffic control) cones or equivalent per site-specific safety practices.
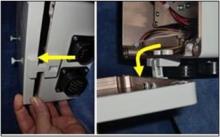
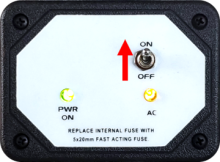
7270 - 7235 - Power off RPM; Remark:7236
7235 - Power off RPM
Power off RPM
7236 - Move LD-260 switch to OFF position. The PWR ON
Move LD-260 switch to OFF position. The PWR ON LED will turn off.

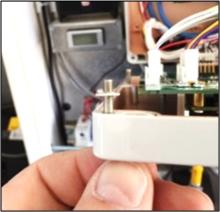
7827 - 7791 - Remove SCA-774 Board; Remark:
7791 - Remove SCA-774 Board
Remove SCA-774 Board
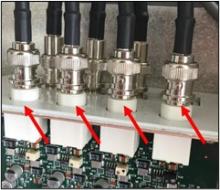
7828 - 7793 - Disconnect only signal (BNC) cables from SCA-775 module; Remark:7794
7792 - Note : It is good engineering practice to ensure all cables and connectors are label...
It is good engineering practice to ensure all cables and connectors are labeled before disconnecting them.
7793 - Disconnect only signal (BNC) cables from SCA-775 module
Disconnect only signal (BNC) cables from SCA-775 module
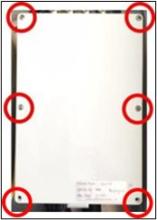
7829 - 7796 - Loosen screws in each corner (4) using medium Philips screwdriver and open SC...; Remark:7797
7795 - Caution : If you rotate cover of the SCA-775 down without first pulling out from the bo...
If you rotate cover of the SCA-775 down without first pulling out from the box, the hinge will break.
7796 - Loosen screws in each corner (4) using medium Philips screwdriver and open SC...
Loosen screws in each corner (4) using medium Philips screwdriver and open SCA-775 module
7797 - Normally the cover screws are captured and should not come out of cover. ...
Normally the cover screws are captured and should not come out of cover.
9467 - To prevent breaking the hinge on the module / door, once the retainer screws ...
To prevent breaking the hinge on the module / door, once the retainer screws are loosened, take care to gently pull the bottom of the cover away from the module approximately ¼ʺ before letting the door open.
7830 - 7799 - Disconnect 4 wiring harness assembly/connectors (J6, J8, J10, J11) from SCA-7...; Remark:7800
7798 - Caution : Never remove connectors by pulling on wires.
Never remove connectors by pulling on wires.
7792 - Note : It is good engineering practice to ensure all cables and connectors are label...
It is good engineering practice to ensure all cables and connectors are labeled before disconnecting them.
7799 - Disconnect 4 wiring harness assembly/connectors (J6, J8, J10, J11) from SCA-7...
Disconnect 4 wiring harness assembly/connectors (J6, J8, J10, J11) from SCA-774 board
7800 - J8 and J11 should be labeled; write J6 and J10 on the appropriate connector i...
J8 and J11 should be labeled; write J6 and J10 on the appropriate connector in permanent marker.
J8 and J11 should be easily removed by grasping the connector and pulling it out with a gentle rocking motion.
J10 is locked in place by the position of J6; remove J6 first.
7831 - 7801 - Remove 4 screws at corners of board; Remark:7802
7801 - Remove 4 screws at corners of board
Remove 4 screws at corners of board
7802 - Do not lose the screws. They are re-used to secure the SCA-774 board.
Do not lose the screws. They are re-used to secure the SCA-774 board.
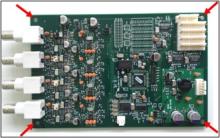
7832 - 7803 - Remove board from SCA-775 module; Remark:7804
7803 - Remove board from SCA-775 module
Remove board from SCA-775 module
7804 - BNC connectors are attached to the SCA-774 board and easily slide down then o...
BNC connectors are attached to the SCA-774 board and easily slide down then out of the SCA-775 box.
3397 - 3395 - Contrassegnare il componente difettoso; Remark:3396
3395 - Contrassegnare il componente difettoso
Contrassegnare il componente difettoso
3396 - Utilizzare un'etichetta o un nastro adesivo. Indicare la data di rimozione, la d...
Utilizzare un'etichetta o un nastro adesivo. Indicare la data di rimozione, la descrizione del guasto, il Paese, il sito e il numero di corsia. Smaltire secondo la guida del Nuclear Smuggling Detection and Deterrence (NSDD) o i requisiti contrattuali.
7833 - 7805 - Install New SCA-774; Remark:
7805 - Install New SCA-774
Install New SCA-774
7834 - 7806 - Install new SCA-774 board; Remark:7807
7806 - Install new SCA-774 board
Install new SCA-774 board
7807 - Use screws previously removed.
Use screws previously removed.
7835 - 7809 - Reconnect 4 wiring harness assembly/connectors (J6, J8, J10, J11) from SCA-77...; Remark:7810
7808 - Caution : Proper connection of wiring harnesses is critical.
Proper connection of wiring harnesses is critical.
7809 - Reconnect 4 wiring harness assembly/connectors (J6, J8, J10, J11) from SCA-77...
Reconnect 4 wiring harness assembly/connectors (J6, J8, J10, J11) from SCA-774 board
7810 - Ensure all pins are engaged. It is easy to install the connectors one pin off...
Ensure all pins are engaged. It is easy to install the connectors one pin off in either direction.
7836 - 7813 - Reconnect BNC connectors on top of SCA-775 module; Remark:
7811 - Caution : Proper connection of cables is critical.
Proper connection of cables is critical.
7813 - Reconnect BNC connectors on top of SCA-775 module
Reconnect BNC connectors on top of SCA-775 module
7837 - 7814 - Close SCA-775 module cover and tighten 4 screws; Remark:7815
7814 - Close SCA-775 module cover and tighten 4 screws
Close SCA-775 module cover and tighten 4 screws
7815 - If the follow-on alignment and functional compliance test procedures are to b...
If the follow-on alignment and functional compliance test procedures are to be completed immediately, there is no need to close the SCA-775 module cover; if not, close the cover and tighten the screws.
7280 - 7250 - Power on RPM; Remark:7251
7250 - Power on RPM
Power on RPM
7251 - Move LD-260 switch to ON position. The LED PWR ON
Move LD-260 switch to ON position. The LED PWR ON will illuminate.
7281 - 7252 - Verify RPM start-up; Remark:7253
7252 - Verify RPM start-up
Verify RPM start-up
7253 - RPM will perform a power on self-test (POST) and collect a background radiati...
RPM will perform a power on self-test (POST) and collect a background radiation measurement.
7279 - 7249 - Return equipment to normal operating condition; Remark:
7249 - Return equipment to normal operating condition
Return equipment to normal operating condition
7840 - 7816 - Perform electronic alignment; Remark:7817
7816 - Perform electronic alignment
Perform electronic alignment
7817 - DET-RPM-RAP-CM01, RPM Electronic Alignment Procedure.
DET-RPM-RAP-CM01, RPM Electronic Alignment Procedure.
7842 - 7820 - Inform system operators upon completion of maintenance action; Remark:
7820 - Inform system operators upon completion of maintenance action
Inform system operators upon completion of maintenance action
322 - 321 - Documentare le attività di manutenzione; Remark:
321 - Documentare le attività di manutenzione
Documentare le attività di manutenzione
2869 - 2585 - Documentare la manutenzione eseguita; Remark:2866
2585 - Documentare la manutenzione eseguita
Documentare la manutenzione eseguita
2866 - Annotare le osservazioni e i risultati per il Rapporto di manutenzione correttiv...
Annotare le osservazioni e i risultati per il Rapporto di manutenzione correttiva.
4706 - 4705 - Inoltrare il report; Remark:4864
4705 - Inoltrare il report
Inoltrare il report
4864 - Inviare il file di valutazione HATS elettronicamente con il Rapporto di manutenz...
Inviare il file di valutazione HATS elettronicamente con il Rapporto di manutenzione ordinaria.