Last Updated: 05/07/2025 1:34 AM
The following table lists all the components that make up the document.
PRM-470 Charging Port Replacement
None
Prior to arrival, notify operators concerning expected work and duration.
247 - 257 - Prepare instrument; Remark:
257 - Prepare instrument
Prepare instrument
607 - 205 - Disconnect charger; Remark:
205 - Disconnect charger
Disconnect charger
397 - 313 - Power off instrument; Remark:398
313 - Power off instrument
Power off instrument
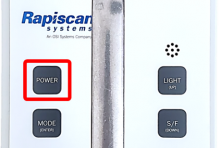
398 - Press and hold the POWER button until instrument powers off....
Press and hold the POWER button until instrument powers off.
275 - 65 - Uvolněte čtyři (4) šrouby v krytu; Remark:264
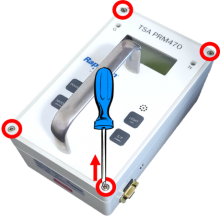
65 - Loosen four (4) cover screws
Loosen four (4) cover screws
264 - Use a medium Phillips (PH2) screwdriver. Screws do not need to be completely ...
Use a medium Phillips (PH2) screwdriver. Screws do not need to be completely removed.
263 - 262 - Odstraňte kryt přístroje; Remark:413
2771 - Note : There are high-voltage detector circuit boards inside the instrument; however...
There are high-voltage detector circuit boards inside the instrument; however, they carry an extremely small current that does not pose a health risk.
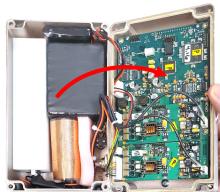
262 - Remove instrument cover
Remove instrument cover
276 - 266 - Vyhledejte přípojku baterie; Remark:265
3033 - Note : PRM-470 CGN models have an additional board and connectors not shown in remar...
PRM-470 CGN models have an additional board and connectors not shown in remark images.
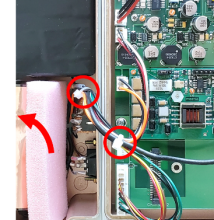
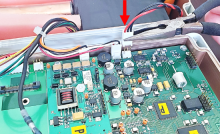
266 - Locate battery connection
Locate battery connection
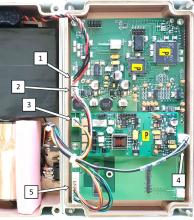
265 - Battery connection is labeled 1.
Battery connection is labeled 1.
271 - 270 - Odpojte baterii; Remark:414
1345 - Note : It is good practice to ensure all cables and connectors are labeled prior to ...
It is good practice to ensure all cables and connectors are labeled prior to disconnection.
270 - Disconnect battery
Disconnect battery

443 - 442 - Odpojte zbývající konektory; Remark:
442 - Disconnect remaining connectors
Disconnect remaining connectors
717 - 716 - Rozdělte kabely; Remark:715
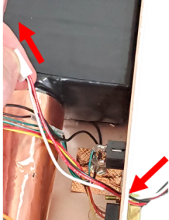
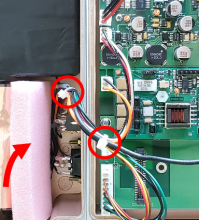
716 - Unbundle wiring
Unbundle wiring
715 - Carefully cut wire ties with scissors, knife or clippers. Remove foam (if pre...
Carefully cut wire ties with scissors, knife or clippers. Remove foam (if present).
719 - 718 - Replace charging port; Remark:
718 - Replace charging port
Replace charging port
728 - 724 - Detach port from case; Remark:720
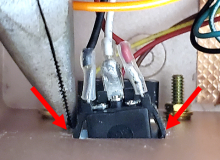
724 - Detach port from case
Detach port from case
720 - Using pliers or slotted screwdriver, carefully push locking tabs on side of p...
Using pliers or slotted screwdriver, carefully push locking tabs on side of port to detach from case.
729 - 725 - Vyjměte vadný nabíjecí port a kabel; Remark:721
725 - Remove faulty charging port and cable
Remove faulty charging port and cable
730 - 726 - Vložte nový nabíjecí port; Remark:722
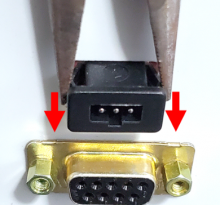
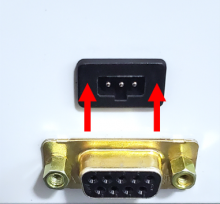
726 - Insert new charging port
Insert new charging port
722 - Insert new charging port wiring through opening in case, white connector firs...
Insert new charging port wiring through opening in case, white connector first.
731 - 727 - Upevněte nový nabíjecí port; Remark:723
727 - Secure new charging port
Secure new charging port
723 - Align port with opening and snap into place. Place the key notch toward the b...
Align port with opening and snap into place. Place the key notch toward the bottom of the case.
303 - 302 - Reassemble instrument; Remark:
302 - Reassemble instrument
Reassemble instrument
500 - 498 - Reconnect all connectors except battery; Remark:499
498 - Reconnect all connectors except battery
Reconnect all connectors except battery
499 - Do not connect location 1.
Do not connect location 1.
306 - 305 - Reconnect battery; Remark:416
305 - Reconnect battery
Reconnect battery
734 - 733 - Upevněte kabely; Remark:732
733 - Secure wiring
Secure wiring
732 - Bind wiring together with new wire ties. Cut excess wire tie material. Reinse...
Bind wiring together with new wire ties. Cut excess wire tie material. Reinsert foam (if applicable)
308 - 307 - Vraťte přední kryt na místo; Remark:
304 - Caution : Ensure all wiring is inside the instrument while replacing cover.
Ensure all wiring is inside the instrument while replacing cover.
307 - Replace front cover
Replace front cover
310 - 309 - Utáhněte čtyři (4) šrouby v krytu; Remark:417
569 - Caution : Do not overtighten screws.
Do not overtighten screws.
309 - Tighten four (4) cover screws
Tighten four (4) cover screws
417 - Use a medium Phillips (PH2) screwdriver.
Use a medium Phillips (PH2) screwdriver.

312 - 311 - Verify instrument charges successfully; Remark:
311 - Verify instrument charges successfully
Verify instrument charges successfully
397 - 313 - Power off instrument; Remark:398
313 - Power off instrument
Power off instrument
398 - Press and hold the POWER button until instrument powers off....
Press and hold the POWER button until instrument powers off.
316 - 315 - Připojte nabíječku; Remark:289
315 - Connect charger
Connect charger
289 - Plug charger into instrument and AC power outlet
Plug charger into instrument and AC power outlet
739 - 737 - Sledujte stav chytré nabíječky; Remark:735
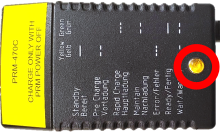
737 - Observe smart charger status
Observe smart charger status
735 - The charger has a blinking yellow light when it is charging
The charger has a blinking yellow light when it is charging
322 - 321 - Document maintenance actions; Remark:
321 - Document maintenance actions
Document maintenance actions
2869 - 2585 - Document maintenance performed; Remark:2866
2585 - Document maintenance performed
Document maintenance performed
2866 - Record observations, times, and results for the maintenance report.
Record observations, times, and results for the maintenance report.
4706 - 4705 - Submit report; Remark:4864
4705 - Submit report
Submit report
4864 - As specified by management or contractual obligations.
As specified by management or contractual obligations.