Last Updated: 06/10/2025 1:35 AM
The following table lists all the components that make up the document.
| Title | Type | Status | Last Updated |
|---|---|---|---|
| Rapiscan PRM-470 CG | Device
|
Published
|
06/04/2025 9:39 PM
|
| Rapiscan PRM-470 CGN | Device
|
Published
|
06/04/2025 10:05 PM
|
| 247 - 257 - Prepare instrument; Remark: | Procedure Step
|
Published
|
04/11/2025 9:08 PM
|
| 257 - Prepare instrument | Instruction
|
Published
|
04/11/2025 9:07 PM
|
| 607 - 205 - Disconnect charger; Remark: | Procedure Step
|
Published
|
07/23/2021 2:42 PM
|
| 205 - Disconnect charger | Instruction
|
Published
|
07/23/2021 2:42 PM
|
| 260 - 313 - Power off instrument; Remark: | Procedure Step
|
Published
|
07/23/2021 2:43 PM
|
| 313 - Power off instrument | Instruction
|
Published
|
07/23/2021 2:41 PM
|
| 261 - 65 - Loosen four (4) cover screws; Remark:264 | Procedure Step
|
Published
|
08/12/2021 7:25 AM
|
| 65 - Loosen four (4) cover screws | Instruction
|
Published
|
07/22/2021 12:38 PM
|
| 264 - Use a medium Phillips (PH2) screwdriver. Screws do not need to be completely ... | Remark
|
Published
|
07/20/2021 3:59 PM
|
| 263 - 262 - Remove instrument cover; Remark:413 | Procedure Step
|
Published
|
08/11/2021 1:41 PM
|
| 2771 - Note : There are high-voltage detector circuit boards inside the instrument; however... | Annotation
|
Published
|
10/04/2022 11:06 AM
|
| 262 - Remove instrument cover | Instruction
|
Published
|
07/20/2021 3:35 PM
|
| 413 - PRM-470 Remove Instrument Cover | Remark
|
Published
|
11/01/2024 8:32 PM
|
| 267 - 266 - Locate battery connection; Remark:272 | Procedure Step
|
Published
|
08/11/2021 1:42 PM
|
| 3033 - Note : PRM-470 CGN models have an additional board and connectors not shown in remar... | Annotation
|
Published
|
10/04/2022 11:07 AM
|
| 266 - Locate battery connection | Instruction
|
Published
|
07/20/2021 3:36 PM
|
| 272 - Battery connection is labeled 1. | Remark
|
Published
|
07/21/2021 12:11 PM
|
| 271 - 270 - Disconnect battery; Remark:414 | Procedure Step
|
Published
|
08/11/2021 1:42 PM
|
| 1345 - Note : It is good practice to ensure all cables and connectors are labeled prior to ... | Annotation
|
Published
|
10/04/2022 11:08 AM
|
| 270 - Disconnect battery | Instruction
|
Published
|
07/20/2021 3:37 PM
|
| 414 - PRM-470_Disconnect_battery | Remark
|
Published
|
11/02/2024 1:21 PM
|
| 278 - 277 - Replace battery pack; Remark: | Procedure Step
|
Published
|
08/26/2021 3:32 PM
|
| 277 - Replace battery pack | Instruction
|
Published
|
07/20/2021 3:38 PM
|
| 280 - 279 - Remove battery pack; Remark:268 | Procedure Step
|
Published
|
08/26/2021 3:32 PM
|
| 279 - Remove battery pack | Instruction
|
Published
|
04/05/2025 1:26 PM
|
| 268 - Battery pack is held in place with a Velcro strip adhered to bottom of instru... | Remark
|
Published
|
07/29/2021 3:55 PM
|
| 282 - 281 - Remove Velcro strip; Remark:415 | Procedure Step
|
Published
|
08/26/2021 3:32 PM
|
| 281 - Remove Velcro strip | Instruction
|
Published
|
07/20/2021 3:40 PM
|
| 415 - PRM-470_Remove_Velcro_strip | Remark
|
Published
|
11/01/2024 8:37 PM
|
| 284 - 283 - Adhere Velcro strip to new battery pack; Remark:273 | Procedure Step
|
Published
|
08/26/2021 3:33 PM
|
| 283 - Adhere Velcro strip to new battery pack | Instruction
|
Published
|
07/20/2021 3:41 PM
|
| 273 - The Velcro is applied to the wiring side of the battery pack | Remark
|
Published
|
07/21/2021 12:15 PM
|
| 286 - 285 - Insert new battery pack; Remark:274 | Procedure Step
|
Published
|
08/26/2021 3:33 PM
|
| 285 - Insert new battery pack | Instruction
|
Published
|
07/20/2021 3:41 PM
|
| 274 - To minimize damage to wiring, insert battery pack with wiring side down. Push... | Remark
|
Published
|
07/21/2021 12:16 PM
|
| 301 - 300 - Remove pins; Remark: | Procedure Step
|
Published
|
08/26/2021 3:34 PM
|
| 300 - Remove pins | Instruction
|
Published
|
07/20/2021 3:43 PM
|
| 299 - 298 - Locate RS-232 (Spare); Remark:287 | Procedure Step
|
Published
|
08/11/2021 2:06 PM
|
| 298 - Locate RS-232 (Spare) | Instruction
|
Published
|
07/20/2021 3:42 PM
|
| 287 - RS-232 spare pins are located on main circuit board (PRCB-472). | Remark
|
Published
|
10/06/2022 10:15 AM
|
| 297 - 296 - Remove RS-232 pins; Remark:288 | Procedure Step
|
Published
|
08/11/2021 2:10 PM
|
| 296 - Remove RS-232 pins | Instruction
|
Published
|
07/22/2021 1:00 PM
|
| 288 - Use pliers to bend pins back and forth until they break. Dispose of pins. Thi... | Remark
|
Published
|
07/21/2021 12:18 PM
|
| 303 - 302 - Reassemble instrument; Remark: | Procedure Step
|
Published
|
10/07/2022 1:49 PM
|
| 302 - Reassemble instrument | Instruction
|
Published
|
06/16/2021 11:28 PM
|
| 306 - 305 - Reconnect battery; Remark:416 | Procedure Step
|
Published
|
08/11/2021 3:11 PM
|
| 305 - Reconnect battery | Instruction
|
Published
|
07/29/2021 3:48 PM
|
| 416 - PRM-470 Battery Replacement - Reconnect battery | Remark
|
Published
|
11/02/2024 2:02 PM
|
| 308 - 307 - Replace front cover; Remark: | Procedure Step
|
Published
|
08/11/2021 2:03 PM
|
| 304 - Caution : Ensure all wiring is inside the instrument while replacing cover. | Annotation
|
Published
|
10/04/2022 11:10 AM
|
| 307 - Replace front cover | Instruction
|
Published
|
07/20/2021 3:57 PM
|
| 310 - 309 - Tighten four (4) cover screws; Remark:417 | Procedure Step
|
Published
|
08/11/2021 2:04 PM
|
| 569 - Caution : Do not overtighten screws. | Annotation
|
Published
|
06/16/2021 2:31 PM
|
| 309 - Tighten four (4) cover screws | Instruction
|
Published
|
07/22/2021 1:02 PM
|
| 417 - Use a medium Phillips (PH2) screwdriver. | Remark
|
Published
|
07/22/2021 1:18 PM
|
| 312 - 311 - Verify instrument charges successfully; Remark: | Procedure Step
|
Published
|
07/20/2021 10:53 AM
|
| 311 - Verify instrument charges successfully | Instruction
|
Published
|
07/20/2021 10:44 AM
|
| 314 - 313 - Power off instrument; Remark: | Procedure Step
|
Published
|
08/12/2021 6:54 AM
|
| 316 - 315 - Connect charger; Remark:289 | Procedure Step
|
Published
|
07/29/2021 3:07 PM
|
| 315 - Connect charger | Instruction
|
Published
|
07/20/2021 10:45 AM
|
| 289 - Plug charger into instrument and AC power outlet | Remark
|
Published
|
07/20/2021 10:48 AM
|
| 318 - 317 - Observe charger status; Remark:290 | Procedure Step
|
Published
|
07/29/2021 3:07 PM
|
| 317 - Observe charger status | Instruction
|
Published
|
07/20/2021 10:45 AM
|
| 290 - This charger has a blinking yellow light when charging. | Remark
|
Published
|
07/20/2021 10:49 AM
|
| 291 - This charger has a solid light when it is charging. | Remark
|
Published
|
07/21/2021 12:21 PM
|
| 320 - 319 - Perform operational test; Remark:347 | Procedure Step
|
Published
|
08/12/2021 7:12 AM
|
| 319 - Perform operational test | Instruction
|
Published
|
06/10/2021 8:31 PM
|
| 347 - Perform DET-HHD-RAP-RM01 PRM-470 Operational Test. | Remark
|
Published
|
07/21/2021 12:22 PM
|
| 322 - 321 - Document maintenance actions; Remark: | Procedure Step
|
Published
|
06/17/2021 9:49 AM
|
| 321 - Document maintenance actions | Instruction
|
Published
|
04/21/2025 11:19 AM
|
| 2869 - 2585 - Document maintenance performed; Remark:2866 | Procedure Step
|
Published
|
06/18/2021 5:58 PM
|
| 2585 - Document maintenance performed | Instruction
|
Published
|
07/09/2021 12:15 PM
|
| 2866 - Record observations, times, and results for the maintenance report. | Remark
|
Published
|
04/21/2025 11:39 AM
|
| 4706 - 4705 - Submit report; Remark:4864 | Procedure Step
|
Published
|
06/29/2022 9:50 AM
|
| 4705 - Submit report | Instruction
|
Published
|
06/29/2022 9:50 AM
|
| 4864 - As specified by management or contractual obligations. | Remark
|
Published
|
07/28/2022 1:36 PM
|
| Corrective Maintenance Procedure | Document Type
|
Published
|
03/02/2020 3:32 PM
|
| 15 minutes | Duration
|
Published
|
04/01/2020 11:35 AM
|
| As Needed | Frequency
|
Published
|
04/01/2020 11:36 AM
|
| Note | Annotation Type
|
Published
|
03/02/2020 3:25 PM
|
| Caution | Annotation Type
|
Published
|
03/02/2020 3:24 PM
|
| Technician 1 | Skill Level
|
Published
|
05/14/2020 2:56 PM
|
| Medium Phillips (PH2) screwdriver | Tools
|
Published
|
04/24/2020 4:40 PM
|
| Needle nose pliers | Tools
|
Published
|
05/06/2020 4:10 PM
|
| PRM470_Remove_Screws_Top_Case | Image
|
Published
|
05/08/2020 6:05 PM
|
| PRM-470_di_CGN_open_00536 | Image
|
Published
|
02/19/2023 11:26 AM
|
| Battery_connection_is_labeled_1 | Image
|
Published
|
02/19/2023 10:46 AM
|
| PRM-470_Disconnect_battery | Image
|
Published
|
05/09/2020 8:40 PM
|
| PMR-470_Battery_pack-removals | Image
|
Published
|
05/09/2020 8:46 PM
|
| PRM-470_Remove_Velcro_strip | Image
|
Published
|
05/10/2020 7:38 PM
|
| PRM470_The_Velcro_is_applied_to_the_wiring_side | Image
|
Published
|
05/10/2020 7:54 PM
|
| PRM-470_Insert_new_battery_pack | Image
|
Published
|
05/10/2020 7:58 PM
|
| PRM-470 Locate RS-232 spare pins | Image
|
Published
|
05/10/2020 8:07 PM
|
| PRM-470 - RS-232 spare pins location | Image
|
Published
|
05/12/2020 2:59 PM
|
| PRM-470 - Removing spare RS-232 pins | Image
|
Published
|
05/10/2020 8:10 PM
|
| PRM-470_Reconnect_battery | Image
|
Published
|
05/10/2020 8:16 PM
|
| PRM-470_Tighten_4_cover_screws | Image
|
Published
|
05/10/2020 8:22 PM
|
| PRM-470 Port for Charging Cord Red Arrow | Image
|
Published
|
05/09/2020 1:49 PM
|
| PRM-470 Charger_New Wall Plug Red Arrow | Image
|
Published
|
05/09/2020 1:47 PM
|
| PRM-470 Charger_New Yellow LED On Red Circle | Image
|
Published
|
05/09/2020 1:43 PM
|
| PRM-470 Charger_Old Yellow LED Off Red Circle | Image
|
Published
|
05/09/2020 1:45 PM
|
Replace rechargeable battery pack on PRM-470.
Prior to arrival, notify operators concerning expected work and duration.
Several major changes: added steps to remove RS-232 pins, changed battery orientation, updated all pictures.
247 - 257 - Prepare instrument; Remark:
257 - Prepare instrument
Prepare instrument
607 - 205 - Disconnect charger; Remark:
205 - Disconnect charger
Disconnect charger
260 - 313 - Power off instrument; Remark:
313 - Power off instrument
Power off instrument
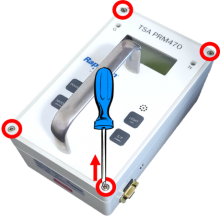
261 - 65 - Loosen four (4) cover screws; Remark:264
65 - Loosen four (4) cover screws
Loosen four (4) cover screws
264 - Use a medium Phillips (PH2) screwdriver. Screws do not need to be completely ...
Use a medium Phillips (PH2) screwdriver. Screws do not need to be completely removed.
263 - 262 - Remove instrument cover; Remark:413
2771 - Note : There are high-voltage detector circuit boards inside the instrument; however...
There are high-voltage detector circuit boards inside the instrument; however, they carry an extremely small current that does not pose a health risk.
262 - Remove instrument cover
Remove instrument cover
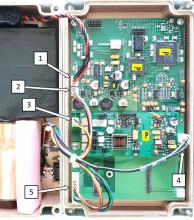
267 - 266 - Locate battery connection; Remark:272
3033 - Note : PRM-470 CGN models have an additional board and connectors not shown in remar...
PRM-470 CGN models have an additional board and connectors not shown in remark images.
266 - Locate battery connection
Locate battery connection
272 - Battery connection is labeled 1.
Battery connection is labeled 1.
271 - 270 - Disconnect battery; Remark:414
1345 - Note : It is good practice to ensure all cables and connectors are labeled prior to ...
It is good practice to ensure all cables and connectors are labeled prior to disconnection.
270 - Disconnect battery
Disconnect battery
278 - 277 - Replace battery pack; Remark:
277 - Replace battery pack
Replace battery pack
280 - 279 - Remove battery pack; Remark:268
279 - Remove battery pack
Remove battery pack
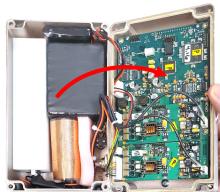
268 - Battery pack is held in place with a Velcro strip adhered to bottom of instru...
Battery pack is held in place with a Velcro strip adhered to bottom of instrument.

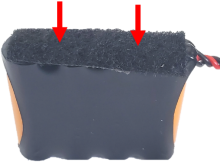
284 - 283 - Adhere Velcro strip to new battery pack; Remark:273
283 - Adhere Velcro strip to new battery pack
Adhere Velcro strip to new battery pack
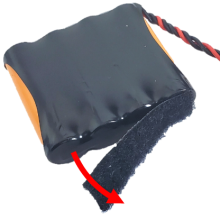
273 - The Velcro is applied to the wiring side of the battery pack
The Velcro is applied to the wiring side of the battery pack
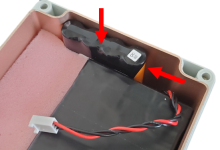
286 - 285 - Insert new battery pack; Remark:274
285 - Insert new battery pack
Insert new battery pack
274 - To minimize damage to wiring, insert battery pack with wiring side down. Push...
To minimize damage to wiring, insert battery pack with wiring side down. Push the battery as far to left as possible.
301 - 300 - Remove pins; Remark:
300 - Remove pins
Remove pins
299 - 298 - Locate RS-232 (Spare); Remark:287
298 - Locate RS-232 (Spare)
Locate RS-232 (Spare)
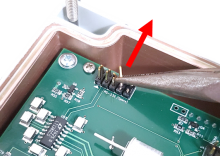
287 - RS-232 spare pins are located on main circuit board (PRCB-472).
RS-232 spare pins are located on main circuit board (PRCB-472).


297 - 296 - Remove RS-232 pins; Remark:288
296 - Remove RS-232 pins
Remove RS-232 pins
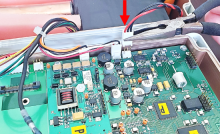
288 - Use pliers to bend pins back and forth until they break. Dispose of pins. Thi...
Use pliers to bend pins back and forth until they break. Dispose of pins. This will prevent damage to battery pack.
303 - 302 - Reassemble instrument; Remark:
302 - Reassemble instrument
Reassemble instrument
306 - 305 - Reconnect battery; Remark:416
305 - Reconnect battery
Reconnect battery
308 - 307 - Replace front cover; Remark:
304 - Caution : Ensure all wiring is inside the instrument while replacing cover.
Ensure all wiring is inside the instrument while replacing cover.
307 - Replace front cover
Replace front cover
310 - 309 - Tighten four (4) cover screws; Remark:417
569 - Caution : Do not overtighten screws.
Do not overtighten screws.
309 - Tighten four (4) cover screws
Tighten four (4) cover screws
417 - Use a medium Phillips (PH2) screwdriver.
Use a medium Phillips (PH2) screwdriver.

312 - 311 - Verify instrument charges successfully; Remark:
311 - Verify instrument charges successfully
Verify instrument charges successfully
314 - 313 - Power off instrument; Remark:
313 - Power off instrument
Power off instrument
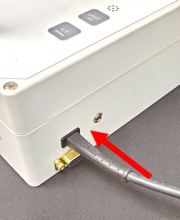
316 - 315 - Connect charger; Remark:289
315 - Connect charger
Connect charger
289 - Plug charger into instrument and AC power outlet
Plug charger into instrument and AC power outlet

318 - 317 - Observe charger status; Remark:290
317 - Observe charger status
Observe charger status
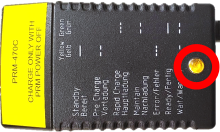
290 - This charger has a blinking yellow light when charging.
This charger has a blinking yellow light when charging.
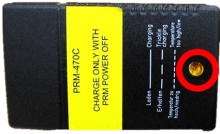
291 - This charger has a solid light when it is charging.
This charger has a solid light when it is charging.
320 - 319 - Perform operational test; Remark:347
319 - Perform operational test
Perform operational test
347 - Perform DET-HHD-RAP-RM01 PRM-470 Operational Test.
Perform DET-HHD-RAP-RM01 PRM-470 Operational Test.
322 - 321 - Document maintenance actions; Remark:
321 - Document maintenance actions
Document maintenance actions
2869 - 2585 - Document maintenance performed; Remark:2866
2585 - Document maintenance performed
Document maintenance performed
2866 - Record observations, times, and results for the maintenance report.
Record observations, times, and results for the maintenance report.
4706 - 4705 - Submit report; Remark:4864
4705 - Submit report
Submit report
4864 - As specified by management or contractual obligations.
As specified by management or contractual obligations.
