Last Updated: 06/14/2025 1:44 AM
The following table lists all the components that make up the document.
Replace battery on the Sensor Technology Engineering Handheld Radiation Monitor (HRM).
Prior to arrival, notify operators concerning expected work and duration.
4373 - 313 - Power off instrument; Remark:4372
313 - Power off instrument
Power off instrument
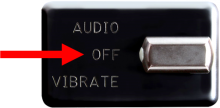
4372 - Move switch to OFF position.
Move switch to OFF position.
4369 - 4368 - Remove battery cover; Remark:11198
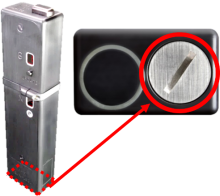
4368 - Remove battery cover
Remove battery cover
11198 - Use a coin screwdriver, a medium #2 slotted screwdriver or a coin. Rotate counte...

4366 - 1816 - Remove battery; Remark:4365
1816 - Remove battery
Remove battery
4365 - Properly dispose of faulty battery
Properly dispose of faulty battery
4364 - 1818 - Install replacement battery; Remark:4363
1818 - Install replacement battery
Install replacement battery
4363 - The positive + terminal points to top of instrument.
The positive + terminal points to top of instrument.

4362 - 4360 - Replace O-ring (if needed); Remark:4359
4361 - Standard : O-ring size is 2-018.
O-ring size is 2-018.
4360 - Replace O-ring (if needed)
Replace O-ring (if needed)
4359 - Replace the O-ring if it is broken or shows signs of damage (cracks or splits...
Replace the O-ring if it is broken or shows signs of damage (cracks or splits).

4358 - 4357 - Apply silicone grease (if needed); Remark:4356
4357 - Apply silicone grease (if needed)
Apply silicone grease (if needed)
4356 - Silicone grease should be applied to dry O-rings.
Silicone grease should be applied to dry O-rings.
4355 - 4354 - Reinstall battery cover; Remark:4353
4354 - Reinstall battery cover
Reinstall battery cover
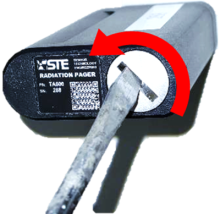
4353 - Use medium #2 slotted screwdriver. A coin may also be used. Rotate clockwise....
Use medium #2 slotted screwdriver. A coin may also be used. Rotate clockwise.

4352 - 220 - Power on instrument; Remark:4351
220 - Power on instrument
Power on instrument
4351 - Move switch to AUDIO or VIBRATE.
Move switch to AUDIO or VIBRATE.

4290 - 612 - Wait for instrument to complete start-up sequence; Remark:4286
612 - Wait for instrument to complete start-up sequence
Wait for instrument to complete start-up sequence
4286 - The unit is ready for operation when the period flashes every 20 seconds....
The unit is ready for operation when the period flashes every 20 seconds.
253 - 242 - Document and report any unresolved problems; Remark:
242 - Document and report any unresolved problems
Document and report any unresolved problems