Last Updated: 07/12/2025 1:36 AM
The following table lists all the components that make up the document.
Search for and identify radioactive material with the Aspect MKC A03 handheld radiation monitor
1012 - 257 - Prepare instrument; Remark:
1010 - Note : Use DET-HHD-YAN-RM02, MKC-A03 Functional Test, to verify equipment f...
Use DET-HHD-YAN-RM02, MKC-A03 Functional Test, to verify equipment functionality before use.
257 - Prepare instrument
Prepare instrument
1015 - 1014 - Apply power to docking station; Remark:1013
1014 - Apply power to docking station
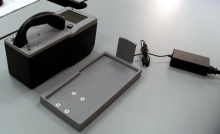
Apply power to docking station
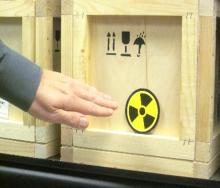
1017 - 1016 - Verify no radioactive sources near instrument and docking station; Remark:7
1016 - Verify no radioactive sources near instrument and docking station
Verify no radioactive sources near instrument and docking station
7 - No Radiation symbol

1022 - 220 - Power on instrument; Remark:1018
220 - Power on instrument
Power on instrument
1018 - Placing the MKC-A03 on the docking station will automatically power on the in...
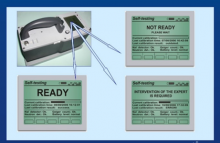
Placing the MKC-A03 on the docking station will automatically power on the instrument, perform a self-test, and calibrate the instrument.
1019 - If the instrument does not power on automatically, press and hold the center ...
If the instrument does not power on automatically, press and hold the center button to manually power on.
1020 - Green LED shows the docking station is supplying power to the instrument....
Green LED shows the docking station is supplying power to the instrument.
1026 - 1025 - Wait for screen to display READY status or follow on-screen instructions ...; Remark:1024
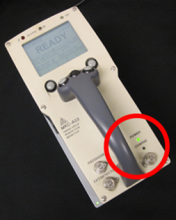
1023 - Note : If instrument did not calibrate correctly or it does not pass the self-test, ...
If instrument did not calibrate correctly or it does not pass the self-test, a message will appear on the screen. Follow the on-screen instructions.
1025 - Wait for screen to display READY status or follow on-screen instructions ...
Wait for screen to display READY status or follow on-screen instructions
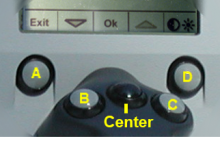
1029 - 1028 - Use graphic to locate lettered buttons throughout procedure; Remark:1027
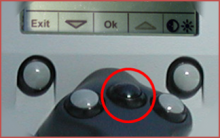
1028 - Use graphic to locate lettered buttons throughout procedure
Use graphic to locate lettered buttons throughout procedure
1027 - Instrument operation involves use of five buttons whose functions change with...
Instrument operation involves use of five buttons whose functions change with the mode.
1031 - 1030 - Scan item of interest; Remark:
1030 - Scan item of interest
Scan item of interest
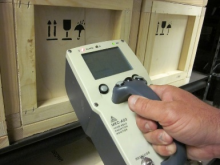
3432 - 3430 - Remove instrument from docking station; Remark:3431
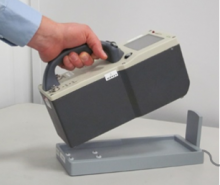
3430 - Remove instrument from docking station
Remove instrument from docking station
3431 - Background collection starts automatically.
Background collection starts automatically.
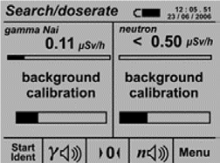
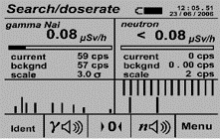
1042 - 1041 - Verify instrument is in Search/dose rate mode; Remark:1040
1041 - Verify instrument is in Search/dose rate mode
Verify instrument is in Search/dose rate mode
1040 - When background is complete, the unit will automatically enter “Search/dose...
When background is complete, the unit will automatically enter “Search/dose rate” mode; graphs of gamma and neutron levels are displayed.

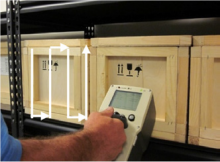
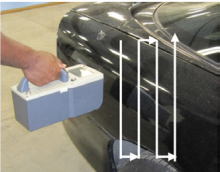
1046 - 1045 - Scan close to area of interest (5 to 10 cm) and move instrument about 20 cm p...; Remark:1043
1045 - Scan close to area of interest (5 to 10 cm) and move instrument about 20 cm p...
Scan close to area of interest (5 to 10 cm) and move instrument about 20 cm per second
1049 - 1048 - Observe display (lights) and listen for audible alarms; Remark:1047
1048 - Observe display (lights) and listen for audible alarms
Observe display (lights) and listen for audible alarms

405 - 368 - Mark point(s) of interest; Remark:4277
368 - Mark point(s) of interest
Mark point(s) of interest
4277 - Place a marker (tape, pencil, etc.) on points exhibiting elevated radiation. ...
Place a marker (tape, pencil, etc.) on points exhibiting elevated radiation. There may be more than one point of interest.
1054 - 1053 - Identify radioactive isotope; Remark:
1053 - Identify radioactive isotope
Identify radioactive isotope
1057 - 1056 - Place unit as close as possible to area of interest (5 to 10 cm); Remark:1055
1056 - Place unit as close as possible to area of interest (5 to 10 cm)
Place unit as close as possible to area of interest (5 to 10 cm)
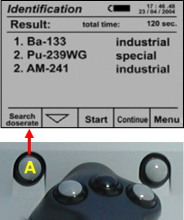
1060 - 1059 - Press button “A” for Identification mode; Remark:1058
1059 - Press button “A” for Identification mode
Press button “A” for Identification mode

1065 - 1064 - Follow on-screen instructions; Remark:1061
1064 - Follow on-screen instructions
Follow on-screen instructions
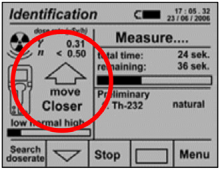
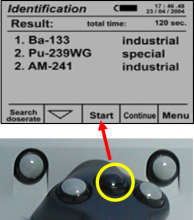
1061 - The Identification display screen provides useful information while measureme...
The Identification display screen provides useful information while measurement is conducted.
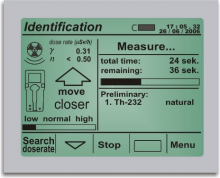
1062 - Optimal identification measurements are obtained when the screen displays the...
Optimal identification measurements are obtained when the screen displays the message “Ok!”.

1063 - For high activity isotopes, the MKC-A03 screen will display the message “mo...
For high activity isotopes, the MKC-A03 screen will display the message “move away.” In this case, move the instrument farther away from the radioactive material until “Ok!” is displayed.
For relatively weak radioactive sources, the MKC A03 will display the message “move closer.” In this case, keep the instrument as close as possible to the location of interest and, if possible, continue the measurement for a longer time (see next step). Longer identification measurements result in a higher probability and accuracy of isotope identification.
1069 - 2220 - Wait for measurement to complete; Remark:1066
2220 - Wait for measurement to complete
Wait for measurement to complete
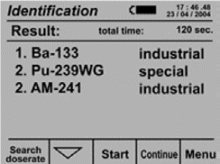
1066 - When set identification time is complete (120 seconds) the display shows the ...
When set identification time is complete (120 seconds) the display shows the isotopes found and each isotope category. The four possible isotope categories are: industrial, medical, naturally occurring radioactive material, and special.
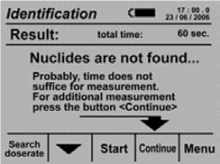
1067 - If the message “Nuclides are not found…” is displayed, press button “...
If the message “Nuclides are not found…” is displayed, press button “C” to continue measurement.

1071 - 1070 - Save Spectra; Remark:
1070 - Save Spectra
Save Spectra
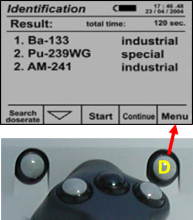
1074 - 1073 - Press button “D” to select menu; Remark:1072
1073 - Press button “D” to select menu
Press button “D” to select menu
1077 - 1076 - Press center button to save spectra; Remark:1075
1076 - Press center button to save spectra
Press center button to save spectra

1079 - 1078 - Perform New Search or Identification; Remark:
1078 - Perform New Search or Identification
Perform New Search or Identification
1082 - 1081 - Press center button (Start) to begin a new identification if needed; Remark:1080
1081 - Press center button (Start) to begin a new identification if needed
Press center button (Start) to begin a new identification if needed
1085 - 1084 - Press button “A” (Search/Dose rate) to continue searching; Remark:1083
1032 - Note : Verify there are no radiation sources in the area while background is being c...
Verify there are no radiation sources in the area while background is being collected.
1084 - Press button “A” (Search/Dose rate) to continue searching
Press button “A” (Search/Dose rate) to continue searching
1120 - 1119 - Wait for new background calibration to complete; Remark:1118
1119 - Wait for new background calibration to complete
Wait for new background calibration to complete

1127 - 11329 - Store or Power Off Instrument; Remark:
1124 - Caution : Store instrument at ambient temperatures between 10 and 35°C, and 80% relati...
Store instrument at ambient temperatures between 10 and 35°C, and 80% relative humidity at 25°C; store at least 0.5 meters from room or other heating elements.
1125 - Caution : When transporting, protect instrument from impacts and vibration; maintain te...
When transporting, protect instrument from impacts and vibration; maintain temperature between 1°and 50°C and humidity below 95%.
11329 - Store or Power Off Instrument
Store or Power Off Instrument
1133 - 1131 - Return instrument to docking station after use; Remark:1130
1131 - Return instrument to docking station after use
Return instrument to docking station after use
1130 - Returning the instrument to the docking station will automatically recharge t...
Returning the instrument to the docking station will automatically recharge the batteries
1138 - 313 - Power off instrument; Remark:1135
313 - Power off instrument
Power off instrument
1135 - Press and hold the central button for 2 to 3 seconds if necessary to power of...
Press and hold the central button for 2 to 3 seconds if necessary to power off instrument for storage or transport.
