Last Updated: 07/13/2025 1:40 AM
The following table lists all the components that make up the document.
Check internal connections of PackEye FHT 681 amplifier.
Need to add DET-HHD-THR-PAK-RM05, PackEye Gamma High Voltage Adjustment when available
Need to add DET-HHD-THR-PAK-RM08, PackEye Efficiency Test when available
Prior to arrival, notify operators concerning expected work, duration, and anticipated alarms and fault indications.
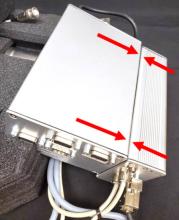
6202 - 6201 - Uninstall FHT 681 Amplifier; Remark:
6201 - Uninstall FHT 681 Amplifier
Uninstall FHT 681 Amplifier
6198 - 313 - Power off instrument; Remark:5939
313 - Power off instrument
Power off instrument
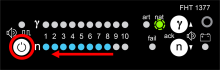
5939 - Press and hold the power button for approximately 10 seconds until indicator ...
Press and hold the power button for approximately 10 seconds until indicator lights are off.
6199 - 4222 - Umístěte přístroj na rovný povrch; Remark:4221
4222 - Place instrument on flat surface
Place instrument on flat surface
4221 - Shoulder straps should be facing down.
Shoulder straps should be facing down.
6200 - 3876 - Otevřete horní část batohu; Remark:5665
3876 - Open top of backpack
Open top of backpack
6217 - 6216 - Odpojte popruhy po stranách batohu; Remark:6215
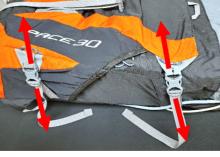
6216 - Disconnect straps on sides of backpack
Disconnect straps on sides of backpack
6215 -
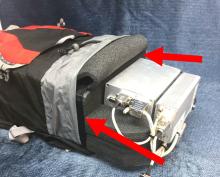
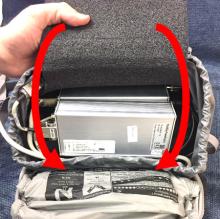
6224 - 6223 - Částečně odeberte obsah batohu; Remark:6222
6223 - Partially remove backpack contents
Partially remove backpack contents
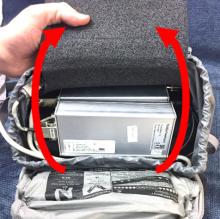
6222 - Slowly slide foam assembly out of backpack to access FHT 681 amplifier. This ...
Slowly slide foam assembly out of backpack to access FHT 681 amplifier. This process might take two people; one to pull the backpack and the other to pull the foam assembly.

6225 - 6221 - Disconnect gamma detector; Remark:6220
6221 - Disconnect gamma detector
Disconnect gamma detector
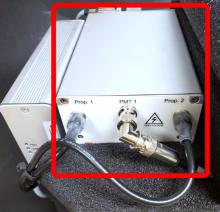
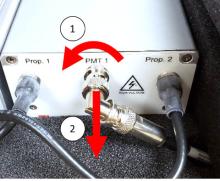
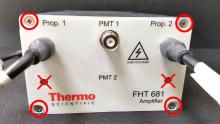
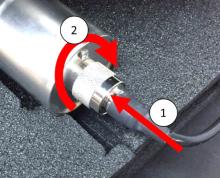
6220 - The gamma detector is connected to the FHT 681 amplifier at PMT1
The gamma detector is connected to the FHT 681 amplifier at PMT1. Push toward connection, turn coupling nut counterclockwise, and pull away from connection.
6226 - 6219 - Odpojte spojku RS-232 a přípojky rozvodné skříňky; Remark:5670
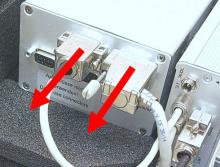
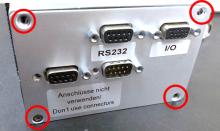
6219 - Disconnect RS-232 jumper and distribution box connections
Disconnect RS-232 jumper and distribution box connections
5670 - Use small, slotted screwdriver.
Use small, slotted screwdriver.
6218 -
6231 - 6229 - Otočte napájecím modulem a modulem FHT 681; Remark:6227
6230 - Caution : Do not completely remove FHT 681 module as neutron detectors are still connec...
Do not completely remove FHT 681 module as neutron detectors are still connected.
6229 - Rotate power supply and FHT 681 modules
Rotate power supply and FHT 681 modules
6227 - The neutron detector connections will be accessible.
The neutron detector connections will be accessible.
6228 -

6235 - 6234 - Odpojte dva (2) detektory neutronového záření; Remark:6232
6234 - Disconnect two (2) neutron detectors
Disconnect two (2) neutron detectors
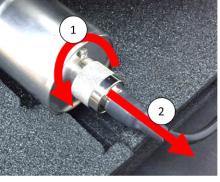
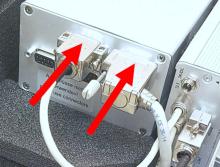
6232 - There are two (2) neutron detectors. Unscrew collar counterclockwise. Pull co...
There are two (2) neutron detectors. Unscrew collar counterclockwise. Pull connector away from detector.
6233 -
6240 - 6238 - Oddělte zesilovač FHT 681 od napájecího modulu; Remark:6236
6239 - Note : The hook and loop strips may require significant force to separate.
The hook and loop strips may require significant force to separate.
6238 - Separate FHT 681 amplifier from power supply module
Separate FHT 681 amplifier from power supply module
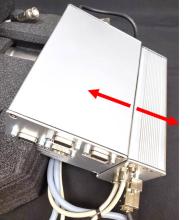
6236 - There are two (2) hook and loop (Velcro) strips attaching the power supply mo...
There are two (2) hook and loop (Velcro) strips attaching the power supply module to the FHT 681 amplifier. If necessary, use a large, slotted screwdriver to pry the FHT 681 amplifier away from the power supply module.
6237 -
6249 - 6248 - Disassemble FHT 681 Amplifier; Remark:
6248 - Disassemble FHT 681 Amplifier
Disassemble FHT 681 Amplifier
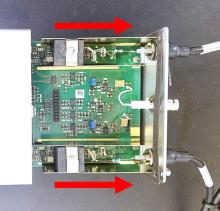
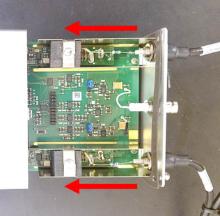
6246 - 6245 - Remove four (4) corner screws; Remark:5296
6245 - Remove four (4) corner screws
Remove four (4) corner screws
5296 - Use small Phillips (PH1) screwdriver. Retain screws.
Use small Phillips (PH1) screwdriver. Retain screws.
6244 -
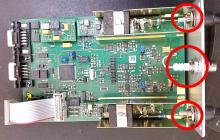
6247 - 6243 - Odstraňte čtyři (4) šrouby s šestihrannou hlavou.; Remark:6241
6243 - Remove four (4) jack screws.
Remove four (4) jack screws.
6241 - Use a 5-mm nut driver or small needle nose pliers.
Use a 5-mm nut driver or small needle nose pliers.
6242 -

6255 - 6252 - Vysuňte prvek pro sériovou komunikaci; Remark:6250
6253 - Caution : Ribbon cable is still attached. Only slide out serial communication assembly ...
Ribbon cable is still attached. Only slide out serial communication assembly until ribbon cable is accessible.
6254 - Note : Do not misplace the rubber gasket.
Do not misplace the rubber gasket.
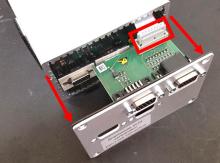
6252 - Slide out serial communication assembly
Slide out serial communication assembly
6250 - Ribbon cable is still attached internally. Pull panel until ribbon cable is a...
Ribbon cable is still attached internally. Pull panel until ribbon cable is accessible.
6251 -

6261 - 6245 - Odstraňte čtyři (4) rohové šrouby; Remark:5296
6260 - Caution : Do not remove the two (2) center screws.
Do not remove the two (2) center screws.
6245 - Remove four (4) corner screws
Remove four (4) corner screws
5296 - Use small Phillips (PH1) screwdriver. Retain screws.
Use small Phillips (PH1) screwdriver. Retain screws.
6259 -
6265 - 6264 - Poznamenejte si zářez, ve kterém je vnitřní deska uložena; Remark:6262
6264 - Note the notch where internal board mounted
Note the notch where internal board mounted
6262 - It is recommended to mark the location with a permanent marker.
It is recommended to mark the location with a permanent marker.
6263 -
6268 - 5702 - Odstraňte elektroniku; Remark:6266
6267 - Note : Do not lose the gasket used to seal around the seam of the plate face to the ...
Do not lose the gasket used to seal around the seam of the plate face to the housing.
5702 - Remove electronics
Remove electronics
6266 -
6277 - 6276 - Inspect FHT 681 Amplifier; Remark:
6276 - Inspect FHT 681 Amplifier
Inspect FHT 681 Amplifier
6274 - 6273 - Check for loose debris; Remark:
6273 - Check for loose debris
Check for loose debris
6275 - 6271 - Zkontrolujte, zda propojovací úchyty nejsou volné; Remark:6269
6272 - Caution : Do not rotate the whole connection assembly or it may break the attached resi...
Do not rotate the whole connection assembly or it may break the attached resistor.
6271 - Check for loose connection mounts
Check for loose connection mounts
6269 - Check that the two (2) neutron detector and one (1) gamma cable connector gro...
Check that the two (2) neutron detector and one (1) gamma cable connector grounding nuts are tight and do not rotate. Tighten with pliers, if required.
6270 -
6281 - 6280 - Vraťte plochý kabel na místo; Remark:6278
6280 - Reseat ribbon cable
Reseat ribbon cable
6278 - Disconnect and reconnect ribbon cable several times to remove oxidation. Veri...
Disconnect and reconnect ribbon cable several times to remove oxidation. Verify connection is secure.
6279 -

6287 - 6286 - Reassemble FHT 681 Amplifier; Remark:
6286 - Reassemble FHT 681 Amplifier
Reassemble FHT 681 Amplifier
6285 - 5720 - Replace electronics; Remark:6282
5720 - Replace electronics
Replace electronics
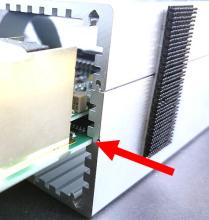
6282 - Align circuit board with fourth slot from bottom of enclosure and slide into ...
Align circuit board with fourth slot from bottom of enclosure and slide into place. Verify face plate aligns with housing.
6283 -
6284 -
6289 - 5718 - Zarovnejte těsnění; Remark:5717
6288 - Caution : If the gasket is misaligned, the instrument could show false alarms due to RF...
If the gasket is misaligned, the instrument could show false alarms due to RF [radio frequency] interference.
5718 - Align gasket
Align gasket
5717 - Verify gasket is aligned between housing and end panel before inserting screw...
Verify gasket is aligned between housing and end panel before inserting screws.
6345 -
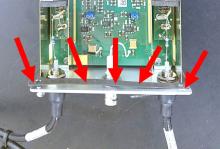
6293 - 6292 - Zašroubujte čtyři (4) rohové šrouby; Remark:6290
6292 - Replace four (4) corner screws
Replace four (4) corner screws
6290 - Use small Phillips (PH1) screwdriver. Attach each screw loosely until all are...
Use small Phillips (PH1) screwdriver. Attach each screw loosely until all are inserted and then tighten. Verify these screws are tight to minimize electrical interference.
6291 -

6307 - 5718 - Zarovnejte těsnění; Remark:5717
6288 - Caution : If the gasket is misaligned, the instrument could show false alarms due to RF...
If the gasket is misaligned, the instrument could show false alarms due to RF [radio frequency] interference.
5718 - Align gasket
Align gasket
5717 - Verify gasket is aligned between housing and end panel before inserting screw...
Verify gasket is aligned between housing and end panel before inserting screws.
6306 -
6308 - 6305 - Vložte čelní stranu sériového portu; Remark:6303
6305 - Insert serial port face
Insert serial port face
6303 - Align serial port openings with internal serial port connectors.
Align serial port openings with internal serial port connectors.
6304 -
6309 - 6302 - Vložte čtyři (4) šrouby s šestihrannou hlavou; Remark:6300
6302 - Insert four (4) jack screws
Insert four (4) jack screws
6300 - Attach each screw loosely until all are inserted and then tighten. Use 5-mm n...
Attach each screw loosely until all are inserted and then tighten. Use 5-mm nut driver.
6301 -
6312 - 6311 - Vložte čtyři (4) rohové šrouby; Remark:6290
6311 - Insert four (4) corner screws
Insert four (4) corner screws
6290 - Use small Phillips (PH1) screwdriver. Attach each screw loosely until all are...
Use small Phillips (PH1) screwdriver. Attach each screw loosely until all are inserted and then tighten. Verify these screws are tight to minimize electrical interference.
6310 -
6322 - 6321 - Reinstall FHT 681 Amplifier; Remark:
6321 - Reinstall FHT 681 Amplifier
Reinstall FHT 681 Amplifier
6319 - 6318 - Connect FHT 681 amplifier to power supply module; Remark:6316
6318 - Connect FHT 681 amplifier to power supply module
Connect FHT 681 amplifier to power supply module
6316 - A significant force might be required to rejoin the components. A snap should...
A significant force might be required to rejoin the components. A snap should be heard when they are successfully reconnected.
6317 -
6320 - 6315 - Zapojte detektory neutronového záření; Remark:6313
6315 - Reconnect neutron detectors
Reconnect neutron detectors
6313 - There are two (2) neutron detectors. Push connector onto detector. Turn colla...
There are two (2) neutron detectors. Push connector onto detector. Turn collar clockwise. Hand-tighten the collar.
6314 -
6331 - 6330 - Zapojte spojku RS-232 a rozvodnou skříňku; Remark:5670
6330 - Reconnect RS-232 jumper and distribution box
Reconnect RS-232 jumper and distribution box
5670 - Use small, slotted screwdriver.
Use small, slotted screwdriver.
6329 -
6332 - 6328 - Vraťte konektory gama na místo; Remark:6326
6328 - Reseat gamma connectors
Reseat gamma connectors
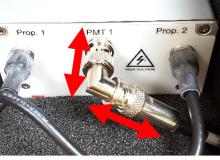
6326 - The gamma detector is connected at the FHT 681 amplifier at the connection la...
The gamma detector is connected at the FHT 681 amplifier at the connection labeled PMT1. Disconnect and reconnect both connections to the 90-degree elbow several times to remove oxidation.
6327 -
6333 - 6325 - Vraťte obsah batohu; Remark:6323
6325 - Repack backpack
Repack backpack
6323 - Slide the protective foam assembly into backpack
Slide the protective foam assembly into backpack
6324 -
6342 - 6341 - Perform Gamma High Voltage Adjustment; Remark:6340
6341 - Perform Gamma High Voltage Adjustment
Perform Gamma High Voltage Adjustment
6340 - DET-HHD-THR-PAK-RM05, PackEye Gamma High Voltage Adjustment.
DET-HHD-THR-PAK-RM05, PackEye Gamma High Voltage Adjustment.
6339 - 319 - Perform operational test; Remark:6337
319 - Perform operational test
Perform operational test
6337 - DET-HHD-THR-PAK-RM01, PackEye Operational Test.
DET-HHD-THR-PAK-RM01, PackEye Operational Test.
322 - 321 - Document maintenance actions; Remark:
321 - Document maintenance actions
Document maintenance actions
2869 - 2585 - Document maintenance performed; Remark:2866
2585 - Document maintenance performed
Document maintenance performed
2866 - Record observations, times, and results for the maintenance report.
Record observations, times, and results for the maintenance report.
4706 - 4705 - Submit report; Remark:4864
4705 - Submit report
Submit report
4864 - As specified by management or contractual obligations.
As specified by management or contractual obligations.